How easy is it to make a retro gaming console? Stephen breaks down his design and build criteria that involves no custom PCBs.
Do not adjust your podcast broadcast device. What you are hearing is a rotary alarm system. This siren denotes the beginning of episode 200!
Parker's repair of the Tigershark seems to be working fine and Stephen learns how to read a Digital Datasheet. Also, only 8 more episodes before 200!
Parker
Stephen
R.F.O.
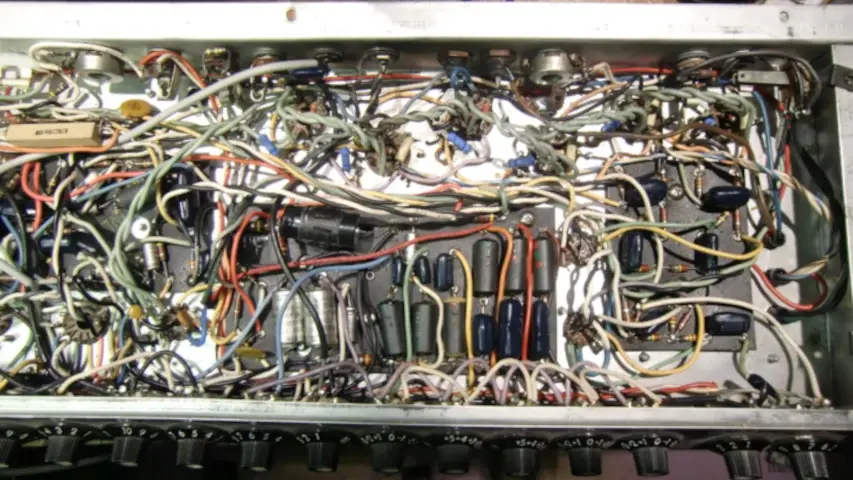
How older style amps where built. Could be easy or hard to service…depending on your point of view.
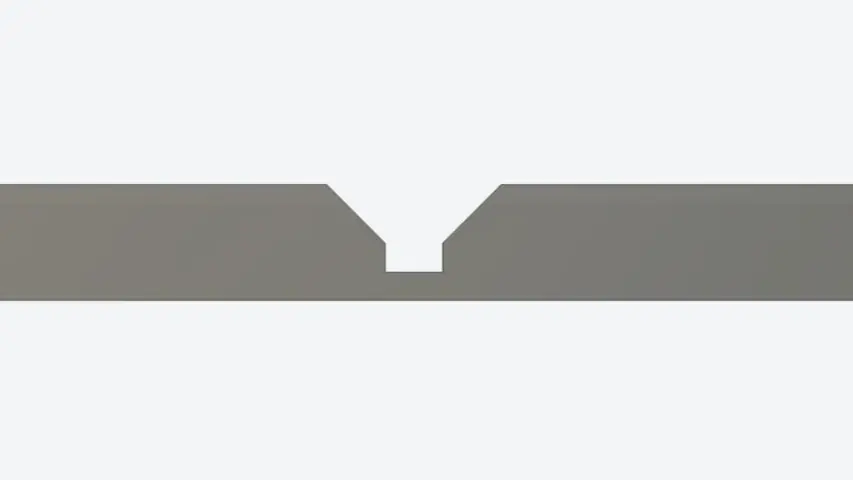
Cut profile for bending aluminum on a CNC machine!
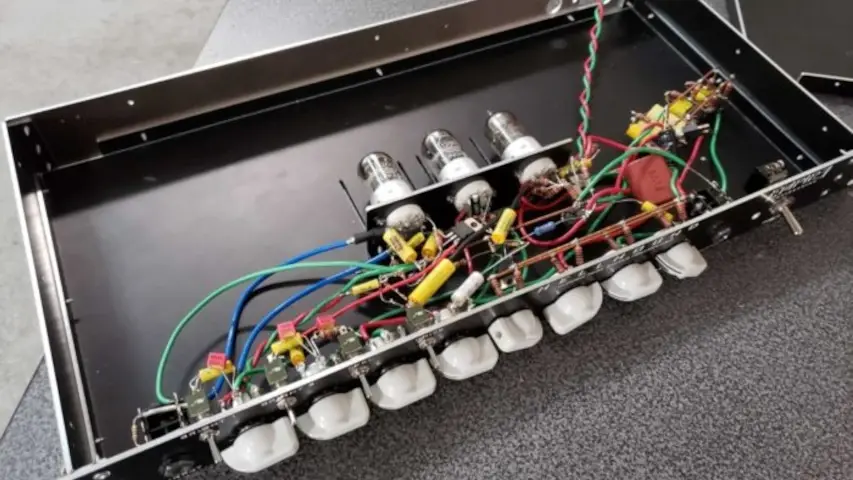
Inside the Stephen’s and Roz’s high voltage preamp.
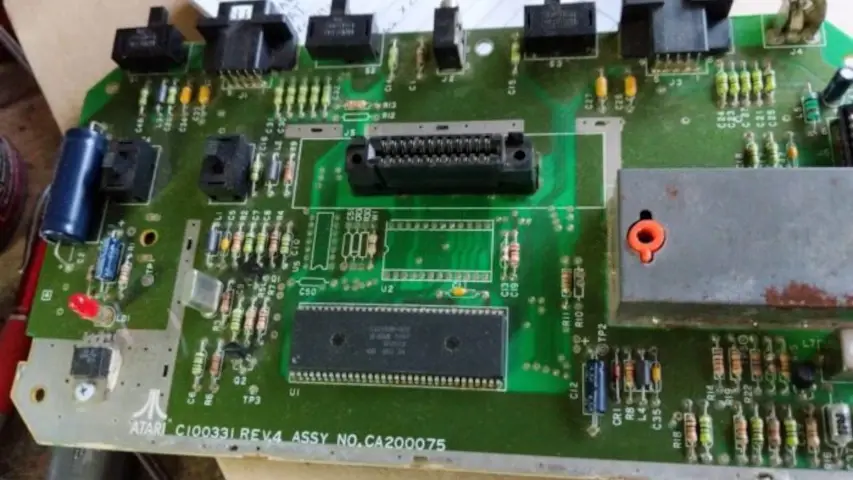
Atari 2600 Junior with the JAN chip.
Parker is an Electrical Engineer with backgrounds in Embedded System Design and Digital Signal Processing. He got his start in 2005 by hacking Nintendo consoles into portable gaming units. The following year he designed and produced an Atari 2600 video mod to allow the Atari to display a crisp, RF fuzz free picture on newer TVs. Over a thousand Atari video mods where produced by Parker from 2006 to 2011 and the mod is still made by other enthusiasts in the Atari community.
In 2006, Parker enrolled at The University of Texas at Austin as a Petroleum Engineer. After realizing electronics was his passion he switched majors in 2007 to Electrical and Computer Engineering. Following his previous background in making the Atari 2600 video mod, Parker decided to take more board layout classes and circuit design classes. Other areas of study include robotics, microcontroller theory and design, FPGA development with VHDL and Verilog, and image and signal processing with DSPs. In 2010, Parker won a Ti sponsored Launchpad programming and design contest that was held by the IEEE CS chapter at the University. Parker graduated with a BS in Electrical and Computer Engineering in the Spring of 2012.
In the Summer of 2012, Parker was hired on as an Electrical Engineer at Dynamic Perception to design and prototype new electronic products. Here, Parker learned about full product development cycles and honed his board layout skills. Seeing the difficulties in managing operations and FCC/CE compliance testing, Parker thought there had to be a better way for small electronic companies to get their product out in customer's hands.
Parker also runs the blog, longhornengineer.com, where he posts his personal projects, technical guides, and appnotes about board layout design and components.
Stephen Kraig began his electronics career by building musical oriented circuits in 2003. Stephen is an avid guitar player and, in his down time, manufactures audio electronics including guitar amplifiers, pedals, and pro audio gear. Stephen graduated with a BS in Electrical Engineering from Texas A&M University.
Special thanks to whixr over at Tymkrs for the intro and outro!
Welcome to the macro fab engineering podcast. We are your host, Stephen Craig and Parker, Dolman. This is episode 199.
Getting there getting there getting there getting there. One more. One more.
That's all over right. And then we've wasted your time for 200 weeks. Cheers. Cheers.
We haven't missed a smell. We'll do that when we hit 200. So well, yes, yes. So I've been working more on that 50 volt power pack that was talked about last week, I managed to pull the cells out without endangering my life or my the building I live in. And the IBC I unhooked the the protection circuit. And basically, I did like a reboot of the protection circuit. So I had like unplugged it from the battery pack and or unsoldered it, I should say, from the battery pack, and then restarted it back on. And it actually managed to work again, I actually was able to pull 50 volts off the safe side of the protection circuit. And it worked for about a day and it died again. And so I reset it again, it only worked for about 30 seconds this time and then died. And then this time I actually took the protection circuit off, I inspected everything, everything looked fine. So I think at this point is one of the four banks in this power pack. Because it's it's a 12 cells in series for parallel those. And I want to say probably one of those banks is probably low. I haven't checked yet. But I'm saying I'm thinking like basically that protection circuit is finding that one of the banks is you know, low or dead.
Does it does it monitor each one individually? Each bank?
I don't think it monitors. I think it monitors each bank individually. But not each cell. Okay. Yeah. So like, each 12 in series, it monitors. Its or something like that. Okay, yeah, yeah. So it basically it knows that something is wrong with it. So I'm going to take it all apart, measure all the banks see what's wrong. And I'll probably end up just scrapping the entire thing. And just use the 18 650s for other projects. Because I can always use lithium cells. And these look like really good, high quality made cells. So it's probably just one cell and its entire pack is bad.
What if you? Oh, but you know, you don't know which one of the banks is bad, you know?
Yeah. So basically, this assemble the entire thing, the entire thing is kind of glued together. So basically, once they break it, the banks apart to actually test the cells individually. It's not going to go back together really well.
Because I was gonna suggest like, okay, so if you have a bad bank, just get rid of that bank and run a, you know, have a lower voltage supply, you know,
well, you could get rid of one bank, and you'd have three fourths of the capacity. Oh, they're all in parallel. Yeah, the four banks are in, in parallel, and then each bank has 12 and series, I'm going to bet you it's just actually one cell. And that whole thing is bad. Yeah. And it's the problem is, once you crack it open, it's not going to go back together really well. I guess I could probably like, put a new cell in and then duct tape the whole thing back together, and then slam it back into plastic enclosure. Well, it's like the moment like, the bike falls over. And then jostles the battery. And now you have a big lithium fire. And, yeah,
and your mom's on the blank. Yes. So but but okay, but if you did get rid of one bank, you could you could just run three quarters.
Yes. If you just dump one bank apart? Well, and then I guess you would just take the monitoring circuit and just put it on the another bank?
Yeah, yeah, you could vote. Well, I'm wondering, with that sense. Like, there's gotta be four different sense wires where it's detecting current from it. So yeah, you could either reroute one but I'm wondering if I mean, if you can access the chip, could you just read those voltages and see if you got any find out what problematic bank it is. Yeah, cuz
the board though, I will take a picture of it. But it's got like a, it looks like 100 wires just like spider webbing into the battery pack. So, like finding out which one that you need to measure? I have no idea.
The industrial design is a nightmare, right?
Yeah, it's like they use really high quality, like power cells. And I think they're LG brand. But the problem is like the actual overall construction This thing is terrible. So all the money went into the lithium. None of it went into the actual, like packaging of this. This power pack. It's almost a wonder like, no wonder this thing did fail. Is it made to the finest Chinese Ium? Yeah, it's ABS plastic all around. So it's not even as good as good as like a tool. Battery Pack. Yeah, because I know you watch AV E on on YouTube, and he takes apart that's my one of my favorite parts is like the tools built when he takes part tools is taking apart the battery pack. Because then you can really see what manufacturer actually cares about, like the longevity of their tool, because what's going to fail first is usually the batteries, right? And the higher end tools they typically have, you know, their construction internally or the battery packs or using a nicer this is like it looks like it was built from Harbor Freight. Like you open it up in his a lot of air. And it's really just like silastic and foam that kind of like, cushion everything. Yeah, it was never really designed to be taken apart. Which is surprising because it's like it had just like six like phillips head screws to take it apart. Not even security screws. I would have thought the whole thing would be glued together. But now use six screws need to take the whole big case off
screws of cheap glue pain. So
yeah, but you think you would just snap tabs and just snap the whole thing together, then you don't have time snap tabs? Yeah. Yeah, I mean, it's definitely not. I mean, when you open it up is definitely not made be serviced.
You know. Okay, so speaking of SNAP tabs. So back in, in my college days, I worked as a computer monitor repair technician for about a year and a half. And I fixed a whole bunch of, well, a whole bunch of varieties of monitors, but mainly Dells. And these Dell used sort of like a clamshell, but snap tab designed for the bezels of their their monitors. And we're talking about this is 2009 or 2008 2009 time, and we were actually fixing these monitors for the automotive industry. So a lot of these monitors were pretty old. In fact, we had an entire team dedicated to fixing the old green screen monitors like like the 10 inch ones, the tiny ones, but but on the on the the monitors I was working on they're like the the cheapo 12 inch ones that you would that you would get for you know, whatever bottom line computer you bought from Dell. The whole point of this is those snap tabs. There was virtually no way to open these monitors without just like beating the living snot at the plastic. Because you had to take a flathead screwdriver and just like kind of like pry into it until you either break the snap tab or like break it loose from its its clutches. I don't know that I can't stand snap tabs, especially on things like consumer televisions and stuff. I mean, I get it. I'm one of the very, very few people who ever take their television apart. But still it's like okay, well I'm about to screw my bezel up because there's no way to open this without doing that.
Exactly. I actually had a the first flat screen TV ever bought I bought a a I bought a best buy brand was insignia was the brand. And it was a dumb TV. So this is before the era of smart TVs that everyone buys now. And it was a 34 inch and about a year after I bought it the HDMI port stopped working. And at the time, I still lived on campus in a dorm room at UT. And the person who came to repair it actually repaired it on the floor my dorm room, but it didn't have it didn't have any snap tabs. It came apart with just everything just came apart with screws. And then the HDMI port box like all electronics was in one box and he just swapped that box out plugged in all the cables. And it worked. Like at the time I'm like oh man that's like was really well engineered that he can just do that on like the dirty ass floor in my dorm room. Right. But that was like I think that's the only piece of consumer electronics I've ever taken apart that came apart that easily. Everything else is Yeah, fighting snap tabs. But the good thing is most I guess some people will consider like appliances like washing machines consumer electronics now because how, quote smart unquote they are now but they come apart pretty easily. Usually it's like two or three screws and then you have like the shell off. So
yeah I think they are still something that is not maybe not intended but but still like has a chance of being serviced.
Yes. Like, you can still replace that $10 part. That's like,
right. Or the the whole motherboard in your washer dies in you can use that. Yeah, yeah.
I've actually replaced like our frigerator is like a Franken refrigerator. Now. The, the, like, you know how usually we'll have buttons on the front of your ice and water dispenser to select what you want, like crushed ice or regular ice and water and all that good stuff. Well, that circuit board went out in ours, and the person couldn't like because it's on their like homeowners warranty or whatever from way back in the day when? Man this is gonna be a long winded story. So back when Hurricane Ike know what's after it was the hurricane after Ike Rita. That sounds right. I know. It's after Rita. Well, it was a hurricane that hit Galveston. And it was after Ike and it was after Rita. And it was like me, was it? I mean hard. No, no, no, it wasn't that it was not that soon ago. This is like 2010 or 29 2009. I don't remember anyways, there was a hurricane. It was a hurricane hit Houston, it knocked out the power at this house for two weeks. And they came in, hooked it all back up all, you know, all nice and good. And then the Comcast guys had to come back out and redo all the copper and neighborhood too. And so they were stringing everything up. And then the guy was on our pole in our backyard. And the power company Miss wired the ground, because he goes to hook up the ground for the cable to the pole, and basically blew his screwdriver in half. But that also shorted out every single thing in this house. Everything that was plugged in blew up. Oh, oh, yeah, everything. And so that frigerator was under warranty still from that whole incident. That's that's that whole circular story now, right. So, but this so this was like two years ago, the circuit board like basically couldn't get the ice to come out. And so first the guy replaces the motor, because that's usually what goes out the dispenser motor, and that still didn't fix it. So guys like well, I don't know, whatever. I tried, right? So he goes away. And I can't remember the company who makes that frigerator but they called up my dad he's like, Well, you can get like 20% off of a new fridge. And I'm like, okay, something's up with this. You know, now my gears attorney like I gotta get this works great. It just doesn't dispense ice. And so I went and I jiggled the switch really fast and I got the expense. I'm like, Ah, something's up with a circuit board. So I take it apart. And it wasn't it was corroded like the switch just I guess being near water dispensing and stuff like that the switch corroded and so I went on eBay and I bought is apparently a switchboard that's in like a bazillion frigerators of this make I think it's like GM GM refrigerators.
You mean GE Yes. General Motors refrigerators.
Yeah. Yeah, Chevy like our I have I have a muscle
refrigerator
my refrigerator makes 450 cubes of ice an hour. Anyways, so I went on eBay found the part for like $10 fixed it. What was funny is that was not a user serviceable part as well but you can just go on eBay and buy it. So that's been my whole thing with like user serviceable parts is like no, you can service them if you try hard enough.
Everything can be fixed everything even even hermetically sealed things right
yes, that's tiger shark is still working, still working and has not electrocuted me. Well, I guess no one's actually been swimming since it's been cold. So it could be just electrifying. The entire
pool could just be lethal, right.
Could be could be No, it runs on a GFI so it would definitely trip if it was if it was electrifying the pool where else was gonna go with that pool or the refrigerator story? Oh, yeah, we're talking about appliances and taken apart. Yeah, to get to that part. It was like three screws and then unfortunately the bezel for that thing is snap tapped on, but you can wiggle it off. That's actually the worst thing is like if it was A piece of plastic that was like hidden. I wouldn't care if your snap tabbed on or whatever but the fact that it was like the bezel that you always see when you see the frigerator it's like, come on make it so like it unscrews in the back or something, you know, just so you don't accidentally you know booger the the plastic by you know, drab. jabbing your screwdriver into it.
Right? Yeah, you're trying to get a small ish flathead screwdriver to like go in between the edge of the bezel and then you're like, just like, cranking and yank and on it comes out. Yeah, you can always see if somebody's opened a computer monitor because it has marks all those
marks on the edge. Yeah. And also one thing this is kind of like a what we talked about last week was the copper to clean out carburetor jets. So I got another tip is clean the coils on your refrigerators?
Oh, yeah, they run a whole hell of a lot more
efficient. So refrigerators run a lot. And they cycle a lot of air over. It's over. It's condensers. And are that it stopped making ice the same frigerator right. But it was so cold. Like it kept stuff frozen, but it couldn't freeze things. So you'd like you'd put water in it, and it wouldn't freeze the water. And my dad was all worried about he's like, Oh, I had to like get a AC guy out here and check the gas and stuff. And I open it up and look at the coil and it is seriously like a quarter inch of dust is caked on on the the coil. And it's vacuumed it off. Works fine. Nice that that refrigerator is a champ it will not die. I think it's like, Man at this point. It's almost two decades old.
You remember the warehouse that I used to have my CNC and everything in? Yeah.
Yeah, it was I use a warehouse. It was a tin shed.
Well, it was 1800 square feet with a three ton gantry crane in it.
Yes, that we could never get the work and it was very scary.
The crane worked in two axes, just not the third. Yeah. The actually funny funny story about that crane, we used to least to hook ourselves up with with a tie down straps, and just driver. So flying around.
That was fun. I would love to have that shop for like doing automotive stuff. Because having a crane. You just pick whatever you want.
You know what was cool about it. We just use the crane to move things around the shop like if like my CNC at one point in time, which I might see was 15 feet by six, six feet five by 15, something like that. We just picked it up with the crane and moved it to wherever we needed to be that day, which was super nice.
You could have turned the crane interesting. See machine? Yeah.
Well, so we had talked about that at one point in time, just as a joke, flipping a table saw upside down and connecting it dangling it by the crane. And then just using it as like a giant guys, what are those called the
radial arm saw a radial arm saw
but a radial arm. So that has like a 50 foot.
I was thinking you take the crane and you on the end of the chain. You just put like a lawnmower engine, and then put your end mill on the shaft. Yeah, crank it up. And then just drive it around. Yeah, you got like six horsepower router right there. Yeah. And it's driving around and routing out stuff. And just that motor just swinging around.
Well, the whole point of even bringing up that the warehouse is one of the other guys that I shared the warehouse with his neighbor who he had known his entire life. She passed away or something of that, I think, yeah, I think she passed away. I can't remember what it was. But she had a refrigerator that she bought in Houston in 1956. And that refrigerator had been plugged in in the same spot since 1956. And she had like she knew my friend who was like since he was young. And she always said, when I pass away you can have my refrigerator because he always thought it was super cool. Because it looks like
family heirlooms a refrigerator.
Like this thing looked like it looked like a like 1950s like Roswell Astro refrigerator, you know, everything's rounded. Yeah, like super curved door and stuff like that. So we got that fridge and we took it over the shop and made it a beer fridge.
How many cockroaches were underneath that thing if it hadn't moved in basically 50 years.
You know, the thing that was crazy was like she hadn't even serviced with thing it still had the original refrigerant in it.
Well, yeah, it's ammonia, right?
Yeah, I probably at that time. I think it was ammonia, something bad was in there. But I mean, it's still it's still rocking and rolling. The thing that really sucked was it was in pristine shape because he cleaned it all the time. And then we put it in the shop and which was effectively outdoors and it just rested to hell. Yeah, kind of sucks. That enamel didn't last too long. Not at all. It's it's a rusted bucket now, which really sucks. So
we've ever had that guy on the podcast yet?
Yeah, we did. Actually. We had
thing we're talking about waterfalls.
Well, I think we talked about water wall, which was a project that I did with Patrick. Ah, yes. Yeah. Patrick. Renner. Wonderful flying carpet creative. I think. Gosh, we had them on back in the
pre filter. Yeah, pretty 100 day.
That was pretty 100 Oh, my gosh, a long time ago. So yeah, check that episode out. Those guys are super cool. And they're doing like lots of really awesome stuff. Now. They got a bunch of
episode 58 tungsten i beams.
Is that what Okay, wow. Yeah, they're they do large scale sculpture work. So they have permanent installations. I know there's one in Austin, there's like two or three in Houston. And they've got a bunch of stuff in in the mix right now. So check out their sculpture work. It's really great. So so as you were mentioning, like, watch this, I'm going to turn this all the way around back to earlier. You were mentioning in your battery pack. Like there's so many wires that it was like a rat's nest. Yeah. and stuff. So I posted a picture up in our show notes. And we'll have this picture available. I found this the other day. It's it's an old guitar amp from the I believe this was manufactured in the 70s. And it's a it's called a Fender super twin, which was like fenders, biggest amp at the time. And there's a few phenolic boards in it with like a pretty sparsely populated resistors, and caps and things like that. But there's almost so many wires in it that you can barely see the chassis underneath it like, yeah, so so like, you know, I was thinking, you can spend a ton of time doing industrial design to make sure that like your stuff goes together really well. And you think about every little aspect of it. Or you can build something this way where it's just like, yeah, just connect a wire from every point that needs to connect to every other point. Yes, that's the way they did it on this. Like, we'll post the picture in our show notes. If you want to check it out. It's absolutely ridiculous.
So I've been also working on I don't know if I've ever talked about this project. But the way back in the day, the I used to build a lot of portable consoles. That's kind of how I got started with hacking with electronics, and the Atari 2600. I always wanted to build a portable of it, I never got around to it, I actually even was able to manage to get a very rare Atari Jr. So the Atari 2600 had a lot of different models that they built over the years. The Junior was like the last of the last ones. It was cut down small, small and quotes. And, and one of the last revisions of that system, they went to a single chip board. And so instead of having the three separate chips, which was the 6507 CPU, they also have a chip called the riot chip, which did RAM and IO, so like your buttons and stuff. And then they also had the TIA chip, which did sound and video. And so you had these three big chips, and I think I have a board. So I have a board right here. I'll take a picture of the podcast. So this one it's got. This is the three chip board. So the single chip looks like that. Oh god, that's huge. So it's got a dip 64 Chip. Wait, wait, is
that a dip 64 But with like selective
pin? No, that's Sharpie because I was counting pins.
Okay, so over over our video stream here I can I could only see a handful of the pins because marker marker over bids, but it looks like like a dip chip that has like, yeah, 64 positions, but it looks like only like 30 of them are populated.
Yeah. And so the funny thing is, Ben, who's been on the bed heckendorn. He's been on the podcast couple times, he actually has one of these chips as well. And he's he wanted to make a portable version of the single chip since like 2000, or something like that. And so I've been helping them throughout this year, kind of like, because he basically tried to build one it could never get his chip working. And what we found out was the only schematic that lives online I have this system is incorrect, huh? 100% flat out wrong? What's wrong in? And so we basically took that PCB reverse engineered it, pinned it out, and then made his own PCB, wired it up and it didn't work. Of course not. And so we I spent a public good afternoon on Sunday helping him debug it. And basically he flipped to address lines around. And that took about an hour to find out. Basically, I had to go basically repin out my board, checked his pen out, and we're like, okay, those who address lines have flipped, flipped them and it started working. And then his video circuit wasn't working. And it was like, one o'clock in the morning. I'm like, I gotta go bed, went to bed. And he texts me like 30 minutes later, he accidentally, like got some surface mount resistors wrong. And he put a 10k resistor instead of like a 30 Ohm in the video circuit, so I'm like, oh, yeah, that's probably why the signal was super attenuated, then what l works now so nice. Hopefully, he says gonna have a video of it coming out soon. So should be pretty cool. Do you guys have a name for it? I don't know what he's gonna name it. So he's done most of the work I just supplied knowledge. Just because I had another one of these boards lying around. And so now I actually kind of want to make a make a portable version as well. But I don't know if I ever I want to like de solder like the only one of these that might exist. Because I have not been able to find another one of these ever in like a decade the junior well a junior with a single chip. Oh yeah, I've got actually like a box in one of these cabinets of 70 Almost 75 Three chip boards.
So don't you Yeah, I might be calling you out here. But don't you have some Ataris that still need to go out to people that you did mods for now. They all went out. Oh, they all went okay. Yeah, for a while at under Parker's desk at macro fed. He's just sitting.
Yeah, because they had to go international. Right. Right. Those finally went out.
Yeah, Ben Ben is a bunch of videos of of making things portable. I remember watching he had a dream cast one which was that look like an absolute nightmare to put together?
Like trying to get an entire dream cast which frankly isn't that big as it's you know from the get go but trying to get that into like a handheld size thing was kind of ridiculous. Huh? I don't know where my portables that they still have. What your Nintendo one?
Yeah, that one's sticking around somewhere. So it's got to be in this room somewhere. And oh, and then I got all my air raid parts printed. Finally. Oh, it's all the parts are printed. And I've got to basically I got sand some of the edges. So they all fit together really well. But yeah, it looks like it's gonna go together really well. And hopefully next week, I crank it up.
You we could start episode 200 with an error rates.
error rates aren't ah, we got to do that. Yeah.
Yeah, that's great. How big is it? It's about the size of your head, right? Yeah, it is more like like a 10 inch kind of rotor or something like that.
Yeah, so this is this is one half the clamshell
we did you press fit a bearing into there? Yes. Nice.
Yeah. It's got pressfit bearings, but all the screws are 3d printed for this design.
weighed like the actual screws itself. Not not not like threaded holes or some.
Yeah, there see. 3d printed screw? Why? Oh, no, it works.
Well, then why? The bearings?
I didn't design the I didn't design it. I'm just printing it.
Now here's the thing. Are those screws? Actual screws you could buy? Or are they super ultra custom only 3d printable?
I think they are really rounded. I'll take a picture of the profile but they're they're almost like, like, almost like Acme thread. Almost, but they're pointed. Yeah, that's, uh, you
know what that is? I can tell you exactly what that is. That is somebody had a 3d rendering tool and they just put a helix on a triangle. No on the outside of a cylinder. That's what they did. Like that is not a actual thread. seems to work really well though. Well, yeah. because they put the opposite he licks on the part that one is a grow command and one is a cut command. But hey, actually, you know, that's kind of cool, though, because that's what you can do with 3d printing, right?
Yes. But yeah, I would have rather had like actual machine screws and then just like press fit fittings in, but I didn't design it. So and the bearings almost fit so like, you have to clearance some of the plastic with like a razor blade to get stuff to fit in. Well, could also because, you know, who knows how accurate my 3d printer is?
Have you spent so long trying to get benci to work? I mean, you've you have some and actually never printed benci on this one. Well, isn't that the customer the ultra maker or whatever? What is it? Yeah,
I never printed a benci on it. I thought you did. I printed a bunch of little tiny one I had. Yeah. Yeah, that little acrylic one or one? Yeah. Which actually printed pretty well. Surprisingly enough. Yeah. But yeah, the this one I never printed Vinci on.
Oh, you printed a whole boatload of like two by two centimeter or two by two inch cubes, right?
Yeah. Wow. First got it. Yeah. And then I printed a giant dick bot on it.
Yeah, remember that? Yeah. And they
got a bar somewhere downtown Houston.
Yeah, that's it Neil's bar if it's still around,
I don't know is Niels Bohr did get torn down from construction. I think Neil's barstool there.
Yeah. Yeah. I remember you printed that and ended up. It ended up.
Yeah, I ended up with the barn in Houston. I was actually looking at the I was trying to look at pictures on like Google Maps of Neal's bar inside see if I can find it. The deck but but everything. All the pictures inside are so blurry. It's dark, and they're gonna make a trip to Neil's bar.
That bar was like two streets down from the old shop.
Yes. I missed that place. It was a lot of fun. That video games and they always had like shitty 80s movies on? Yeah. So you don't have anything cool like that are the new fab.
This is the nostalgic cast right here. Yeah, talking about all the things that people don't know about.
No one can be a soldier with us. Yeah. So yeah. Cool. What are you been working on Steven?
So I've been wanting to do something for a while. Or do this for a while.
Like, don't we all? Yeah.
Well, here's the thing. That's cool. So I've talked about it a handful of times, we have a de Tron cube Ma, which is a high speed CNC mill at work, which is absolutely amazing how crazy you can get with it. And all the all the stuff you can do, we've got a 15 tool, tool changer. Everything is like touch. Street is screen controlled. Everything I can design things almost looks like the Tesla of a scene seem pretty very much is Yeah, no, no, it absolutely is. And I've got a bunch of plugins for fusion 360. So I can just design things up and it spits it right out to the custom code for this machine. It makes machining things. Let's put it this way, I have a smaller mill at work that is very much a manual mill. And then I've got this flagship Mazda harati mill right next to it. And the the amount of work you have to put into a like lesser mill in a way is you get spoiled by the big one, because it just does everything so perfect. And you don't have to worry about anything and it's always checking you to make sure you're not making mistakes and stuff like that. You're not going to derive your bid into the table and crap like that, like
it does. It does a lot. But the whole point of this is I've been I've been kind of developing some some new ideas for doing aluminum bends like because we do a lot of sheath work at at work and I've I've had some ideas about making some custom cuts in the aluminum such that we can make some really nice bends and do enclosure work and stuff. So last week I took some time and made a one U rack unit that it's it's a preamp design that I've been working on with Ross who's been on the poor his name actual name is Josh but he's been on the podcast a handful of times. In fact, he was on last year's Star Wars special. Yes, and he did a transformer episode with us a few months ago. Regardless, he and I've been kind of designing a preamp together and I wanted a nice case for it, because we're sort of prototyping and just like getting sound, right and things like that. But so I designed this entire case and, and built it in one day, which was like, it's incredible with with a mill like that to be able to get this or to like go walk into a place with just an idea and leave with something that looks like a professional enclosure, it's kind of it's almost cheating. But so get this, what I came up with is a few a few months ago, I tried just doing V scoring, so taking a 90 degree chamfer bit and plunging it into the material and driving a line. So you get a V score, that's a 90 degree angle. And if you do that, and then bend on that score, you can actually get something decent out of it, like you can get a 90 degree bend. The one thing that sucks about that, though, is that the outside of the material, the
the the side that you're bending against, I think, Gosh, what is that? It this is a weird tangent. But in origami, I think they call that a mountain fold. There's a there's a valley fold in the mountain fold. One is where you fold towards yourself. And one is where you fall away from yourself. Regardless, the outside of the material aside that it's getting stretched, like you actually you're literally stretching the aluminum. And you're putting all the bend force, you're focusing it right at that point. And with with the aloes of aluminum that we have available, it doesn't really work super well and you get a lot of cracks. And depending on how deep you actually plunge your bid into the material, you end up getting, it just cracks entirely and splits and you don't get anything good. So I was thinking of other different ways that I could pull that off without putting focusing all the stress of my bend directly at the tip of a 90 degree V cut. One of the thoughts was like, Okay, well, what if I did, like three or four or five V cuts that are more shallow? And I sort of like accordion it? And then you know, get that
kind of an old desk? The old coordinating desks? Yeah, yeah, old desks,
that's a good idea. If you want a wider radius, maybe not even a good idea. But that's, that's an acceptable idea that that would get you something, but it still doesn't get you like a really sharp 90. So I ended up coming up with this idea to take a one millimeter and mill, plunge it into the material about three quarters of the way down. So you have about a quarter of material left at the bottom. So it's a flat bottom channel that you've cut across the material with this one millimeter bit. And then on the edges of that one millimeter bit, I chamfer them not all the way down. So in other words, like you still have like 90 degree chamfers. But they don't go to a point, they actually go to a flat that I milled with that one millimeter bit such that when you actually perform the bend, the two chamfered edges come together and touch so you still get your your dimensional accuracy of the bend, but you use that flat that you milled before doesn't focus the energy of the bend directly to a single point. So it doesn't crack the metal. So I ended up doing that across to all of these bends and they came out beautiful, like absolutely flawless. Basically, it's probably not the strongest thing on earth. I don't know if I would do that in a production environment. Or if I would, you know, do it for something that had to hold a lot of weight, but for making a rackmount case for projects and things like that. I mean, like I said, to be able to walk into a shop with just an idea and leave with a case that look like you spent a lot of money on it is brilliant, especially
if you can machine a small group like that as well.
Yeah, I want a Yeah, one millimeter bit. Yeah, drive that around 1617 inches. But I mean, the thing is, if you have a spindle that can spin at 52,000 RPM, then you can push a one millimeter bit pretty damn fast you know, because it's only taking really really small nibbles every cut. Also the bit the the one millimeter bit I have is a single flute so it's like a it's like a curved razor blade that I mean you're spinning it at from repin speeds and it cuts through aluminum like butter.
So that's actually interesting construction technique because it reminds me I made the the electrical panel switch panel in the jeep. i It's made out of like quarter inch aluminum which is way overkill but it's what I had on hand and I needed to put a bend in it and I actually ran it on my table saw and I I took about a you know, a blade on tables balls on eighth inch and kerf and I was able to slot out about half the material on my table saw And then I bent it. So almost the same kind of bend
that actually that's exactly the same kind of bend if you just took the edges of that of the channel, and then you chamfered those such that once you bend it they close up.
Yes. Well, I was bending it. I was doing a valley bend. Right, right. So there's the bend. Yeah.
So, yeah, I'm showing Parker some, some images, take some pictures of that. Yeah, we'll, we'll take some, this is just the lid to the enclosure that I made. But I, the thing that's crazy is like, I was able to bend this all by hand, because this is pretty soft aluminum. But will you have the whole rack mount unit that I made, I was able to bend it by hand. And what's really nice is if you cuz I have a known thickness of material. After the bend, I could be pretty confident of my outer dimensions and I hit them really, really nice, you know, for Pan bends. So if you have a really nice meal available, then I can share these cuts with you.
Handcrafted rackmount cases made by CNC. Yeah.
So also the want to talk about a little bit about the circuit that went into this rackmount case, it's nothing particularly special. It's just a guitar preamp. However, one of the things that we that both Josh and I have always wanted to change about guitar preamps. That has been a huge, I don't know, annoyance, is that traditionally, there's a part of the circuit that is basically meant for tonal controls. And most guitarists call it a tone stack. And that that word doesn't necessarily mean anything electrical. But the reason why it's called a tone stack is because the actual way you draw it on a schematic usually puts three potentially potentiometers stacked on top of each other. So treble, middle, and bass. And in a passive configuration of tone stacks. They're almost always drawn in the same way. There's there's a few variations, but in general, they're always that. And it's one of the things that always sucks about those kinds of tone stacks is usually the source impedance that drives these tone stacks is not particularly high. So they're very lossy, they dragged down whatever stage is driving them. And it's sort of like a treble, middle bass, pick two, and the other one is not going to work. So like you can design it where your treble and your middle are really powerful. But your bass just sucks, like and what I mean by that is like as you turn the knob, you get very little interaction. Or that knob doesn't actually do what it says it does. And I've hated that, because it's just like, why do we have knobs that don't do what they need to do. So I've always wanted to design a better EQ. And earlier this year, I designed the big more the bigger flagship, the vintage EQ, which is a 20 band graphic EQ, which is a little bit overkill for a lot a bit overkill for what this application was, what we really wanted was a four band EQ, that, first of all ran on high voltage because I didn't want to create a second power supply just to run low voltage stuff. And I also didn't want to have to do level transitions from high low signals down to low and then back to high in order to interface you know, solid state electricity, electronics with it. But also, we wanted to have low mids and high mids available. So we have bass low mid high mid treble is our kind of our configuration with that. So I ended up designing a circuit that uses DJI Raiders, which we have talked about before. But previously, we mentioned generators to not be signal conditioning circuitry. We mentioned the more as power supply inductor or choke replacements. But what I what I ended up doing, and I'm super happy because it worked beautifully. On the first go, which was this this was one of those circuits that was designed entirely in simulation out of an idea in my head where I just, you know, I didn't even test the sub circuits of it. I thought of it I was like, Yeah, that should work. I simulated the snot out of it and then actually physically built it and go free configure it worked like actually were Asians. Yeah. So, this is I use a differential pair like the input like that most op amps would use however, the differential pair is a vacuum tube such that it can run on 300 volts and I buffered one of the outputs of the differential pair with a high voltage MOSFET. So I get the benefit of having high voltage input and being able to handle that but then I get the low impedance output from the MOSFET And then from the two inputs of the differential pairs, I connected a potentiometer across them. And that then connects to a Gyrator, which a Gyrator circuit effectively, depending on how you hook it up, you can simulate an inductor, or you can simulate an inductor and a resistor and a capacitor in series an RLC circuit. And with an RLC circuit, depending on how you set the values and everything, you can effectively make it resonate at a particular frequency. So depending on how I configured that I could change the queue of each one of the bands in the EQ. And so I set everything at the lows are at 80 hertz, the low mids are at 220 hertz, the high mids are at 750 Hertz. And then the highs are at two two kilohertz. And so basically sweeping that pot across its range, effectively takes the impedance of the Gyrator and connects it from one side of the differential pair to the other side of the differential pair. Basically, it's a really, really stripped down op amp circuit with a with a pot that sweeps across the two inputs, which is a pretty common circuit, if you for doing filtering and things like that, or EQ filtering, but I did it on the scale of vacuum tubes. So each one of the generators uses an IRF 820, high voltage MOSFET. So for that, I had to create a second rail, so power supply rail, so they run on 300 volts, but they also need to be referenced half scale. So I created a second circuit that produces 150 volts. So we got 300 150. And then basically, by just selecting resistors. And capacitors, I was able to convince each one of those generators to be an RLC circuit that resonates at those four frequencies that I said before. And the cool thing too about it is it has a really, really, really huge input. Basically acceptance range, you can put massive signals into it before it distorts. So it it acts like generally a transparent EQ, where like large signals come in, you don't distort it, but you can filter them. So you can put, you know, your master volume through this thing and put 20 3040 volts into it, and it's really not going to distort. So super happy with how that came out. And it's got a really nice, cool looking enclosure that everything goes into now that you see. Yeah, you
made.
Yeah. So that's what I've been up to that was a lot but, or a lot,
I'm gonna have to see this a Gyrator powered EQ someday,
I'm going to post my schematic of it. And I love it because my schematic only exists in spice land right now. So I haven't haven't actually measured the exact frequencies that that the circuit is doing. However, when you turn the knobs, it sounds like those frequencies, like, my ear is telling me that I got close enough, you know,
yeah. That's only 224 Hertz.
Actually, with how bad this circuit is, I guarantee you as you turn the pot, it actually shifting the frequency also, as the amplitude of the filter goes up and down. So it's somewhere around 220 hertz.
So to do just like the test out, do you just like pump white noise into it? And then see what comes out?
No, I just play my guitar through it and turn it off. Well, so actually, in reality, if, uh, yeah, I mean, eventually, I will connect it up to my computer and physically measure those things. And that's a good way of getting a an approximation, you can put white noise into it, and then turn the knobs and just watch the amplitude of the white noise. You know, you have to look at across this spectrum. Yeah,
FFT of it. Yeah. Right, right.
I was doing something with that the other day, I can't remember. Gosh, I was doing some kind of filtering just the other day and doing exactly that. And it was fun to watch the filtering, like affect the noise. Because if you're doing a cut, you're not actually you're sort of not looking at the white noise content. You're looking at the opposite of white noise. What I mean by that is like you're not looking at the content of the white noise itself. You have to look at the peaks and watch the line peaks. And that's fun. Yep. Cool under the RFO
RFO. So CAD now has action plugins a sense what the Hackaday article says. So KiCad with like version four, added the bill. lead to do Python scripts. And but they were external. So you had to like, install like KitKats like Python library and then you like, and then you ran your Python script externally? Well, it seems like now you can actually, through like a drop down menu, you can run those scripts, same scripts internally in your EDA tool, much like eagles, eagles scripting works, yeah, the ULP stuff, which is that's kind of exciting. Like, you can actually write your own tools now, which is really nice. That's one of the reasons I like Eagle a lot is there sometimes you're like, hey, I need to do this automation thing, I can actually write something to do it. Right. So having KY CAD support, that kind of functionality is pretty cool. And
in this Hackaday article, they were showing off a video of one of these plugins called RF tools, where you can you can, you know, it's via stitching tools, and creating like proper impedance traces and things like that. But one of the things I thought was really cool is they had a, a tool where you could add curve traces, but you get to choose the radius of the trace, and you choose to stems of a trace, and it'll automatically radius them, which might not be a unique tool for a lot of other people. But in dip trace, doing curved traces is kind of a pain in the ass. Just because of the way that dip trace handles curves. It's such a pain in the ass, I don't even do it. Not that like curved races, or like an everyday occurrence or anything like that. But if I had to do it, I would be like, Oh, God, this is gonna suck, you know, just because like, you don't get to pick things as in like, here's the my curve, here's my radius, this is what I want, you have to do a lot more work to it. It's almost like three point arcs that you have to do everything in depth race with and that really sucks. That's pretty rough. So I thought this was super cool that you could just pick two stems and say, give me this radius, and it would
pop it out. So KiCad just needs to fix one more thing. Oh, was that the how the middle mouse scroll wheel works, that zoom functionality is just awful. Where it will. So if you use and he can't if you have your mouse on the screen, and then use a scroll wheel. Instead of zooming towards the mouse. Like, like, if you like a normal CAD program, or actually any almost every single UI design program. When you scroll with the wheel, it zooms in or out depending on which direction but in relationship to your mouse. So like if your mouse is like on the right side of the screen, it zooms closer to the right side of the screen. Right, right in KitKat. It snaps your mouse to the center. And that's the center location. So it like jars the whole screen around. You do that. It? It that whole functionality of how that works. I just can't use KitKat because of that.
Yeah, I remember that now. That's yeah, that's pretty rough. Yeah, like it should always should always go towards the mouse for sure.
Yeah, but KitKat does that. But to the extreme, it's it basically snaps the view to that, and then zoomed in a little bit.
Yeah, that's no good. Yeah, you know, okay, this is this is one thing that diff trace does that bothers the living snot out of me. And I'm curious if KiCad does something like this, in all of dip traces, programs, which there's, there's four kind of like quadrants to it, they basically have your pattern generator, your component generator, your PCB layout, and your schematic that's like the four ecosystem. In all of them. This is true, and it's so annoying. If you select something and you copy it, and then you click paste, it, paste that whatever you just pasted a fixed distance away from whatever you copied. So if you copy something, and then you scroll away the whatever away from it, and then you paste it, paste it still a fixed distance away from the thing that you copied. In my opinion, if you pay something, it should appear where your mouse is. And then you can place it like it just when you click paste, it should like center on your mouse and then you get to play with it. So with dip trace, like if you select an entire like chunk of circuitry, and you want to copy that, it will copy all of that circuitry and then you click paste it still paste it only a fixed distance away from all of the chunk circuitry. So if you accidentally deselect something, you've now doubled all of your crap everywhere. And it's stuff all over the place that are like crossing wires and things like that. So If you don't catch yourself, you can easily make a whole lot of extra work for yourself. You know, especially in the, if you're copying and pasting things on the board side, you don't want to, like, that's terrible. That makes it so much more difficult. I absolutely detest that. I wish that would change
me work like a normal CAD tool, which is like, when you paste it does like a highlighted version of what you're pasting it, and then you get to select where it goes.
Yeah, exactly. Instead of just, yeah, when you click paste it, paste it somewhere. Yep. And I think I think if I'm not mistaken, it pastes it. Point one inches in the negative y direction and the positive x direction. Like so down into the right.
Now that's fine. Right. But like some person hardcoded that DipTrace? Yeah, that's fine. Yeah, it's this is all right.
Yeah, no problem. And there's ways around it. And like, if you know what's going to happen, you just work around that. But it's also I don't know, such a pain, you know, CorelDraw, which I use a lot at work. Also, when you copy and paste things, the paste function makes whatever you copy and paste, paste, exactly on top of what you just copied and paste it. So like, it'll places it in the exact same coordinates, which I don't necessarily dislike that because what I like, if I have a circle that I know is one inch away from another circle, I can copy and paste one circle, and then click on it and say, add one inch and it moves, it immediately snaps over one inch. That's not bad. But in dip traits, if it moves into a different location, then like Utah, gosh, sorry. Okay, yeah, I'm done. So our next topic in the rapid fire opinions is about E web, which if anyone frequency e web, it's just basically an aggregator of E News. The website has changed fairly recently. And now it has more tools available. So if you go to the top of the page up there, there's some tool functions that has a handful of E calculators, which is cool. So like tracer resistance, and a whole bunch of RF tools and a handful of other things. But they also have now their own EDA tool, which is called PCB web, which I thought would be fun, I actually created a login to it. And just before we started the podcast, I just threw some quick together. What I'm what I'm really kind of interested in is it seems that there's a lot of EDA tools that are now becoming available, that are a little bit more of these stripped down simple EDA tools like this one. This specific one is PCB web. It's obviously a it's a way for Arrow to sell products. And what I mean by that is like when you pull up this, this tool, it looks like a regular EDA tool. But all the parts you can pick, it's suggesting, like, hey, are these are the whole arrow catalog, you can pick from any of these things. And I think they also have a spice tool where like, all the parts are like you can simulate arrow parts. And that's super cool. But at the same time, it's like, gosh, there's so many more EDA tools than when I started now, like because there's their macro fab have their own EDA tool. You know, I talked to the CEO, macro tool. At one point in time, I was like, What about an EDA tool? And he's like, I don't want to code that.
Well, because at the time when we started macro fab was when like, easy EDA and stuff was kicking up to, right like the browser was online ones. Yeah.
Which don't get me wrong. They're super cool. I actually helped a buddy of mine design a board net the other day, and he got it built. It was his first PCB and bam, you know, it worked out really well for him. Super cool. But like, as, as somebody who deals with clients on a daily basis of people who run EDA tools, it's getting harder and harder, you know,
continually support all these new ones. Yeah, because like somebody's like, well, I
designed this entire thing. I'm passing it off to you and now I'm like, Oh my gosh, I have to learn a whole brand new thing now just to be able to support your product. It's it's getting a little tough. So I don't know check this out though. This PCB web, of course, you have to like, you know, you have to sign up and give them all your DNA sample and everything just to be able to use this little product.
Firstborn baby.
I played around with it. It looks like a clone of Ki cat and Altium interesting, which don't get me wrong. They're they're schematic and everything has a really clean look. I've always kind of liked that. KiCad looks really really like Altium No, they It's clear they had some inspiration there
Cool. Cool, I guess.
Oh, great. Um, so
I think I think Altium is like dark mode KiCad this new version dark mode. How so? It's the interface is dark and geek Ed's interface isn't dark.
Oh, I got it. Yeah, no, no. Yeah. But there's schematics. Look, I mean, the whole yellow boxes and things like that.
Oh, yeah. Across the, we actually speak in dark mode, we use a tool called fab 3000. Here at fab for looking at Gerber's and ODB plus plus stuff. And we started using it on version 17. So version eight is version seven. Anyways, a new version comes out, I think, a couple of months ago. And the big feature was, it was dark mode. Really, and they seriously just made everything charcoal colored. Dark and like it made all the text whites? I don't know. I'm not I'm not a big fan dark mode stuff. Really? Yeah. It's like,
Oh, no. So I never do white schematics. I like dip traces black and yellow lines. Like it's just so much easier on the eyes.
I like, I like the schematic to be white with green. And then PCB is, you know, whatever color your layer is. And then black background. Yeah, it's
got to be black background. It's got to be a I've seen I've seen some people do white background PCBs, and it just makes me go through all your triggers. Oh, well, no, no, like, it's just like, how do you do that? Like, my eyes go cross eyed fast.
So that's where we differ. I don't, I don't see a big draw for dark mode. But some people I guess, with new OLED displays and stuff like that, that dark mode saves power for those kinds of displays. So
isn't everyone on Reddit or Reddit mobile is going nuts about like, I think what the the browser version of Reddit has dark mode, but the the mobile doesn't, and it's like, the mobile is the one that should have dark mode because you got people laying in bed, you know, late at night scrolling through stuff, and it's just the brightest light you've ever seen.
Finding all those means late at night. That's right. Okay, so a lot last Arvo last RFO is actually,
I was just kind of cruising through some some articles I found about the new Apple AirPod. Pros. Actually, I was I was looking at some articles about some counterfeit air pod pros. And I realized I haven't been to Apple's website in I don't know, a decade or so. So I wanted to go there and see what kind of marketing link they had going on with their air prod pro stuff. And on their page for these air pod pros, which, by the way, are $249 for for the pair.
No wonder people have counterfeit ones.
Right. Right. So well, okay. And the whole point of this is like, Oh, you cannot counterfeit because apparently these air pod pros have the h1 chip. And I was I was looking at the their webpage for these pros. And they have a comparison against their air pods. So the non professional pods, I guess, and they're showing this comparison, so you can you know, pick which one you want to buy. And it says with a checkmark that they both have the h1 chip, but no description of what that means or why you will have the
average user be like, oh, yeah, the h1 chip. That is what I want. Well, and looking into this,
so I am not an Apple fanboy, obviously. But like, so Parker and I did a little bit of research. And so previous generation of the air pods had other chips like the w one chip.
Why is this not a W two?
You got to fill out a W two just to justify this thing. But it's like, Wait, okay, so they put this checkmark on this h1 Chip, but no description on what that is? Or even why that makes it great. And in my opinion, like that is some serious marketing wank right there because you know, they're just building up people will be like, hey, Parker, you know what, as the h1 chip in it, and you're supposed to be like, oh, man, that's awesome. Yeah, that's great. I'm gonna go out buy it right now.
I need that h1 chip with salsa. I mean, Siri.
So I found that it's funny. I found a website that was doing reviews on these air pod pros. And the funny part about is the fact that the website is Android authority.com. Which is like, Okay, well, we'll skip over that but they had There's one paragraph that I just I wrote down here because I want to I want to read this, just because well, let me just read it, and then we can talk about it.
Let's back up a second and consider what exactly the apple h1 Chip does. It's not a processor in the smartphone or PC sense. It's not running a complex operating system or powering a display. No, the h1 is a streamline chip designed for just a few tasks. Apple keeps the innards of the chips a secret, but we do know that it includes a modem for handling Bluetooth connectivity, a digital signal processor for decoding compressed audio stream, and a coprocessor. Possibly a second DSP for handling sensor information.
So it's, um, custom designed microcontroller. Yeah,
yeah, exactly. It's a custom designed microcontroller. That probably just handles the audio stream. Yep. So there's nothing special about this. Ah, I don't know. That kind of stuff bothers me. Like, Hey, man, this has got the h1 chip in it. Better go out and get it. Yep, I think I think the next thing I designed I'm just going to the T 1000 1000. chip in it, that's for sure.
Is you take a take your a tube amp, right. And then epoxy fill, it's all filled with resin and make it a ginormous chip. Oh, yeah. I like this. And they call it the s one to Steven one. Oh, yeah, absolutely.
Yeah. Okay. So I can't I can't dog on Apple too much. So they've had a history of having custom named chips in their products, right? Like the the washing machine and stuff like that back in the day. But it wasn't. Like, back in the day. They didn't necessarily use that as like some marketing wank to say like, Well, man, he was got a washing machine inside of it. You know, better watch out, you know?
Yeah, it's worth another $3,000. Because of that. No,
I don't know. Yeah. Yeah. It's really what gets me on this advertisement for this air pod. Is it seriously comparing it to like, another have its own thing that also has the h1 chip, right? It's not a comparison that that says that a comparison at all. It's like, yeah, they both got it. Yeah. Well, but like, it doesn't have like, why is that more important than not having it?
I don't know. Right now. They're just built. It's obviously just building hype, you know, and somebody's gonna walk around and be like, so Okay, now, here's the thing, this reminds me of this is really going to become a nostalgia podcast here, or nostalgia episode. This reminds me of being like 12. And having a Super Nintendo and being like, dude, Nintendo 64 is coming out. It's got 64 bits. If you asked me to tell you what that meant, I wouldn't be able to tell you what that meant. But it had 64 of them. You'd
like or the superintendent has got mode seven modes. Yeah, you're right. Actually,
have you ever looked at the the or the good weather the you know, all the modes that the Super Nintendo had, like, Have you ever looked at at all of those modes, so one through six are like pretty damn close. They're pretty much like cop copies of each other with some slight variations. Mode seven was really the only one that like, was drastically different. And it looked awful. I mean, I mean, well, now it looks awful. Back in the day, it was like the coolest thing ever, because you can play Mario Kart in in mode seven, like 340 by two to 40. jpg that's stretched out across your entire screen
at an angle. The I think the most amount of marking though, would be towards like the, the Sega Master System, or the blast processing? Yeah, blast processing. Yeah. But um, the other one turbo graphics. I'd also just as crazy marketing. I can't remember what their big stick though was.
I can't remember. I really think we talked about this at one point in time we have no but like, specifically, there was a guy I saw who he hacked his Genesis, such that he could control the clock speed on the fly. So he could just press a button and he could double his clock speed, which the Genesis processor actually would handle that it would it would heat up very quickly. But the guy would use it at select points in, in games. Like remember, if you were playing Sonic, and you had a boatload of rings and you hit an enemy then all the rings explode. And the end the system just like goes nuts and slows down like right Easy, he would press that button right then and double his speed. And it actually worked. He had some videos of it that was it was super cool like there was very little slow down after that. And he would just basically have it on like a foot pedal that he could throttle the speed of his Genesis. But that was super awesome.
So yeah, Turbo graphics. They had a they had a comic book with Johnny turbo.
Johnny turbo,
Johnny turbo, man.
Those were simple times whatever happened to those those were great. You remember? Gosh, what was his he's like the guy from the Nintendo Power Nesta. or whatnot.
I never read Nintendo Power.
Oh, you're on those good. Okay. Nice. Also are not the turbo graphics is the turbo graphics. 16 Because this mattered back in the
matter back in the day. If you want to look at awful consoles, though, look at the Atari Jaguar controller.
Hey, but the Jaguar was 64 bits.
Also 16 and also 32 bits. It was a mess.
That's right. Yeah, it had all kinds of different buses, right?
Yeah, that was its downfall is no one knew how to program for it. So right. Well, we should wrap up this episode 199.
Almost there. Almost there.
So that was the McWrap engineering podcast. We are your host Parker Dolman Steven Greg. Go by turbo graphics 16 today
Take it easy 64
Thank you Yes, you are listener for downloading our show if you have a cool idea project or topic. Let Stephen I know. Tweet us at macro at Longhorn engineer or analog ng or email us at podcasts at macro voices.com. Also check out our Slack channel. You get to that by going to macro fab.com/slack fill out some information bam you're in. And if you're not subscribed to the podcast yet, click that subscribe button on iTunes. That way you get the latest episode right when it releases and please review us wherever you listen, because it helps the show stay visible and helps new listeners find us
Parker's repair of the Tigershark seems to be working fine and Stephen learns how to read a Digital Datasheet. Also, only 8 more episodes before 200!
How easy is it to make a retro gaming console? Stephen breaks down his design and build criteria that involves no custom PCBs.
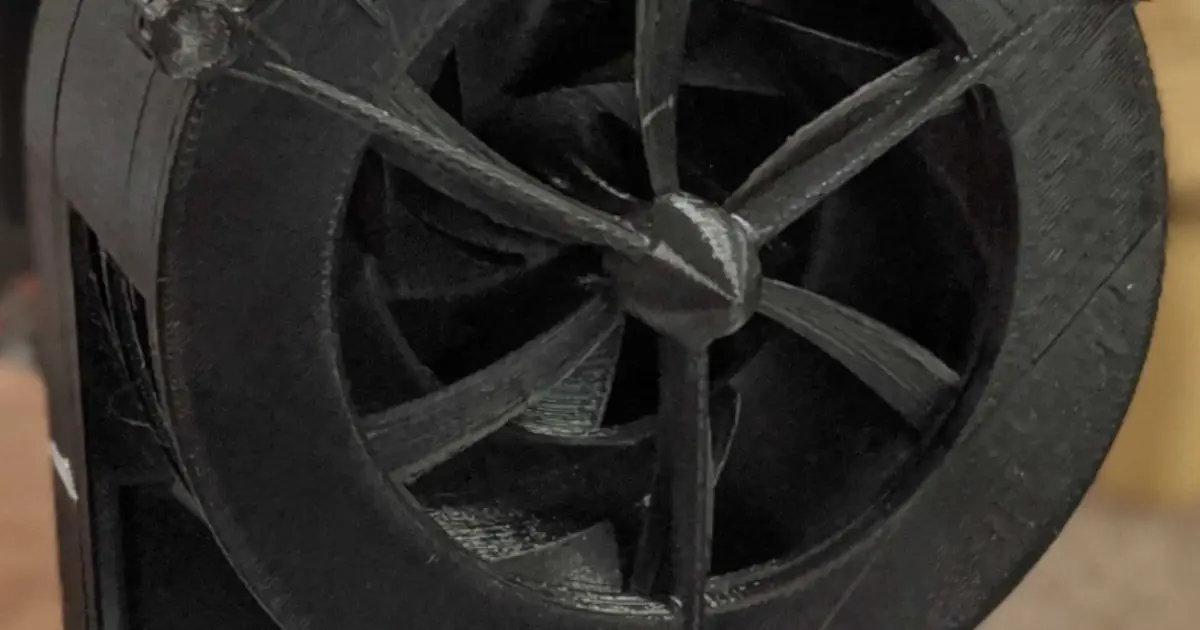
Do not adjust your podcast broadcast device. What you are hearing is a rotary alarm system. This siren denotes the beginning of episode 200!