AI and ChatGPT have been in the news about how it will change world views or will it be relegated, making sure NPCs in video games don’t repeat dialog?
This week's topics are: Porsche's Synthetic Gasoline, Record Chip Manufacturing Sales for the year 2022, and the Raspberry_Pi Social Media Firestorm.
Right to Repair is going global and Stephen might have solved his injection molded component's void by tweaking the mold design.
Parker
Stephen
R.F.O.
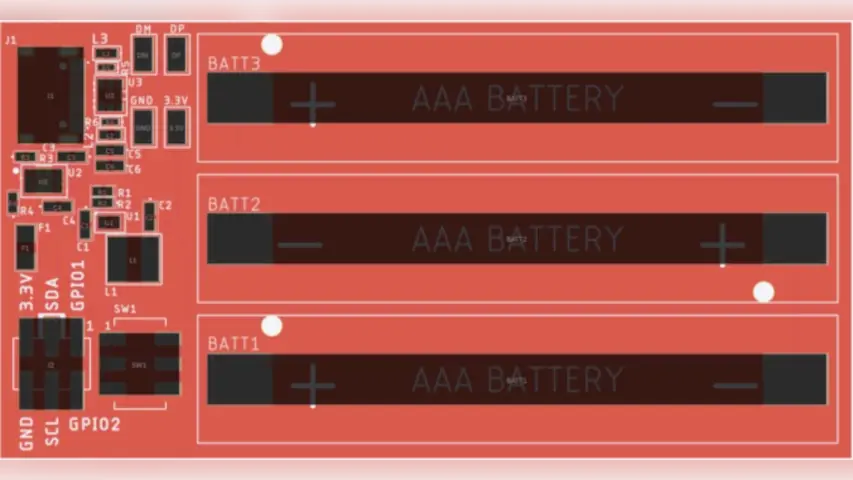
Front of the PCB Parker design to test the power system of the badge he is working on.
Back of the PCB Parker design to test the power system of the badge he is working on.
Parker is an Electrical Engineer with backgrounds in Embedded System Design and Digital Signal Processing. He got his start in 2005 by hacking Nintendo consoles into portable gaming units. The following year he designed and produced an Atari 2600 video mod to allow the Atari to display a crisp, RF fuzz free picture on newer TVs. Over a thousand Atari video mods where produced by Parker from 2006 to 2011 and the mod is still made by other enthusiasts in the Atari community.
In 2006, Parker enrolled at The University of Texas at Austin as a Petroleum Engineer. After realizing electronics was his passion he switched majors in 2007 to Electrical and Computer Engineering. Following his previous background in making the Atari 2600 video mod, Parker decided to take more board layout classes and circuit design classes. Other areas of study include robotics, microcontroller theory and design, FPGA development with VHDL and Verilog, and image and signal processing with DSPs. In 2010, Parker won a Ti sponsored Launchpad programming and design contest that was held by the IEEE CS chapter at the University. Parker graduated with a BS in Electrical and Computer Engineering in the Spring of 2012.
In the Summer of 2012, Parker was hired on as an Electrical Engineer at Dynamic Perception to design and prototype new electronic products. Here, Parker learned about full product development cycles and honed his board layout skills. Seeing the difficulties in managing operations and FCC/CE compliance testing, Parker thought there had to be a better way for small electronic companies to get their product out in customer's hands.
Parker also runs the blog, longhornengineer.com, where he posts his personal projects, technical guides, and appnotes about board layout design and components.
Stephen Kraig began his electronics career by building musical oriented circuits in 2003. Stephen is an avid guitar player and, in his down time, manufactures audio electronics including guitar amplifiers, pedals, and pro audio gear. Stephen graduated with a BS in Electrical Engineering from Texas A&M University.
Special thanks to whixr over at Tymkrs for the intro and outro!
Welcome to the macro fab engineering podcast. We are your host, Stephen Craig and Parker Dolman. This is episode 201.
So as Steven just said, Episode 201, which means the air raid siren did not get this show canceled, or me fired.
Yet Yet Yet
Yet, it did have it. The desired effect though, is everyone else's departments noisemakers have been silenced since I brought that air raid siren.
Yeah, no one no one wants to be known as also having sounds associated with the air raid siren.
Yes, but I will say people really enjoy actually cranking it up. It's pretty funny.
We like we're with a lot of people doing it. Oh, yeah.
Like, oh man was every other person at the fab has cranked it? Because a lot of times people will show up and be like, What is this and I'm like, see that handle this, hold it and just give it a crank as hard as it can. Because by the time they get going, it's already got momentum spinning up. And so it gets to its full loudness before they realize what they've done.
Oh, no. But I'm sure I'm sure the leadership team absolutely love you for that.
Church was the first he church likes it a lot. Really? Yeah. That's great. Actually, he was the one who spent the longest. I think he's wandered for like 30 seconds straight.
Oh, wow. He totally went for it. Yeah.
So yeah, that project went really well. I'm pretty happy how that turned out. It's had the desired effect, which I wanted, which was people realizing that the noisemakers that they like the bell in the sale Gong are worthless.
Parker is not a team player, that's for damn sure.
I want him a team player. I gave my team a noisemaker at the table noisemakers now. Nice. That's been good. On the last week, I was talking about the badge, power supply thing I was designing, we actually got it ordered. So we should have them in. I think at this point eight days, we should have them eight business days and be testing them. And if they work, if this design works, I'm going to post it publicly partly through the podcasts and then on my Longhorn engineer website. And so that people can look at it. And I started working on the lithium battery version of like a badge. System. I'm so looking for like an icy to use for bass. I picked a battery protection circuit already. And then I picked I'm doing an 18 650. So I have like a keystone 18 650 battery holder. They will also work with like, you know, gel packs. Lithium flat packs will work with those as well. But for testing, it's easier just to use the 18 650s.
What is your what is your test? Method? Just turn it on? Does it work?
Oh, pull power, see how clean the power is? Like for the other one? Yeah, it's going to be runs on runs on triple A batteries. That basically let it run down and see if throughout its entire the lifespan of the batteries if the power fluctuates too much, because it has a switcher that's keeping it at 3.3 volts, making sure that we don't get too much ripple stuff like that,
you know, something that also might be worth doing is
starting it with a heavy load. And seeing like how well the switcher actually ramps up dumps into it. Yeah, ramps into a heavy load. We actually we've run into some issues with that with a product at work where we've we've made a device that has a specific ramp up period, but it ramps up to a decent amount of current. It's not like anything ridiculous. Well, there is one other manufacturer that makes the switch mode power supply for powering these things, this particular product. And in our case, we pulled just a little too much current right at the get go. And their switch mode power supply doesn't deliver enough current right away and it goes into a oscillating state where it turns on and off. And it's kind of been a thorn in our sides because they are the company that manufactures switch mode power supplies, not allowing enough inrush current. But a lot of our customers are trying to send our maize back back home. This is like this is not necessarily our products fault on in this case. But is it
because your customers are using like this other supply as a third party thing?
Yeah, it's a third party we don't we don't supply the power supplies. Like that's something that is traditionally a third party thing. You buy the product from us and you buy whatever supply you want to go with it. And our our product works with every supply on the market, except for one. And and sometimes it doesn't even work with that one. It just all depends on the on the inrush current, and we've adjusted the firmware to make the inrush current ramp up slowly and things like that, but I don't know it's a pain in the butt.
Yeah. Yeah, we'll test that too. Within reason of heavy load, which is like 100. Oh, I guess if you have a shitty add on, which is 250 milliamps Max. Exactly. Yes. Yeah. So probably tested at the max what I had the MUX at which is half an amp. Yeah. Basically, like, Can you do a half amp load from the get go when you turn this thing off? Turn your puppy
on? Exactly, yeah, put whatever resistance that is directly on and just see if you can blast into that. Yep.
And I've got a nice load tester.
Oh, that's right. You have the reload Pro. Right. Yeah,
I have a real pro which is right. Right there. Oh, yeah, it is. Look at that. And then I have another one too. That's for USB applications.
Okay, so it can pull 500 milliamps pretty easy.
Why it can pull five amps at 20 volts. But it's like oh, it's USBC plugs on it are designed for testing USB stuff. Oh, that's cool. So yeah, lithium battery version, I gotta find a actual charging circuit for it now. And looking for I've been looking at the T is catalogs ti makes tons of them. And I'm looking for like one that can handle USB type C for power delivery, because some of them have like that stuff is built into that front end. So all you have to do is it that acts as the charger and the USB front end, which would be kind of cool to handle it that way. So hopefully next week, I have more information about that. Like I've picked a circuit and have something designed maybe. Yeah. And then on the brewery buildings since we are one week closer to Christmas now.
Hey, Parker's actually making a lot of I've been getting brewery pictures all week long.
I got all the stainless soldered. So all my brew pots like the hot liquor tank, which is your heat exchanger for your mash tun and what use like heat up water that you need for like cleaning and
when when we say hot liquor tank, it's literally a pot of hot water.
Yes. I don't know why it's called a hot liquor tank, but it is the hot part makes sense. The liquor tank does not
traditionally the yeah the hot water that's used specifically for brewing what's called a liquor.
Okay, that makes sense. Yep. So I got all those fittings soldered. It is a pain in the nards to solder stainless, like
well, but it's I mean, it's using like your torch braising basically right? Yeah, your
torch bracing? Yeah, so like you would solder or braise copper pipes together with lead. This case it's not led you using silver solder. It's like three to 4% Silver if I recall, and then using a really aggressive stainless flux. That is that stuff is super aggressive. And that stainless like it will actually oxidize the stainless have you let
sit too long. Correct me if I'm wrong, are using the stuff that looks kind of like clay. It's like gray.
No, this is like a clear look like a yellowish clear liquid.
Oh, okay, I haven't seen
and it took a couple of times the first time to get the solder, right because you can't apply the torch directly to the joint because you just basically cooked the flux off and then the flux turns all crusty. And then you just won't get the flow like the you will not get any wicking action. So yeah, the trick is basically, you know, bolt everything together so it's all the fits tight. And then as you heat it up your heat, you heat the area around like the pot itself really slowly and then you just hit the fitting is what I found the work the best.
Yeah, I've seen that before. Well, okay, so most of the time, the pot itself is pretty thin gauge stuff. And the fitting is it has a ton of mass on it. So So you cook the bejesus out of the fitting and then you kind of like well wipe around the pot. Yeah,
that seems to work the best. It's funny, like on the last video, I did a perfect one. Yeah, the very last, all the other ones are like, go look like garbage compared to that.
And that's one of the hardest things though, because you really want that that joint to have a good fit and to like have smooth, smooth this all the way around. Because you don't want any voids or areas where bacteria can grow. Yeah, well,
I don't really care too much about bacteria in these fittings. Well, that's the thing is like, I'm going to be cleaning anything with a caustic material. And when it goes into the boil, everything will get boiled in that circuit. So that's like the big thing with with, I think breweries pay more attention to it because they kind of have to from a, like, regulation standpoint and how clean everything has to be. But like so my brew pot I didn't know this is because I cleaned everything with just like start saying NuSTAR San. P BW? Well, there's a oxy clean free, which is almost like P BW. So PW is like a
P bw is powdered brewery wash. It's basically it's tsp but not as aggressive.
Yeah, well has tsp in it. But it's got a basically OxiClean free it's almost just like it except it's like 20 of the price or something like that. And so I was I just couldn't do anything with that. And so in my brew pot, this is like story long time ago, when my brew pot there was a spigot a pickup in it for the valve. And so that's how you drained out. Well, I never knew you could actually clean that thing. Oh, gosh, just like it just magnetically gets stuck to the inside of the inside of the pot. Cuz you know, I had that really fancy brew pot. Right. Right. It was like a Blichmann. Yeah, really high end pot, because I thought I had to have a high end brewed pot, right. Right. Now it's like the cheapest shit I have with like solder fittings on. But so it had a really fancy valve and all that stuff. And it was actually I was giving it away to where my friends like a year ago, and I'm like, oh, I should probably clean it. So it's nice and clean. So when they put it in their car, it's that Oh, gross and stuff. And so I was cleaning it out. And the inside that the little pickup fell off, because I bumped it and it just came apart from its magnetic color held on I'm like, Oh, hmm, that's the first time it's ever been undone in like seven years.
And 100 bruise
or more. Yeah, it had some crust in there. But guess what? I never had an infected beer.
Well, yeah, I mean, it's part of the boil right? If you're boiling the living bejesus out of it,
so it's like my soul made really good beer in that was in there. Now, I would clean it now if I knew about that. But I don't think like if you were if I if I had to do this again, I would have just TIG welded those fittings. Yeah. And not not worried about sanitary TIG welds or whatever. It's a homebrew setup. Right, right, right. What's the worst that's gonna happen?
The I think the only thing that is what was stainless steel, you have to have shielding gas on both sides of the stainless if you're doing like internal pot welds, or something like that, because you'll get the sugaring if you ever see that TIG weld sugaring on on the they look terrible and they don't actually hold up very well.
So but it's on the wall never see it
I think I would still braise with solder just because it's it's easier to get it right.
I don't know it was a pain in the butt and I knew I could probably lay down a bead of weld like I am was busted out my like MIG wire weld with my stainless. We'll went to town on that. Because it was so it was annoying the crap out of me like I'm like, This is so much harder than just like the MIG gun and just gluing this shit together. So but I did solder with silver solder. If I would do it again, I would do it with I would take TIG weld it.
So you'd now you know you need to passivate all of your all of your stainless. It's one of the one of the first things you're supposed to do with those pots is put like a pretty hefty star saying,
Oh yeah, you're supposed to like oxidize it. Yeah, you build
you build a an oxide layer on the stainless and then I think you're supposed depending on how often you brew You'd need to redo that on a regular basis. But I cleaned with star Sam all the time when I brew, so it's like, I'm just rebuilding that oxide layer anyway. Yeah. So I can't remember exactly what like you have to put, basically you're creating a certain pH level liquid that comes in contact with the surface of the stainless and it creates an oxide layer
can do a DSP to I can't remember, I got a whole book when I bought my first pot, and it was like this booklet of like, here's how to take care of your stainless and I was like, I thought it was stainless. I thought it didn't have to take care of it.
Well, I'll say I never did anything to my previous brewery setup. And it never, never deteriorated on me. So
I made the mistake one time of not cleaning. Well enough, my
wart chilling my 50 plate or chiller, and I got a sticky sugar solution that just crossed over and it was nasty. Yeah, well, and what I ended up doing is I just I went on Amazon and I bought straight lie. And I just filled it with with lie and made like a ridiculous solution. And it was smoking like it was coming out of the ports. And that thing is super clean now.
Yeah, that's actually one thing is how I've set up my plate chiller is because it's actually the first time I've ever had a plate chiller as well. And so what I was gonna do with the plate chiller is the because I haven't researched pump for the hot liquor tank. And that's always gonna go through that pipe chiller. And so when you're about when you're ready to cool down the wart, which is the cooked beer at this point, before fermentation. And you have to cool that down from like, boiled temp. So 210 cells Fahrenheit 100 Celsius, it's cooled down to room temp, about 70 degrees Fahrenheit, or what like 2120 20 545, something like that, something like that. And so what I'm gonna do is I'm gonna put ice in the hot liquor tank, ice and water in the hot liquor tank and Rhys and that way, that circuit is the cold side of the chiller plate. And then on the hot side is the the brew pot research. And that will just circulate in there. And hopefully there's an I probably should calculate how much like heat I had to remove? Well, it's the same specific gravity so it would just be Well, no, because there's a phase change in there too. I have to calculate that I have to calculate how much ice I would need. Make sure the hot liquor tank is big enough. Because the 15 gallon pot and you have five five to 10 gallons of wort. That's, yeah, that's yeah,
I'm not gonna do the calculation. This is how Parker's brain works. Yeah,
this is just how my brain works right now. Yeah,
in all that I've read. You know, I'm sure there is there is like a limit to this. But in terms of in homebrewing there is really not a rate that's too fast for cooling like correct the the answer is go as fast as you can. So yeah, whatever the coldest inlet to your plate chiller is just do
well. Yeah, it's, it's, I'm not worried about that. I'm worried about if I put if I fill my hot liquor tank up full of ice and water,
and then you melt it, it'll overflow. Melt it all away.
Am I gonna have enough bass? Am I gonna have enough cooling capacity with that hot liquor tank or am I got to add more ice basically have to drain it and add more ice while I'm pulling down my wart?
You know, I realized I just made a mistake. If you if you melt ice, your water level actually goes down, right? Because so so yeah, no, it's not going to overflow. It's just you might not have enough. That's what I'm worried about. You might not have enough. This leftover to cool. Well,
I call that cooling capacity. Sounds a lot more fancier than cold. This come on that's left.
Cold. The coldness is way cooler. Yeah, isn't it? There is no such thing as cold. There's just a lack of heat. Lack of energy. Lack of energy.
Yeah, for sure. So I got that all done. The electrical box is almost complete. I'm going to try to finish it up tonight. I just got a wire up some pump switches. I opened that thing up and I'm like, that's why I stopped working on it. Just like looking at it.
Just a pain in the ass. Right? Yeah.
And so it's almost there, though. Pretty happy so far.
You know, cabinet wiring, I think is actually kind of fun, doing like industrial cabinet wiring. There's something weirdly therapeutic about it. I mean, some of its really just super monotonous and boring as hell. But it can it can be super fun. Especially like when you get ridiculously anal About and you start looming all your wires and stuff to make you look really
pretty even doing that. Oh, I like doing the little ends on the furls Farrells Farrells. That's right. Yeah, I'm doing those just because that makes it easier if you have to change it later.
You're talking about the ferals on the end of wires for sale terminals and stuff.
Yeah, that you crimp on?
Yeah, yeah, yeah. And then
I was we were I was looking for our photos for this week. And I found a article on the challenges opening a brewery. And I think the actual title is, so you think you want to open a brewery.dot.so I was scrolling through it. And it says there's a joke in brewery that's 90% cleaning and 10% paperwork. And I'm like that is 100%. True. There's, it's exactly what it is
actually, what's kind of funny, too, is even in home brewing, like, Yeah, I'll spend I'll spend four or five hours brewing, but I will also like the week before I brew, I will spend time like jacking with my recipe and things like
calculating everything out. Yeah, getting everything ready. And then, yeah, cleaning. I'm hoping this setup is either gonna be an amazing achievement in homebrewing technology, or completely worthless.
So Wait, does your electronic cabinet have like a big Clean button where you just press that? And it like, auto cleans everything? No,
all my valves are manual. Yeah. Okay. So that would be cool. It would be
really funny to have all these like complex controls that give you like, all of these controls over individual things. But then one button, that is the master button and it doesn't say brew, it just says clean, clean.
So we'll have to see how well the cleaning function of this thing works. I'm expecting it to be like it to take about 30 to 40 minutes to clean instead of several hours. If I can get down to that I'll be pretty happy. Yeah. So yeah, that's what I've been up to.
Nice. Well, hopefully, you know, here's to Parker, getting it done before Christmas. Well see. It's gonna be tight, right? Yeah. Cuz
it's like today, it's like, I'm gonna finish up the electrical box and then like, make a list of other things I need to order to finish up like electrical stuff like plugs and
stuff. Yeah. I mean, you don't even have your tube bender yet, right.
That's ordered, but it's it got shipped on Monday.
Oh, nice. Okay, so you'll have it maybe by the weekend. Yeah, I
won't have any tubing. No, I haven't ordered that yet. I'm still trying to shop around where I live is yet well, I need to figure out how much tubing I need. So I need like, I want to finish all the fittings on the pots. Yeah, then measure everything. Yeah. And then I'll start ordering tubing and I think McMaster I think that's so far the cheapest I found the stainless tubing. Yeah, because I can get it in like six foot sticks there. It's it's like $2 ish foot. Not cheap. I can get a I get a roll of stainless really cheap, but I don't want to frickin unroll roll that thing and make it straight. Oh, no, that sounds awful. Yeah. Yeah, but they do make tools that straightened tubing. I don't know how well those work, though.
Sounds like another tool you need to buy.
And I've already bought a frickin almost $500 tool already. At least it's gonna be useful for other things.
Your your your way in the hole when it comes to this brewing rig.
Yes. You can even go farther back is like, huh, I bought a welder so I could weld this card. And that was like three, four years ago.
Is that why he bought the welder?
Actually, yeah, I've done a lot of other projects with it, but not the one I originally bought it for.
I still need to build my welding cart for my welder. I bought my welder such that I could build a welding cart for it. And that's usually how it goes. Yeah, that's, I'm sort of crossing my fingers that maybe over Christmas break. I'll have a little bit of time and maybe a little bit of extra cash to slap together. A card for my low cardholder. Yeah,
yeah. Yeah, I need to build a proper cart for mine because I've got the Harbor Freight jabi Yeah. Which is whenever I have to go bring it from like in the garage to outside. There's like a four foot step it has to go down. Oh, geez. I don't know how many more trips over that four inch gap it can take before it just completely falls apart. Nice. Just thin sheet metal.
Oh, yeah, I see. I want to make I want to make nine out of one or one and a half inch box tubing.
Well, that's what I want to do. It's just I haven't I bought a $40 carton said. Yeah, yeah, yeah. Don't blame and it works great if you just have to wheel it around the flat area works great the moment you have to make it go up or down a step. The whole thing like shutters and shakes as it moves
sounds like sounds like standard fare for harbor freight.
Though I do have like a larger welder than it's designed for in like a ginormous gas tank on it. So,
you know, that's, that's the thing about my welder that that I would rather do custom on it is because I got a TIG welder. That is the aspect ratio of the enclosure, it's very tall and thin. And most of the welding carts you find are more for like the Hobart's and the Vulcans and things like that where or, you know, all those other guys where they're way more Stubby. And I've seen people put my TIG welder on those cards. I'm like, Ah, that just looks like it's gonna fall over. Like you hit a twig on your garage floor. And and it's all over, you know?
All custom from here on out. Yes. I mean, hell, you bought a welder. So you could do custom stuff like that.
So I didn't make my welding table. So that was nice. So even up to seven.
So I had a thought actually had this thought a while ago when we were doing the useless design contest or the useless. Okay, whatever useless project.
The trophy that we created for that included a seven inch touchscreen for the Raspberry Pi. And we had purchased multiple of these touchscreens just basically one for me and one for Parker. And the one I had was mainly to get dimensions and to test fit when I was machining the case, but I ended up hanging on to the touchscreen. And I was like, you know, eventually one day I'm going to do something with this. Now, I'm not actually starting a new project here. I'm I'm withholding that I'm
like looking at this and I'm like, Huh, what are those other projects that we need to get done?
Yeah, no, no, no, no, no, I'm prefacing this as in this is a project that one day would be really fun. And I think it would be really fun because it might be something that could be fairly simple to do. But it's just an idea that's been floating around, I saw this this touchscreen, which is basically just a, it just connects to a Raspberry Pi. And bam, you've got you've got a seven inch screen. It's sort of the right size for a retro gaming console. Like it just everything seems kind of nice about it. And the biggest thing is, it's a flat screen. And it's shallow. So think of like a Nintendo Switch. You could do something Nintendo Switch esque. I mean, it would wouldn't be that thin for sure. But that's the first thing that came to my mind. And really, when it was that idea, I started thinking about it. What if what if I wasn't aware? What if I was to approach making a handheld retro gaming console? But without having any kind of electronic knowledge? Like, what if I was just a machinist? And I was like, Oh, I can make a case for this. But I want to make a retro gaming console. And so I kind of challenged myself the other day to just see like, Okay, how easy would it be to actually make a retro gaming console? Assuming I have a mill or a 3d printer available? And the enclosure wasn't a difficult thing? What would it take? And it's kind of cool to do that exercise in your head where it's like, okay, I don't get the luxury of designing my own PCB. I have to just buy off the shelf stuff. Can you even pull this off? And surprisingly, you can nowadays, and it's kind of cool to see that hobby electronics have come a long ways. Especially since when when I was younger, like Hobby electronics meant you got a bag of parts and a breadboard or you got like a schematic that just made some something that just made an awful buzzing sound or, or you wound your own pay that
makes sales made a sale. Yeah, right.
So to kind of just like, visualize this, okay, so once again, if I was just a machinist, I knew really not much about electronics. Like how could I go about making a retro gaming console and sort of the one stipulation I put on that is
the the most amount of electronics I would allow myself to do is just solder wires together. So no, like buying loose dip sockets and things like that or like breadboard or perfboard stuff soldering, just like okay, so if I if I buy a board and it has holes on the side, I can solder to that. So this screen, you can get it right on Have a bit of fruit for 80 bucks at a fruit has a nice little power board. That's called the power boost 1000. And it basically interfaces with LiPo flat pack batteries. And I found a flat pack battery that is 2500 milliamp hours. And it's 15 bucks, and it plugs right into this power boost 1000 board, which is 20 bucks. So that's 35 bucks for your power section. Cool thing is it's, it charges over USB, but you can also utilize, it does hot swapping. So if you want to just run your retro console off of USB, just plug right into this board, and it'll power your PI and it'll power the screen. And then on top of that you need a Raspberry Pi Zero, or I mean, you could do it with a regular PI. But I was thinking more about space constraints and things. And the Pi Zero would be a better solution in this case for that because you don't have any connectors on it. Right. And for my gaming purposes. My consoles of choice are the NES and the SNES and the Genesis and things like that and maybe play something on PlayStation or something like that emulator. So I don't need something with a lot of grunt, I basically just need it to be a capable of playing it. 16 bit console stuff. So Pi Zero was perfect for that. And so you know, you get your Pi Zero, you get what is it RetroPie on an SD card. And effectively you have the meat and potatoes there of everything. Sort of the the only thing left? Well, two things left really are your enclosure. But like I said, assuming that I had the capability to either 3d print one or machine one out of some material, the only thing left is your inputs. So your your buttons, your D pad or your joystick or whatever your choice is. And that's where I found the hang up there. At least in all the searching I found, I didn't find something that really seemed to cure the itch. With that. I mean, there's there's plenty of options for inputs and buttons and things like that. But nothing that really worked for what I was thinking because the the screen that I have that seven inch screen,
I can't remember the width of it. But it makes sense to hold it like a Nintendo Switch where you have your your some buttons on the left side of the screen and some on the right side, which means that if you're not designing your own custom board for it, you need a way to have your D pad or your joystick on the left side of the screen. And then you need input buttons on the right side of the screen. And there just really isn't a lot of options out there for you know, here's a board that interfaces with a Raspberry Pi that just has buttons. And here's a board that is just a joystick. So that's kind of where I got my hang up. And that was a little bit disappointed. Because as I was going through it, I was like, Yeah, I can totally do this. This is pretty straightforward. And surprisingly, well. Maybe even unsurprisingly, there's a ton of people who have done this before. And so the internet is just absolutely filled with people who are like, here's how you accomplish these things. But a lot of times it ends up just being you know, somebody buys a Super Nintendo controller, and then they take a hacksaw to it. And they put the D pad over on the one side and they're done that yeah, and don't get me wrong, that's, that's totally fine. But
totally fine. If you're making like a one off for fun in your basement, and things but I was thinking more like, it would be nice if you could just buy. Here's a PCB that has four buttons and contacts and connects to your pi. So unfortunately, I think that's where the concept of this project kind of fell off. I wish I wish that was available. I mean, there's plenty of boards I've found that are just buttons, or just a joystick, but they still need to interface with some kind of logic chip, which kind of defeats the purpose of what I was saying earlier, like, the kind of game I was playing is you can't like the most electronics you could do is solder or plug things together.
So regardless of solder chips on boards,
exactly, exactly. It still would be a really fun project to do. And after I priced it out, I think for about 150 and that includes an aluminum enclosure. I think for 150 bucks, you can make your own custom
retro gaming console, which, frankly, How incredible is that that you can get like a full on like portable, rechargeable thing. And frankly, the most amount of design work you'd have to do is the enclosure. Like everything else is just like plug and play. I don't know. I think that's that's really fun. I do those kinds of exercises a lot actually where I'm like, Okay, if I were to do something like this, what would it take? And How easily could I do it? That was a that was a fun one. But I don't feel like going through and in chopping up other people's PCBs, and then you scraping away solder mask and soldering to Rockhopper.
If I were to do this one, I think what I would do on a custom, I would actually use all those parts that I talked about. But I think I would make a singular custom PCB that kind of surrounds the screen. And it has pads for the D pad on the left, and it would have multiple pads for your buttons on the right and maybe starting selecting things beneath the screen. And so one board that's basically just button contacts and things like that. But sort of defeats the, the rule that I put at the beginning where he you don't know how to design a PCB.
Tool X, you could probably buy a cheap controller and then pull off the membranes and the actual switches, but the plastic buttons and
parts. Yeah, a lot of people do that. And in fact, I even found a place where you could buy new old stock buttons and l&r shoulder buttons and things for a Gameboy Advance because people do that, exactly that, you know, they, they they design those into whatever fun little project they're doing.
I've always wanted because I used to make portable consoles like hacking up Nintendos and Super Nintendos and Tories and stuff like that. And looking back on it, I think what I would like to do is make a new one, but just in the kind of having done a lot trips and stuff is having the controller buttons attached to the device. I don't really care about that that much. Looking back on it, like just be able to set up kind of like how the switch has like, little flimsy kickstand kind of thing. You just set it up. And then it has a controller that's with it. Oh, yeah, yeah, yeah, for sure. And then that way, you can use a real controller, right, that you would normally use for a console. And then that little box is all the logic and
stuff like that. You know, that's what I've actually done. More recently, I take my switch when I fly. And on flights, instead of using the the joy cons that connect to it. I'll bring a full on controller. That's why and you just you just said you said it on the little tray table that comes down. And then you know, you put your controller between your legs, and you're good to go.
Yeah, the only thing is that doesn't work for like if you're on the bus, or a little harder in a car. But most time when I'm like actually going to do like portable gaming, it's on an airplane or at an airport. I'm not doing it in a car or on a bus or waiting around at the bus stop or whatever. Right? Yeah,
yeah, no, I mean, the same with me. Like my switch exists in two places, under my TV, or in an airplane, if I'm flying like those. That's it. So, another another thing, though, that I found kind of a little bit annoying. I'm curious to hear your opinion on this. There's lots of DIY controllers and even out of fruit sells, like, you know, button boards and things like that, that you that you could totally use to do exactly what you're talking about. Where Yeah, you make the brains and the screen is involved there. And then you just plug this controller in. But when it comes down to the hacker and the hobbyist style controllers, man, most of the time, they feel like crap. And they're really, really small. And they use tactile buttons for everything. And it's just I don't know, I like it that just doesn't feel like a good controller that you can actually play a game on.
Well, because those are off shelf parts. Exactly. The actual membranes and contacts require custom boards and a custom membrane.
Well, right but But what I'm, what I'm getting at is if if you were to invest $150 And a good bit of your time into this, I would hate to like make a really, really nice thing and then have it feel like crap. Oh, yeah, you know, and the tactile button thing is just like zero started for me. I
would know, a long time ago I found some buttons. I can't remember who made them but they they are like membrane tack switches, or they're like dome switches or whatever. Kinda but they're like the membrane switches that are underneath the controllers. Okay, except that they're in a six millimeter by six millimeter by three millimeter format. Well, that'd
be cool. Do you have the part number for that?
No. I actually started looking for like, where cuz I made a post on a form ages ago with a part never really find it.
That's Yeah. How'd you how'd you run into those?
I think it was just searching a Mauser forum. Nice.
So maybe maybe down the road, that'd be something that could be fun. Because especially if, if I had just had all the parts available to me, and all I had to do was machined the aluminum. I have that capability pretty easily. This seems like a project that could be done in an afternoon, you know, machined the case, and then just like, basically glue everything together. And when I say glue, I mean, like, just connect it all together. I would, I wouldn't machine the case such that everything had either screwed in or went into slots or something like that. But this doesn't seem like a project that is months and months of design work. In fact, it was sort of designed like the project was developed in my head as like, it's supposed to not take a long time. Don't make this take a long time. Yep, yep.
There's actually a different design philosophy of thinking about your projects that way. Of, okay, what is the bare minimal or easiest to get satisfaction
from? Right, right, exactly. And you, when you start doing stuff like that, you start looking at the prebuilt things like Okay, so this power boost circuit, I could design a power boost circuit, or I could just buy a $20 off the shelf thing from Adafruit and plug a battery into it, and then plug a USB and I'm done. Okay, Jack, that's how you would do this. And frankly, that 25 milliamp hour or 220 500 milliamp hour battery, I have no idea if that would would work for this. Well, I don't know if that's 30 minutes of gameplay or six hours of gameplay. I have zero clue. I just picked it because it was big.
I did do a little bit of googling. I still can't find it. Odd to dig through my archives that it's got exists somewhere.
I'll never know you vide. Yeah,
I made the post about it. Yeah, I guess I guess, a decade later, remembering 12 random characters is wasn't really high up on my priority list in my brain.
At the time, it probably was though.
Yes, probably right.
All right, under the RFO
RFO. Okay, this is one that's been a hot topic on Reddit and Hacker News and a couple other different places. Deep PCB, pure AI powered cloud native printed circuit board routing. So this is a auto router that uses deep learning to route your board. And so it's got 24 hour turnaround. And that's the thing that was that I couldn't think of any boards that I could give this thing that I couldn't route in less than 24 hours.
Now, I've got some boards that would take long in the net should send them over to him. Well, I mean, a lot of these boards are client boards. I'm not just gonna set random client boards. I just I just finished a six layer board the other day, but two days should
pay for. I think it only does two layer boards right now. Oh,
okay. Yeah.
I really, I was thinking about this. And I think we talked about this a couple podcasts ago is the hardest part of PCB routing. Isn't the routing, generally, it's part placement.
Oh, yeah. If you, if you've done your homework ahead of time, and you know, your part placement, then the actual routing, the connecting of the dots goes really, really fast.
It's like, how does the AI know that that's a differential pair. Unless you told it.
It what this is, is it's just auto routing with more steps. Right? Sure. No, frankly, it is I mean you Okay, so yeah, it can hold the title of AI but I mean, how is that different?
Yeah, yeah, exactly. is a series of if loops different from an AI if I see pizza I will eat but it's neural. Yeah, my biggest problem is like how do you define differential nets stuff like that, like said that you know, as the designer of the board, that these things need to be routed this way because of the signals crossing them. I bet you more high end EDA tools you can put that stuff in. Because I think there are some EDA tools out there that like cadence, the one Is that we complain about a lot that you can actually like, simulation. And it Oh, PCB
PCB level simulation. Yeah.
Yeah. So you would need to know like, oh, that's gonna have a 500 megahertz clock on it or whatever.
Right. You know, the one thing about it is I, I visited the website for this deep PCB that's DEP pcb.ai. And, yeah, sure, it's a beta version, but they don't have any pictures of like an actual routed board. So does it just look like auto routing? That's just done in 24 hours? I don't know. I would love to see what, what actually happens here. I'm looking at their FAQ page. What do you know about hardware? That's a question
about hardware. So what do you know about hardware?
We have significant domain expertise in hardware and electronic design automation. Several of our team members have worked many years in companies such as St. Micro NXP dialogue, Sega, etc. We believe is is an exciting time to be working on PCB design automation. And because we have both AI and hardware expertise, we could be well positioned to do so. I don't know it'd be fun. I would love to put a board in there and just see what comes out.
Zero comes up. It looks like you need KY CAD though.
Right? It's this is all Yeah, KY CAD, right?
Yeah, it's KY CAD, currently.
Oh, there's a launch video. Oh, okay. So in this video, they actually show a lot in a lot more depth. Wow. It's a it's an hour long. an hour long video. Yeah, an hour long video about instant deep. Hmm. Okay.
Interesting. Well, we'll have to see what happens with it. Cool. Well, I'll take our jobs. Actually, routing shouldn't be a big part of your job. Hey, speak for yourself, man. I don't know if I can click a button and it routes for me because that's just tedious work at this point.
I really enjoy routing, I would rather routing be a majority of my job.
The exact opposite. I'd rather do schematic and then do placement and be like, take it from here.
I like the puzzle aspect. Like I was saying I did a six layer board the other day, that was just a It was fun. Just you I don't get to do those super often. So being able to, like, reconfigure my mind to think about it in six layers is I like
that. I just I think from a engineering perspective, it's not a very useful use of engineers time.
Robbing a board. Yeah. Hmm. Okay. I, in my opinion, writing a board is just as important as the schematic side of things in terms of getting the end result that you want.
Sure. That's why I say placement. And then after placement, it's like, shoot a lot of most of my designs, like my placement, is that good and automatic. Probably just barf it out. Perfect. That's great. I mean, you've seen a lot of my design. So.
Yep. So on this, this next RFO this is actually something I ran into. And it's a this is a pretty quick one. But it's worth mentioning that because it kind of caught me off guard a little bit. Apparently, not all PCB manufacturers are the same. dumped on don't know what I mean by that is I actually say and when I ordered a board the other day, and I went for black Max mask on it. And on this board, I had multiple areas that have six mil clearance, which six mil for most of the boards we do, that's low, but for this particular board, that was fine, and we've we've done six mil clearance plenty of times, but apparently our PCB manufacturer barfed on that and complained about it, because with black solder mask from them, they can't hold six mil, but they can with green interest and the same with white they can't hold six mil on white. So for their high tolerance stuff, green is your is your color. So just you know, that's something that just keep in mind. Frankly, I had not run into that before. This is the first time I've ever even heard of that either. And the thing is, I know for a fact that's not the case of all PCB manufacturers. So before you start going making you know multicolored all kinds of wacko boards know that there might be some extra criteria that you need to know before doing that. And it never hurts to ask your PCB manufacturer.
Yep. Or just find another PCB manufacturer because there's like a zillion of them out there.
Right. But I mean, if you already have an established, established contact center, right, and a relationship and pricing and things like that, but frankly, I didn't know that and and I would have probably changed things around.
So what do you have to do?
These are all prototype boards. So there's, there's no problem with them being green. So I just went with green. But it was just, it was kind of a little bit of a shock in a way because Wait, I thought, I thought we could do black. But no worries. I might have to move some things around if If this ends up going to production, which I mean, that's the goal. This is prototype number two, the first time around, I did green, and there was no issues. Second time around, I asked for Black. Now there's issues.
So is that is that six mil in between, like, pads for like an SMT? Part? UEFI?
Yes, yeah. Okay. Which, which that's tight. Yeah. And I mean, some manufacturers are just going to complain about that as a whole with any color. Yeah, you know, but if your stencils good enough, you don't want your pace, you won't have to worry about it. No, it's more about the PCB manufacturers ability to place mask in between six mil stuff. Some Some manufacturers don't like that. That's a little too.
I wonder if it's with their aeoi their alignment, huh. Yeah, that's a good point. And so instead of actually being a physical thing with the, it could be the paces, or the that LPI liquid solder mask is is thicker or thinner than the green, I actually would just be the aeoi can't pick up the white and black as well as the green. It's like calibrated for the green. We do
have issues for sure. With different colors and our pick and place machine. Green just works. It works really well. But but other colors, especially white, makes pad detection kind of difficult.
With our old GSM was like that it was really bad with any of the green. Oh, especially yellow. I remember yellow was awful. Yeah. Yellow was bad. And then then we got to my chronic and that was okay. But then our new micronic that we got as got a 4k image sensor forte.
Yeah, that's pretty sweet. Yeah. Nice.
So yeah, it, it can pick up, whatever. So. Yeah, remember the the GSM. Like, if you had, like, the light on the other side of the building on, it wouldn't affect it? Because it was like, put a glare on the board. Yep.
Yep. The the machine we have right now with a Samsung, it has inner and outer LED rings. So you can shine light at different angles on your part. And you can actually set up the lights to shine specifically for specific components in specific applications. Sometimes that's what you have to do you know. So this depends, especially like weird odd shaped surface mount switches. Those are the worst. Especially when they don't have good contrast between the pins and the body of the switch. It's game over. They're really hard to detect.
Yep. Yeah. Really hard to detect.
Cool, so yeah, keep keep keep that in mind. Like every little button, or every little thing that you mess with on your on your PCB could have an impact on could it even
yields? Yeah, yeah, right.
And then this last RFO was just something goofy. I found when we were searching for our foes. I've titled this. Has the water analogy gone too far.
Basically, what is the water analogy? Well, okay.
Effectively, everyone who goes through electronics, one on one learns about voltage and current.
In my classes. We didn't do this. You didn't do the water analogy. You. You brought this up to me when you were at the fab. I was like, I have no idea what you're talking about. Can
everyone does the water analogy, where current is the flow of water and voltages, pressure and a pipe? Basically? No, no, doesn't ring a bell. UT didn't do that.
He didn't do it. So I found this one. This website. I don't even remember where I found it. But basically, they were suggesting thinking of the water analogy as a little bit more in depth, where they're almost thinking of electronic components as appliances or things you would find in your bathroom.
water usage, the water uses devices.
So like they're showing they're showing the hole Okay, so if you restrict a pipe, it's kind of like a resistor or whatnot. But then they transform this idea from water pipes into schematic symbols, but they're Cymatics schematic symbols for pipes that are called, or I'm sorry for resistors called pipes. But then they also have a potentiometer. That's a shower and fixed resistor. That's a toilet. Switches a toilet. Yeah, well, yeah, basically a Switch isn't, right. Yeah, you switch it on, but it still has some water resistance. And it's like, Wait, okay, eventually, you're going too far with the water analogy. And I think this is a great example of going too far. Although I do like because later in the article, they they discuss the toilet as being digital because it only has two states. And they shut it off, right on and off in the shower is analog, because you get to choose any any bit in between there. But eventually, you just need to say like, Okay, well, we're done with the water thing. Just start learning electron. Yeah.
So who uses like, the pressure regulation on their shower at all? I just turned it freaking full blast and just adjusted temperature.
Yeah, I don't know. You're right. I don't know. Like, does anyone just like leak out their shower?
I don't know. Let us know. In slack.
Does anyone shower you have that capability? Now that I'm thinking about it? You're right. It's just temperature control, isn't it? Yeah. Yeah. That was one of the things when when my wife and I were searching for our house, we were very interested in the water pressure because no one likes taking a week shower, you know? Oh, no, I want it to be hot enough that it feels like it's like pulling my skin off. And it like has to be like, pounding you on the back. Like that's a showery. Yeah, that I guess what does that low resistance? low resistance? Yeah. All right. Well, I think that's probably going to wrap that up or write about it. I think it's a wrap up episode. Okay. So that was the macro fab engineering podcast. We were your host Stephen Craig
and Parker Dolman Take it easy. Later everyone. Thank you. Yes, you our listener for downloading our show. If you have a cool idea, project or topic, let Steve know. Tweet us at Mac Feb or at Longhorn engineer or at analog EMG or email us at podcast at Mac fab.com. Also check out our Slack channel. If you amazing community. We have over 400 people in there now that are engineers just like you. If you're not subscribed to this podcast yet, click that subscribe button. That way you get the latest episode right when it releases and please review us on iTunes as it helps the show stay visible and helps new listeners find us
This week's topics are: Porsche's Synthetic Gasoline, Record Chip Manufacturing Sales for the year 2022, and the Raspberry_Pi Social Media Firestorm.
Right to Repair is going global and Stephen might have solved his injection molded component's void by tweaking the mold design.
AI and ChatGPT have been in the news about how it will change world views or will it be relegated, making sure NPCs in video games don’t repeat dialog?