Will the Rebel Codebreakers be able to emerge victorious against the Empire, or will they succumb to the overwhelming power of the Empire? Tune in!
Mandatory USB Type-C for everything? Parker and Stephen discuss the current EU ruling and preparing your PCBA design for contract manufacturing!
Topics include StarWars, NASA, Magnets, Perpetual Energy, and Virtual Grounding.
Visit our Public Slack Channel and join the conversation in between episodes!
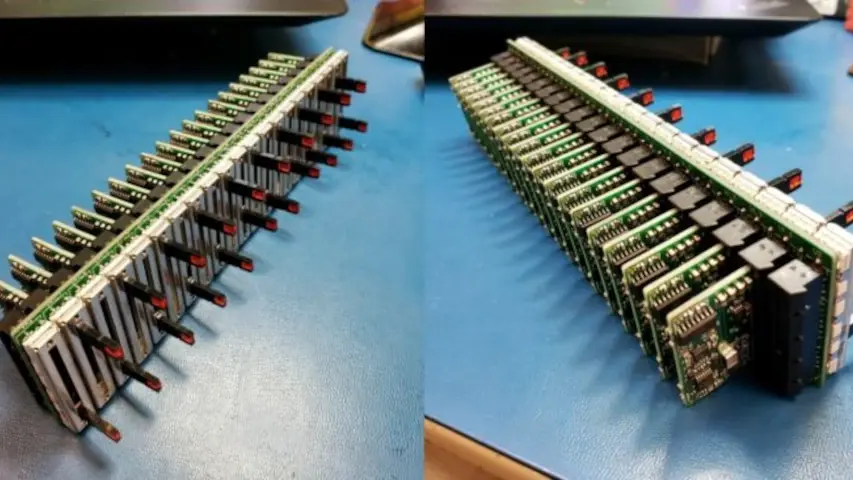
The Venti-Q assembled. The PCI-E card edge idea worked out well for Stephen.
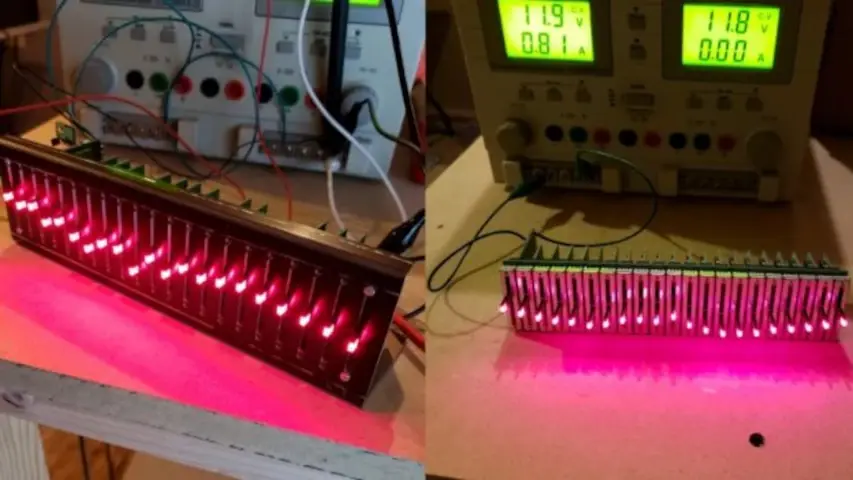
Stephen’s Venti-Q powered up. Red LEDs on the sliders looks legit!
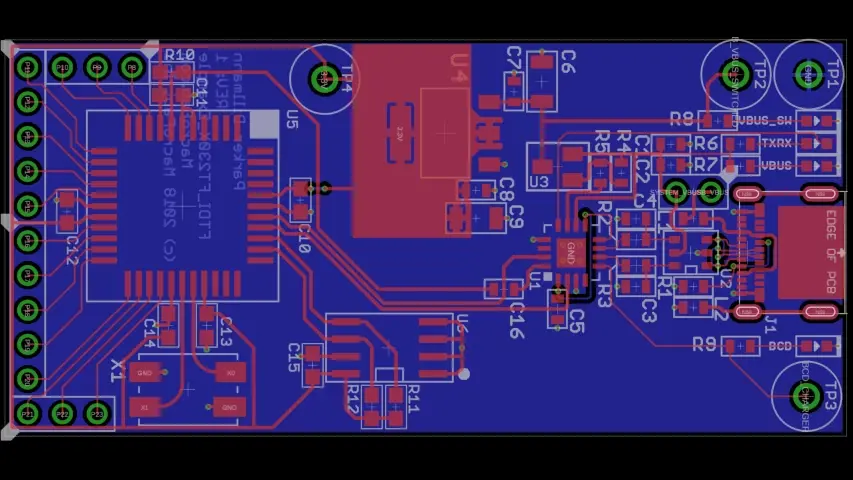
USB Type-C example layout circuit using a FT230-X and a Parallax Propeller.
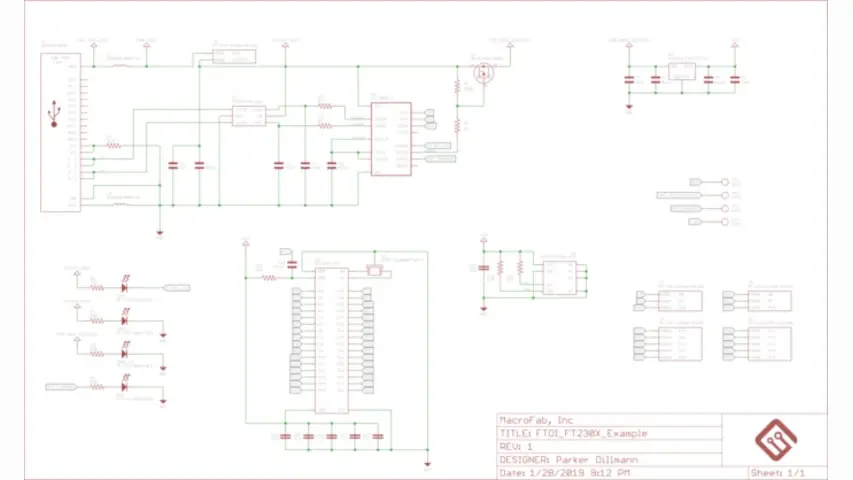
USB Type-C example schematic circuit using a FT230-X and a Parallax Propeller.
Parker's Star Wars Thermal Detonator is 95% complete.
Parker is an Electrical Engineer with backgrounds in Embedded System Design and Digital Signal Processing. He got his start in 2005 by hacking Nintendo consoles into portable gaming units. The following year he designed and produced an Atari 2600 video mod to allow the Atari to display a crisp, RF fuzz free picture on newer TVs. Over a thousand Atari video mods where produced by Parker from 2006 to 2011 and the mod is still made by other enthusiasts in the Atari community.
In 2006, Parker enrolled at The University of Texas at Austin as a Petroleum Engineer. After realizing electronics was his passion he switched majors in 2007 to Electrical and Computer Engineering. Following his previous background in making the Atari 2600 video mod, Parker decided to take more board layout classes and circuit design classes. Other areas of study include robotics, microcontroller theory and design, FPGA development with VHDL and Verilog, and image and signal processing with DSPs. In 2010, Parker won a Ti sponsored Launchpad programming and design contest that was held by the IEEE CS chapter at the University. Parker graduated with a BS in Electrical and Computer Engineering in the Spring of 2012.
In the Summer of 2012, Parker was hired on as an Electrical Engineer at Dynamic Perception to design and prototype new electronic products. Here, Parker learned about full product development cycles and honed his board layout skills. Seeing the difficulties in managing operations and FCC/CE compliance testing, Parker thought there had to be a better way for small electronic companies to get their product out in customer's hands.
Parker also runs the blog, longhornengineer.com, where he posts his personal projects, technical guides, and appnotes about board layout design and components.
Stephen Kraig began his electronics career by building musical oriented circuits in 2003. Stephen is an avid guitar player and, in his down time, manufactures audio electronics including guitar amplifiers, pedals, and pro audio gear. Stephen graduated with a BS in Electrical Engineering from Texas A&M University.
Special thanks to whixr over at Tymkrs for the intro and outro!
Welcome to the macro FEHB engineering podcast. We are your hosts, Stephen Craig and Parker Dolman. This is episode 157.
So last week, I was talking about my Star Wars detonator project. And I actually managed to stuff it into the enclosure. So I've put it in the webcam for Steven to see.
Oh, yeah, cuz we got we got an audio sample of it exploding last week.
Yeah. So here it is again. But this time you can
Yeah, it actually works with like the slide switch. And the LEDs are doing stuff.
Yeah. So what will happen is I'll take some pictures, the insides, but there's a little lever micro switch in there. So when the the slider switch on top of the thermal detonator slides back, it hits lovers, which hits the micro switch, and then that just actually just powers on the whole board. And it just runs through a state machine and at the end that goes to a while loop and just sits there until you turn it back off. It doesn't keep repeating. But the insides got a Arduino Nano, the LM 386 amplifier, and a piezo. And then a nine volt battery. So that's got some heft to it. Because at nine volt batteries pretty heavy. And also as for LEDs, yeah, it's got four LEDs, three orange ones, and one red one. The only thing left to do with the project now is to make like a little stand, 3d printer stand for it. And then I actually printed the lenses that goes on the red LED. But I can't find them. So I'm gonna have to reprint them.
So I'm curious. How did you how did you mount the microswitch? Inside? Because it's a curved surface?
It's got a little tiny ledge in there. Yeah, that's flat. Okay. And I just glued it to that. I'm assuming that's what the original designer of this model intended. Okay, yeah,
yeah. Was that a thing of verse model?
It's a three verse model, I can push the, the model link in our in our description. So it's after this thing's done. So but yeah, I needed to put that little lens in there. And then like, make it all grimy, and then shoot it with some clear coat? Yeah. Nice. I'm pretty happy with it. And I've been trying to think if I want to continue, because I've made my prop. And I'm pretty happy with it. It's like, do I continue with the project and like, make it better? Or go on to something else now?
Well, what would you do differently?
Well, like right now, like, if you open it up, it's just like a mess of multiple boards in there, the batteries, everything's just glued in. I don't like using hot glue and projects, because it's like the moment something breaks, it's impossible to fix. And so what I'd like to do is take take the model, put some standoffs in it, and then build a board in there that just mounts in there with screws and change the battery over to a lithium, so you can just charge it because right now the battery is actually hot glued in there. Oh, it's one time it's this, once this battery dies, you have to basically rebuild it. Got it, we're just fine for a prop, that nine volt battery will last forever. And like this situation until it like you know explodes with acid.
You mean it becomes a thermal debt
of acid. And like some things I'd like to change is I want to change the front with LEDs, the orange LED show up, I want to actually put like some frosted lenses in there. So that like diffuses it a bit. So it looks more like it does in the movies. And make those LEDs just mounted on the PCB. Like maybe even use light pipes for that part. Like make it more an actual product design. Instead of a like hack together. Prop. Gotta be pro, right? You gotta be pro. And so I've been thinking like how to do that. And I can eat like, it's that's not a hard problem to do. Like, it's just a little more 3d printing and some board design. But it's like I made mine and I'm happy with it. So if anyone else is interested in these kinds of things, like make a kit, that's this board, like you can just get all the files and make your own now, so you don't have to have the, you know, hot glue skills that I have to put this thing together.
It would be really it would be really awesome if it could be single board that includes the battery on there and the switch and the switch and the LEDs were the two clamshells of the device just so sandwich the board. And you're done.
Yeah, I'd like it to make it so that like, because right now the lid just kind of slides on, I want to put a walking mech, so you put it on and then twist it. And it kind of just, it doesn't have to like lock it, but needs to be better than just a slip fit. Especially with 3d printed. Yeah, 3d printing parts. All that stuff is doable. It's just do I put the effort through to do it? Well,
I mean, it looks great. So this is one of those situations where I'm assuming you probably won't, unless somebody wants you to. If it's up, if it's up to you, the answer is probably no,
yeah, it's up to me. The answer is, once I like finished the paint and stuff, it's like, I'm happy with it. But if someone says even if it's like, one person says, hey, I want to build some of these. I'd be like, Okay, let's do this. Let's like, let's put someone get on Slack and say, I want to build something. But the thing is, I got to go on the honor system, they gonna want to have to build them too. So I'll put all the work in to do it, because then I can make like a really nice version. Right? Yeah. But um, maybe the
I bet you there's somebody, there's some movie prop forum out there that wants, you know, thermal detonators? You know, I, I can almost guarantee you, there's someone out there that wants that.
And I wouldn't even sell them like, done or anything I'm like, I would be like, here's the models I modified, because I don't own the original rights of the model. Right. So like, I modified them. And they're open source because I think the original ones are open source and Sir on Thingiverse. I guess I didn't need to look at the thing. But some like you can print them wherever. And here's the board design. Athan, and here's the code.
Okay, so two things on that. First of all, you should you should post on the Thingiverse. Page, you should post that yeah, you should absolutely do that. People will go there and be like, Oh, my God, I gotta get that. But what I see that thermal detonator being is a fantastic project for makerspaces. Where, like, in order to prove I know how to 3d print, I know how to work with Arduino. I know how to code. I know how to solder all of these things put together. Like it's kind of like a test bench in Yeah.
Yeah. It's kind of like it rolls up your entire maker experience in one little ball.
Well, and I say that because the TX RX the MakerSpace. In Houston. I don't know if they still do this that they had in the past, they used to have maker bricks, where you would make a maker brick. And it's sort of proof that you know how to use the majority of the tools tools there. And yeah, like you had to be able to 3d print, you had to be able to code you had to be able to solder. There was a handful, I think you even had to use the CNC because they had like steps in order to make a maker brick. And then once you were done, you would hang your maker break on the maker wall. And like you could see that like oh my gosh, all you know all of these people have made bricks and they're all lighting up and doing stuff. And so I could see a thermal detonator being a version of a maker break.
Yeah, that'd be cool. So let me know in Slack or on Twitter, if you're interested in making some of these, because I'm just glad to how well went together like I it's pretty compact inside of it. But yeah, I can totally see this being a nice kit. For like, was it the five oh, first Stormtrooper army people that were it's almost like Civil War reenactment, but for Star Wars. you've ever seen that where they dress up as the five oh, first. Storm Troopers? Is this some kind of like fan video or something? No. It's like a whole group. That is like it's like a nationwide thing where you can join the firewall first and build your own Stormtrooper armor and stuff. That's gonna and you go to like conferences and cons and stuff and wear it. Oh,
that's cool. I didn't know about that. Yeah, you know,
it's actually really I want to do and you're gonna roll your eyes is here in Houston has Houston has the largest collection or largest group of people who have Jurassic Park Jeeps? Oh, really? Yeah. The YJ tan and red Jeep Wrangler jeep? Yeah, so I'm always on the lookout for one of those y j's that's in the right price bracket. I'm like, Okay, I'm gonna build a a Jurassic Park cheap.
You know, I was playing video games with some friends the other night. Friends that that Parker knows and Parker wasn't on and the other night they were like you know, Parker needs to just convert his jeep into a Jurassic Park cheat. And it's it's funny you say that because I was driving down the road the other day and I saw a Jurassic Park Jeep and it was like, straight up like with the the logo and everything. I even took a picture of it, I was gonna send it to you. So yeah, no, I totally think you should do it. But the one I saw the other day was was super classy. It was like the red and gray version. It wasn't the jeeps or the vehicles that were like super neon green and yellow. Yeah, that's
what I'm talking about is the the sand color tan and red. Like the actual wrangler Jeeps they had the one that Newman gets eaten out of, by the spitter.
Yeah, right. Yes. That's such a weird thing for a city to be like, This is what we're best at Houston.
Margins group for those. What it has like two, I think there's like that's, that is actually yes, it go. If you join the group, I think you have to go online and figure out what number to like they have you sensel on it. They see I realize, I don't know if it's like, I think that's probably an unwritten rule is because no one wants had like the same numbers.
Right? Of course. Yeah. It makes sense. Okay, so your next product, your next thing is to 3d print a, like a Tyrannosaurus and put an Arduino Nano on it and have it play like
yeah, oh, that'd be cool. Like set up like a projector that would project into your side mirror. And so every so often, you'd look over and there's a T Rex there, and your side mirror? Yeah.
objects appear closer.
Well, that went off the rails. You know,
actually, okay, so I'm gonna go a little bit more off the rails. projector that so so in the Slack channel this week, I was I was talking with some of some of our folks in there about building a bench because I'm trying to build a new workbench for my basement. It's specific and electronics one, and I can't remember who it was, I apologize. But they brought up a really cool idea that I think was taken from a Hackaday something or other. But apparently like this idea, I love it. It's augmented electronics workbench, where instead of having like your oscilloscope up on a shelf, or looking in front of you, or something like that, have a vertical projector that projects down onto your bench. So while you're working on your circuit, it can project your oscilloscope
screen. So you can still be looking at your hands and then just glance over to like your desk area.
Exactly, or your meter or whatever, you know, like have a webcam that's looking at it or, or I don't know, maybe there's maybe there's some more fancy way of doing it. But that's what came to mind was like, Oh, that's such a good idea to have, like I circuit, you know, right in front of me. And directly to the right of it projected on the table is my waveform or my voltage or whatever. It's like, Oh, that's such a good idea. I mean, I'm probably not going to do it, but it's a good idea. It's
a really cool idea. The only issue I see with that is projectors need to be it needs to be really dark for it to work. And usually workbenches are like, blindingly nuclear, like light hots everywhere.
Oh, yeah. Yeah, yeah, for sure. And actually, what was it there was there was three things that I've found in electronic workbench that are paramount. First one is it needs to be deep enough. And that's one that you don't think about a whole lot. And it depends on on what your test gear is, but like my oscilloscope is freaking deep. So if I put my scope will actually you I'm see I'm looking at your oscilloscope and your picture right there. It's like a foot and a half deep. So to work on something in front of your scope, you need another two feet in front of that,
yeah, this workbench is not deep enough and it's got six inches in front of the scope.
You can't work in front of the scope. Okay, so that's the first thing on a workbench, you need a deep workbench. Second thing you need tons of light, like that's absolutely critical, like and focus like you don't need like, light everywhere. If you have a fluorescent tube that's right on your bench. Like that usually works pretty well. And then I don't remember what the third thing was, but maybe it was power or something like that to
have enough outlets. Yeah, outlets, right. And I would say depending on what you build a good like magnifying glass like either one of the ones that's the magnifying glass that's on like a ring light kind of setup. Or I'm like at the point where I'm like a microscope is like the best thing ever. Oh, they're so great. I would I'm actually at the point where like, I would rather have a microscope than like an oscilloscope
that's a little much but but I do understand what you're saying and like if I ever worked on on surface mount anything now I do it under a scope.
Yeah. It just makes it so much easier. It's like I used to like it's no longer like five years ago like solder oh four, two by hand without anything, but now I'm like it's so much She's here to use a scope microscope. And for like 300 bucks, you can get a really good one. So, yeah, you
can get an E again. Okay, so And on top of that, I think it's worth noting, like, if you go on Amazon and look at like aim scopes and stuff like that you can spend anywhere between 200 and like $2,000 on a scope. And it's important to note that like, Yeah, you get good features when you spend more money, but the $200 scope will get you like a really good scope that you can work with. The biggest thing, in my opinion, when working like surface mount is having, what do they call them like a binocular scope, you have to realize stereo, you cannot look through one eye and work on
it. You have no idea, your depth, you don't have any depth perception. So you have no idea where that that soldering iron and your tweezers are at.
Yeah, yeah, you have to be really comfortable well working on surfaces and stuff you don't like and that's a really great way to make you just go and say. All right, there's our like, fifth tangent. Yeah, that's
a whole topic in the future about talking about workbenches.
Yeah, yeah. Okay, real quick on workbenches, there's two things that I'm going to add to mine. I know for sure. Because I absolutely want this, I'm going to call three real quick. First one, I'm going to have outlets that just power outlets, but two of them are going to be dedicated to a light bulb limiter. So if I want to plug something in, and I want to limit the current, in fact, we just talked about this a few podcasts ago, I've had a light bulb limiter for like a decade, but it's been its own standalone box, I want to just plug into my bench. And there's a light bulb limiter. I also want to have a switch so I can defeat that. So if I have the light bulb on, and then I find out that the currents fine, I flip a switch and I give it full power. Like that's, that's for sure one thing, I want to have another two outlets that are also on a switch where I just flip the switch and I can lift the ground on those two outlets. just float them make it easy. Yeah, I want to be able to float it on a switch, just so like if I want to test ground looping, I can flip the switch, flip it down, and I can see the difference without having to plug in plug out or turn my device on or off. Those are absolute musts. The last one that I'm going to do, and I've actually already done this on a bench before, but I'm going to do it again and better. I'm gonna have quarter inch inputs on my bench that go to a speaker cabinet underneath, such that if I'm working on an amplifier on my bench, I don't have to roll a cabinet over I don't have to roll speakers over I just plug into my bench and I have a load. My bench has an eight ohm load built in that. Yeah, I absolutely want that. So it's good. Yeah.
Are you gonna put that grossesse carpet on it again?
No, no, no, no, I wait. Parker remembers my old shop. I actually I needed like a bench topper. And I went to like a nasty like carpet reclaim shop down the street. And I was like, I'll give you 40 bucks for like, a mile of carpet. And the guys are like, yeah, sure, whatever. And I glued it to the top.
And I bet you it was okay when it was new. But by the time I met Steven and went to the shop. Oh, it was like two years old. Yeah. And it's been through like four floods. And like cigarette butts green. Oh, and like glue all over it. And my soldering iron had to lead like, I melted it on there. And there's like solder guy and like, melt. Silhouettes all over it. Yeah. Yeah, it was. It was gross. Yeah. But it was 40 bucks. And it worked great. The best thing about that surface, though, was if you dropped a screw, it just landed there. And didn't bounce anywhere.
Oh, yeah. Yeah, no. And when you're working on a keyboard that has 10 trillion screws in it. It's so awesome.
Yeah. So that was one thing I took away from them. Like if you drop like a surface mount part on it. Good luck. You're never gonna find it again. But if you have a screw, like taking stuff apart, it just falls onto this carpet and it doesn't bounce and roll anywhere. So
So yeah, let in the future. Let's do a let's do a workbench special. Like that. Yeah, that would be that would be really fun. Okay, yeah, you had something else on your
list. So yeah, go for been talking about this USB type C article. So this is gonna be quick. My FTDI ft 230. X and parallax propeller board is designed. It's already up on GitHub so people can go check it out. Let me know what sucks about it, what we should improve, etc. And so the next example for that article is I'm going to do it like a direct MCU style. So I'm gonna go directly from the USB type C to like an 18 Mega 32 you for unless someone else has a better idea for this other example. That's what I'm going to do. Cool. Yep. So go to Check that out and see what I did wrong.
This is your propeller dev stick, right? No, no, this
is kind of a breakout board kind of thing. Oh, I talked about the dev stick last week or two weeks ago, I am converting that over the Type C as well. And I'm probably going to work on that this week. I kind of want to get that done in order because I'm like, I'm actually down to like my original dev stick. Yeah. Which looks nothing like the current version.
Oh, yeah. Yeah, yeah. Not at all. So
this, I still have this. This is like one of my first this is actually my first microcontroller PCB ever built.
Nice read 0.1 1.11 point. So
it was the second one. I have on the first one, your
actual release edition?
Yeah. Lacks? No, I remember how on the first one, the I made the EEPROM. If I put it si si eight, normal package, and E prompts. SOSC, eight wide. Oh, I was able to get work by bending the legs, you know, like, straight down? And then this version fix that. I fixed that problem.
Ah, got it. Yeah, yeah, that'll that'll get you.
This brings back memories. I need to find the schematic for this. Because there's a there's like a transistor or an EEPROM. Not a problem a MOSFET. on there that I don't know what it does. But it's all single a single sided board. Nothing on the bat. Yeah.
Yeah. Yes. Big female headers on it. Yeah.
And it was designed to plug into your computer like a thumb drive. Yeah, I see that. That's great. So it's, it was really convenient when you're working on laptops, like in school. That's what I had it for. So I can like plop it in and then jumper over into it. But like, now, I don't really do development work on a laptop. So it's like, I have to plug in my computer that's down there. And then like, how do I interface with it?
But wait, it's not very convenient. If your laptop's USB ports are upside down, then it's super inconvenient. That is true. Never had it wouldn't be awful. Yeah, that wouldn't be so bad. You know, and that's something I don't know, is there a default USB up? And you have speed down?
I think there is technically. Okay.
I mean, the only thing I know about USB other than type C, is that you are you have a 100% chance of getting it wrong the first time. And you also have a 100% chance of getting it wrong the second time, and then you flip it back to the original position. And it goes in. Yes. Yeah, that's how it always works with USB.
Type C just works. Yeah,
yeah, it does. I got it. I got a new phone with Type C on it. I was like, Oh, this is great. Yeah, I love it.
Okay, Steven, EQ time. Here's with that.
The EQ is working, we finally built in. It took a it was a lot of work. But I got it, I got it up and running, actually up and running, meaning I built it. And I turned it on. And it works, which is awesome. So the basically, so I simulated the absolute snot out of it beforehand. I spent quite a while doing simulation. And usually I'd found if you put in a lot of effort upfront doing simulation, you'll get it it'll work kind of thing. So if you do a little bit of simulation and just kind of like I've kind of proven that it works, then there's a chance it won't but I did a ton of simulation and I'm happy like it's actually working the way I asked it to. And it just fired up. So first of all I want to call out I'm maybe I'm maybe I don't know how to pronounce this, but GRTYV are, maybe there's a Gert or ver I don't know how to address it from from our Slack channel. We had actually asked people to come up with a name for the EQ and they came up with a fantastic name, which is the venti Q, which if you've been to Starbucks, the 20 ounce giant coffee is a venti sighs. So he he got the venti Q and I was like, Oh, that's perfect. There's layers to this show. Like that is officially the name of this the venti Q so fantastic. So yeah, so I built up all the boards, and everything kind of fit together really nicely. And I actually cut up a piece of aluminum and put it on the mill and milled out a whole like chassis for this. So I can use a little testbed. So everything kind of like screwed together. Well, I'm actually surprised like, I shouldn't be surprised, but But it all fit together. Well, like everything actually worked. Yeah, you know, Fusion 360 You know, showed me that everything works and it kinda does. So the mechanical design is nice and the had the electrical came together. So, you know, the one thing is, this device is incredibly power hungry. I think it pulls 800 some odd milliamps on the positive 12 rail and about 600 on the negative rail. And the difference between those two is just LEDs.
LEDs. LEDs.
Yeah, it's well, it's 21 LEDs, and I'm hitting them kind of hard. So if that was
one thing I didn't know is that the sliders lit up? Oh, yeah. Oh, yeah. Show me that picture. I was like, Oh my God, that looks awesome. It looks evil. Yeah.
Oh, yeah. Cool. Okay, so it's gonna go. So I have some cool ideas for the amp that it's gonna go inside of that will potentially use some more LEDs, I've got some stuff to prove a test on the mill before doing that. So I'm thinking about doing some potential frosted acrylic with LEDs behind it to be indicators, you know, like, when you turn on the amp, and then like all of the all of the text starts to appear, because LEDs like begin to glow like volume and tone and all that stuff. So hopefully, like a slow start kind of thing. Yeah. So start where like the whole thing comes alive. And every LED is going to be read. So but I haven't proven if that will actually work I want to see, because I have some, I have some access to some cool reverse mount LEDs that I'm thinking, there might be a cool way to make like a carrier board that goes inside the amp that has reverse mount LEDs such that on the front side of the PCB, there's frosted acrylic, that fits inside of milled out text in a chassis. And you see what that looks like? It will. So I don't know, there's just a lot of stuff I have to prove there. But regardless, back to the EQ, like, so it's it's 21, or there's 20 bands. So there's 21 PCBs that connect to the backside of a carrier, I call it the distribution board that basically is sends all the signals back and forth. And so a few of the of the bands have some minor issues like one has a little bit of an oscillation problem. One pulls a bit more current than the others just a bit. And then yeah, and then two or three of them have weaker outputs than the others. But all of them are exactly the same design. So all that means is there's some soldering issues, or maybe I populated component in a wrong spot somewhere. So I actually purchased some extra parts. And I'm going to build a little test harness, such that I can plug one band into my test harness, fire up one band and test it individually. And so I actually have a Parker sent me a signal analyzer that he had lying around. So I'm going to take each band individually and test them all, get them all functioning properly, make plots of each one of them, and then put them back into the Master System and test it as a full system. So I like to take the one kilohertz band, I want to put it in my test harness by itself, measure its its response when I have the boost maximum. And when I have the cut maximum, you know, show a plot for that and then put it in the Master System and show that it's still doing it even with all the other bands affecting it. Yeah, so. So one thing I took a function generator, I put it in and into the Master System with all the bands. And I I'll take 1k for example I did on a handful of bands, but I put one kilohertz into the the one kilohertz sine wave into the system and just move the one kilohertz fader. And it was absolutely affecting that one band. And then I moved the bands just to the left and the right of it, which would be 750 hertz at 1.5 kilohertz. And they were barely affecting it. So their cut offs are really nice. My cut offs are where they need to be. And each band is doing what and I tried that across a handful of bands. So effectively, everything is working well. The one thing I haven't tested yet is the main input board that controls the signals that go in and out of the hole, vent EQ or vent EQ the whole thing. I actually built those to interface with tube gear. So those actually run off of about 350 volts. I haven't tested that section yet. It's basically what it is, is a 350 volt buffer that has a huge divider, so it can take 200 volts and drop it down to four volts signal. And then on the back end, it has the exact opposite. It has a four volt to however much large amplifier. So I still need to test that I've just been injecting small signals further in and to the circuit so but that's a really simple circuit. So I expect that to work. So later this week, I'll get my, all the parts in and I can build that little test harness and test each band individually and just confirm that everything is to the design. But so far everything seems to be working exactly like I want it to.
It's cool. Yeah, I want to post the pictures, because it looks pretty cool.
Yeah, yeah. And the I'll find a way to distribute some of the schematics on there, because there's 200, some odd op amps on it, and 20. Well, no ad Voltage Controlled amplifiers on it. So it's kind of like a fun exercise in signal conditioning. Because what's funny is the actual signal that flows through the EQ, it only touches a few of those op amps, it doesn't like all the rest of the op amps on there are purely for the controlling aspect. So there's a couple of like rectifier, or precision rectifier circuits that I use, mainly because so here's the thing, Each band has a cut and a boost amplifier. And the way I have it set up is Each band has its own slide potentiometer that is supplied by plus five volts and minus five volts. When the potentiometer is in the middle, it's sending out zero volts. So that means that both the cut and the boost amplifiers are not doing anything. So the way I have it set up though, is I've got that signal coming in. And I condition it such that if you're above the center point, in other words, you're boosting, the cut amplifier is still doing zero, but the boost amplifier is only activated. And if you go beneath zero, then the boost amplifier is shut off and the cut amplifier is is amplifying. So it's it's not this thing where they're both working at all times. One only works when the potentiometers past halfway, and the other one only works when it's beneath halfway. But I implemented that entirely analog. So you know, it's it's a bit of op amps, and some extra crap to make that kind of work. So I'll throw the schematics up somewhere. I don't know maybe on GitHub, you have your own website. I do have my own website. Yes, I should. I should update that with this. You're right. You're right. That's a good place to put it. GitHub is a hell of a lot easier. Yes,
me? Oh, yeah. Cuz you don't have to do any work or it has cost you becoming what you hated? I know, people don't just toss files up there with no documentation.
Yeah, yeah. No, I'm gonna I'm just gonna post it on GitHub. And the text just says, Here it is. Yeah.
That's the commit message. Yeah, that's
right. Yeah. Yeah. And I will fork it 10 times too. And but all the forks will be identical. But you you won't know that. Yeah, yeah, exactly. So yeah. You know, I'll keep working on it and make sure it's perfect. And I want to, I want to, maybe in a future podcast, down the line, I'll show like all the plots not show a guy's podcast. But we'll talk about all the plots and make sure that like, I designed to every band to be perfect in in its own, you know, specific way. And I want to see if I met all of my design criteria.
Actually, when thinking about branching this over to a video podcast eventually.
That's right, where plots can be used shown. Yeah, you can see our ugly mugs. Oh, actually, I have to comb my hair, our ugly mugs. So sort of the next thing. Last week, we talked about the the old ribbon mic design that I had played with a gush A while back, and we've recorded a podcast on it. And in in last week, we had talked about setting up a live design of a handful of, you know, new revisions to the ribbon mic. So we're actually planning on doing that this Saturday, which is February 2 at 6pm. Central. So we will give us some information.
Oh, you're right. Yeah, that's 29. Oh,
yeah. So yeah, so this Saturday, February second 6pm Central. We will tweet out where and how to watch that video. And we'll also talk about on the Slack channel and we'll give information on the Slack channel, which you can go to macro fab.slack.com. And you can find out information about that. So what we're going to do is live on video, we're going to meet up with whoever's listening with us and we're all kind of together going to design a preamp for a new ribbon microphone. We're also going to talk about the mechanical design. So how we want to make like a jokester and stuff. And on top of that, potentially start talking about enclosure designs for the mic as a whole. And then we're also going to talk about how we get audio out of this device. Are we going to do a PCM 2912 A, in other words, are we going to make this a USB controlled device are we going to do through traditional XLR, like how are we going to do all this? So if you want to come and check out a ribbon microphone discussion and how to design it and, you know, give your input and help us out because we don't know what the hell we're doing. Come on and have Saturday February 2 at 6pm. Central Time. Central time. That's right. Yeah.
Cool. Yep. Onto the RFO. So this one is yours, Steven. Yeah,
yeah, I'll just keep talking on this. I found this earlier today. And I thought this was a really cool, really cool little. I haven't seen this been done before. And it's like, oh, my gosh, this is so simple. So I found a a, an article on electronics weekly talking about a new dev board or potentially new dev board from STM for their brand of STM eight bit microcontrollers. Where this, I love it, this little dev board comes with three individual microcontrollers on it, which are all in the STM eight series. And these three micro controllers are sort of like their low end offering, their middle end offering and their higher end offering. And the really, the difference between that is just like RAM and ROM, yeah, things, things of that sort. So it's got three microcontrollers on it. But the microcontrollers are all connected to the dev board via mouse bytes. And so they and they're already pre populated with through hole headers on them, like point one pitch headers, so you can program this dev board. And once you've kind of got everything working, you can just break the microcontroller off and plug it into whatever circuit you're working on. And bam, there you go. You have like, it's all taken care of. I, you know, I don't know exactly how they're accomplishing the programming. If you are always programming all three at the same time, I would bet that that's like, if you push code, you're pushing it to all three at the same time, but that I thought that was really great, because like you can develop code for one and then if you find out that your code is potentially too too big for like, say the small offering then you can just go oh, the mediums already right here. I just bought it off. Yeah. Yeah. freaking great. I love that it's and it's like a super simple concept where you know, you have the mouse bites on the edge of your PCB, you can just run your programming traces and I guess they do power and ground and stuff in between the mouse bites. It's just a really cool little, little concept. So
I like that idea a lot. That'd be really cool for Have you ever seen like allegro stepper controllers? It's like a little tiny. It's like it's what 3d printers used to use a lot for, like on the ramps board and stuff. That this style reminds me that a lot. Oh, that's cool idea.
Yeah. And gosh, who is it? I think it's STM the nucleo boards. I think they do something similar to that right. They have like a little break off section. I think that's a great idea. But but the idea like the the concept of having all of them in one place, such that if you do find out that you need a bigger one you don't go oh crap. Now I gotta go order the next one. It's just right there.
That actually is what happened with my macro watch because I wanted to do a capacitive touch macro watch so like you will just touch the surface and the macro watches a binary watch I design using the FM eight. microcontroller sleepy b I originally picked 12 Yeah, originally pick six. Yeah, you're right pick 12
It was a pick 12 You were so mad.
One day for one registered
an entire day of parkour just fuming It was so funny.
I even like contacted a microchip F A E. And we could not figure out why I could not use this one pin. As a general i Oh,
you know, one thing I would love to know is how many times we've told that story. And the best part is it never gets old. No.
And the reason why is because it that pin defaulted to a comparator input only that one pin only that one pin.
Right. All right. Why Why would it do whatever? Okay, yeah. So So yeah, you you did a sleepy right.
Yeah. And so I put the smallest sleepy be on it. gets sleepy bees have built in capacitive touch hardware in it. So I got the smallest one. Because I'm like my code doesn't take a lot of room. Popped it on, and I imported the capacitive touch library. The capacitive touch library alone is too big to fit on the small CPB. It's on like, well, that project is done. I haven't even come back. That's like that was like a year and a half ago and I haven't even come back to it yet.
Yeah, you even had boards made right you I have a
I don't think either. I think they're at work. Yeah, I had boards made tests. I've seen those. Yeah. Yeah. That's I have to get back to it. Yeah, maybe I should do that. Next instead of the Star Wars detonator actually do capacitive touch for that thing? It's just code. It's just code. Okay, next RFO. This is a really interesting Hackaday article that I never even think about. But it's totally a security vulnerability, I guess you can say. It's about smart light bulbs, and the fact that smart light bulbs knows your Wi Fi password. And so when one of these smart light bulbs goes dead, people just unscrew them and toss them away. Well, they all have like, you know, ESP Wi Fi chips that just store your your, basically your Wi Fi credentials in plain text. And you can just usually, a lot of times, it's like the the driver circuitry or the LEDs go out. The ESP, you know, Wi Fi chips are pretty robust, and they usually don't fail. So you just D solder them. And you can just rip off the just redirect just straight read it. Yeah. Oh, that's awful. That's terrible. And the thing is, the way to fix this is just to encrypt that, that password data. And then right, yeah, people.
weigh you You even said you didn't even think about that. No buts
like. Yeah. Who I even though I'm, I would have my reason from this. Steven was, I would have thought they would have done their due diligence. And,
and it's actually your password. You will and we've, we've talked about this multiple times. In fact, we've talked about it with guests to where it's like, if you're a designer, it is your responsibility to think about these things. Yes. Like, okay, yes, the ESP chip does a ton of work for you. But it doesn't do all of it. Clearly. Yeah. So that's sucks. I hadn't thought about that.
So go check that out. It's really cool article. And the next one
reminds me I need to go change the password on my Raspberry Pi that's sitting upstairs because it's just the default as you go password. It's not said that.
Now it's part of the botnet. Yeah, that's right. Yeah. All right, what's the next one? So the last one for today will be the list of common electrical engineering interview topics by Luke Metro. So Luke has been interviewing with Bay Area startups and big tech companies during his last year in college, and he kind of compiled a master list of questions people have asked him during the interview process. That's great. And so if you are a budding engineer about to graduate, I would definitely go over to this list and look at it all. Because some of them are, this is this is a kind of electrical engineer, that's going to be designing circuits. So but these are questions, and I would say most electrical engineers, least embedded engineers would need to know, at least how to look at an answer some of these kinds of questions like some of these, I don't know, like, like, between the big three switching topographies, Buck boosters, boost converters and Buck boosts, like, I don't know exactly how the inductor works. And those those, you know, typographies but like, I know how, what how they work.
You know, the funny thing is, I'm reading through this, it seems very much like, this guy has never interviewed for an analog job. I don't like there's there's a few questions on op amp, topologies, and things like that. But other than that, like everything is just like, how does this digital communication work? And what are the problems with it? And like, that's super valuable. And even in in every analog interview I've ever had, I've been asked those questions too. So
it's interesting that some of the ones I've been asked are not on here.
Oh, yeah. One of those.
The big one is like what is one component to protect a device from reverse polarity?
Chris church asked you that one, didn't he? Yeah. Yeah, yeah. Yeah. There's there's a lot of components that will deal with that.
One component. Okay. And yeah, diode and series diode, yeah. But then if you add, you could do a fit. Well, fit requires more than one part and make it work.
Oh, the question is, how do you accomplish Should in one component. Yes. Okay. Okay. Not just what is a component that can do the correct Yeah, yeah. Got it. Got it. Okay. And actually the best thing.
The best thing about that when church asked me that question, I had just designed a circuit with a p channel MOSFET input thing. So I'm like, Ah, here's all the ways you could do it. Nice. Nice. Yeah. The pros and cons of the mall. Yeah. Yeah, that's the best thing I think is when you go through this list is just know, like, the general concepts of how these things work. You don't need to know like, what, like clock skew and how to avoid it, and like crosstalk and stuff but like, knowing what they are, what and, and maybe some pros and cons of like, like ice square severs SPI like what's the pros and cons to both of those?
Yeah, also, like, if, if you were to be asked right now, like, name, the name one difference between SPI and I squared C. Like, just, there's, there's a couple but Just name one. Like being able to answer that question on the fly. That's, that's good. You know, in fact, you know, it's funny, gosh, a long time ago, we got asked a question like, how do I how do I learn things? Or how do I like, grow as an engineer, this list is fantastic. And both of us answered the question. Like, we just read a whole bunch of crap online. Like, go through this list. And okay, here's the here's, okay. Switching versus linear regulators. I'm just pulling one off. May, what are the main trade offs between switching and linear regulators? Efficiency, noise, PSB, area and heat generation? Like, okay, there's a lot in that question right there. But answer that question for yourself. And if you don't know the answer, go find it. Yeah, that's, this is great. I really liked this. Yeah. Luke looked at a
good job. Yeah, that's
fantastic. So analog, okay. That's, you know, this is actually okay. This is a hard one, if he asked me, in the analog to digital converters, the common topologies, pipeline, sigma, Delta, successive approximation, being able to only know one of those. But first of all, being able to understand the differences between those, explain the differences between those and know which one is good for which application, that'll put your resume on the top of the stack? I guarantee you that like, that's big. Those are and I guarantee you like those are, that's not super common knowledge. So you know, I got asked a question about dithering once in a in an interview, and I was just like, All right, let's, let's try this out.
I really liked his miscellaneous section too, because his his top sentences or top paragraph for this is these are less common questions, but they tend to vary more greatly from job to job. Yeah, my interviewers from Apple did not ask me about motor control. But if you're going to work for a scooter startup, they're going to ask you about motor controls
scooter.io X, okay, so this one right here. Under analog to digital converters, I, I've legitimately been asked this in an interview before anti aliasing filters, why they're used cutoff frequency selection and filter order. And on top of that, would you do an analog implementation? Or would you do a digital input limit implementation of an of an anti aliasing filter? And, like, straight up, it was almost exactly that question. And I was just like, All right, let's go for this.
Three hours later.
Yeah. No, these are fantastic. Actually, you know what, this is actually pretty good for. This is good for the people who are doing the interview when they need to go find questions to find questions. Yeah. I should save this. Yeah, yeah. Cool.
I think that's going to wrap up this episode. Sounds like else. No, that's about it. Okay, so that was the Mac fab engineering podcast. We were your host Sparky Dolman. And Steven Craig. CO let everyone take it easy. Thank you. Yes, you are a listener for downloading our show. If you have a cool idea, project topic or interview question that you want to ask Stephen and I tweet us at Mac fab or at Longhorn engineer or at analog E and G or email us at podcast at macro fab.com. Also, check out our amazing Slack channel. If you've not subscribed to the podcast yet, click that subscribe button. That way you get the latest episode right when it releases and please review us wherever you listen to is it helps the show stay visible and helps new lives sinners find us
Mandatory USB Type-C for everything? Parker and Stephen discuss the current EU ruling and preparing your PCBA design for contract manufacturing!
Will the Rebel Codebreakers be able to emerge victorious against the Empire, or will they succumb to the overwhelming power of the Empire? Tune in!
Topics include StarWars, NASA, Magnets, Perpetual Energy, and Virtual Grounding.