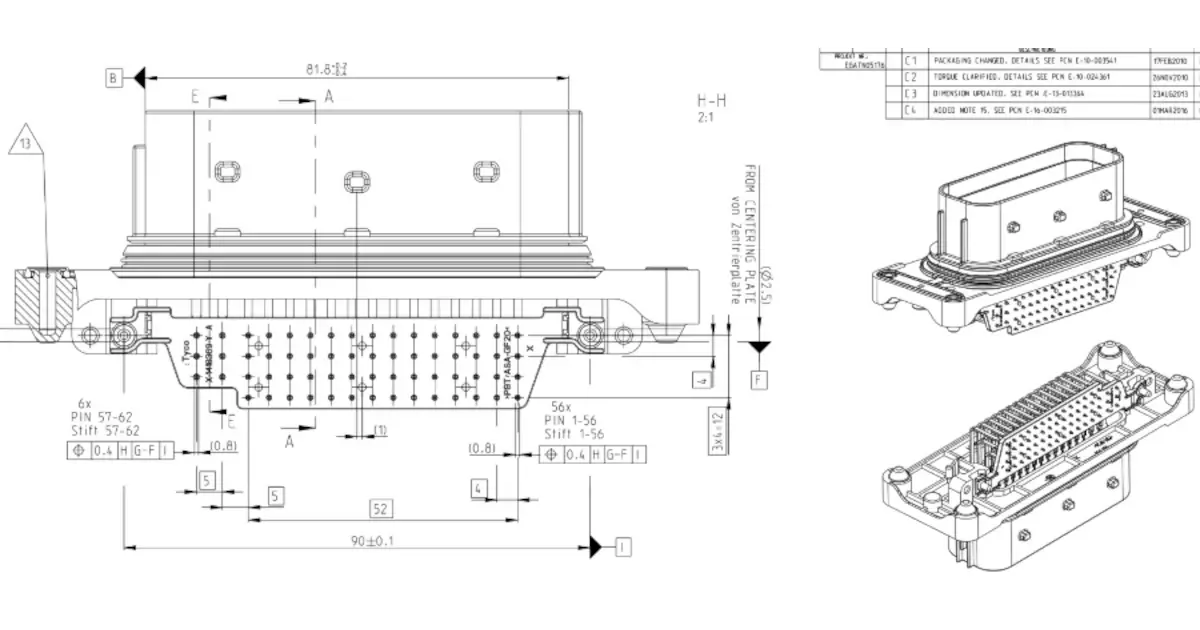
The quest for the right connector for a project! The right of passage for any hardware electrical engineer starts with a connector catalog.
This is the last installment of Stephen's 'Adventures in Injection Molding'. We are going to recap the entire two year sage and close the book on it.
The Jeep Prop Fan project rides again! Well some iteration of it at least. Lets design an open source PCM (Power Control Module) for automotive apps!
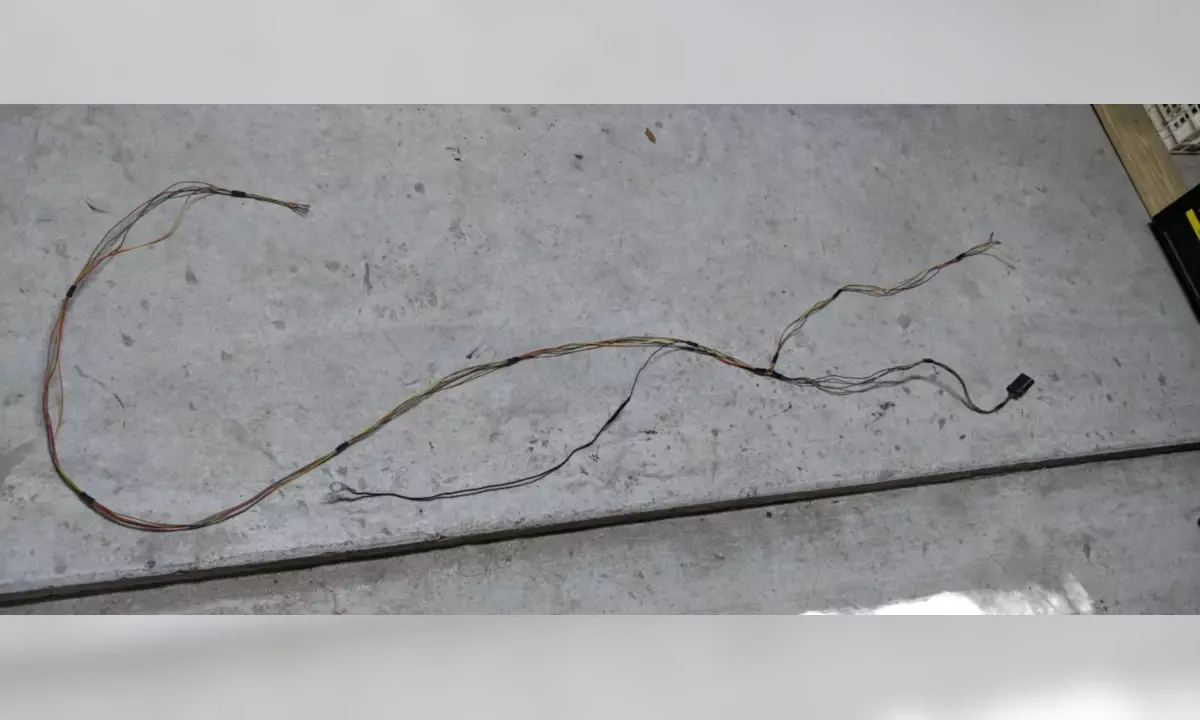
Figure 1: Wiring harness parts for Parker’s Jeep Cruise Control. Salvaged from a late model TJ Jeep.
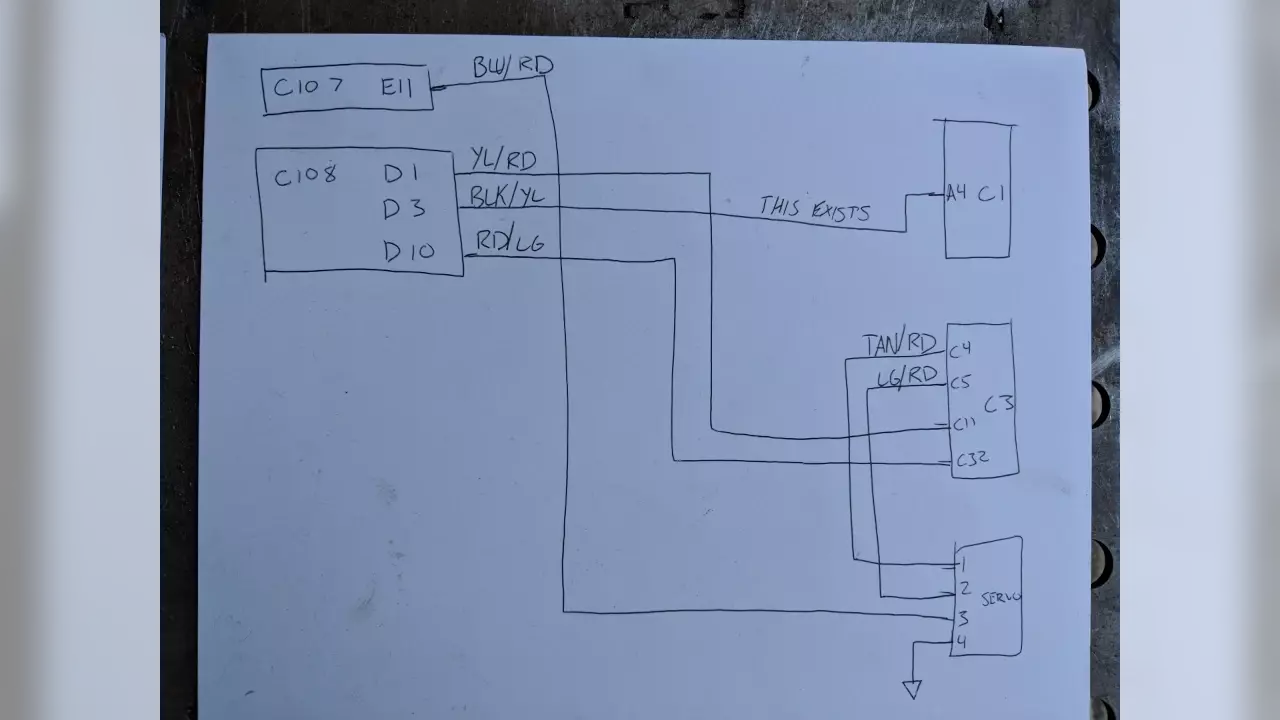
Figure 2: Schematic of what needed to be added to the existing connectors in Parker’s Jeep.
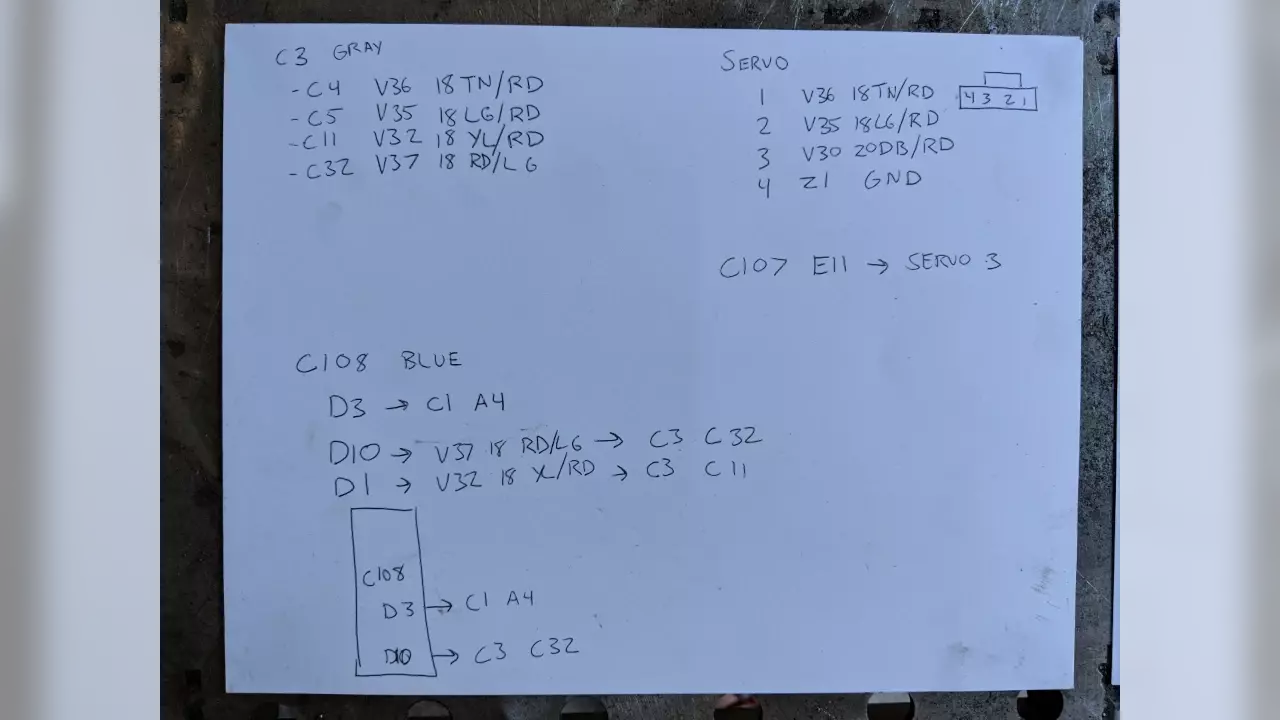
Figure 3: Wire listing with the colors and circuit numbers from the Jeep Factory Service Manual.
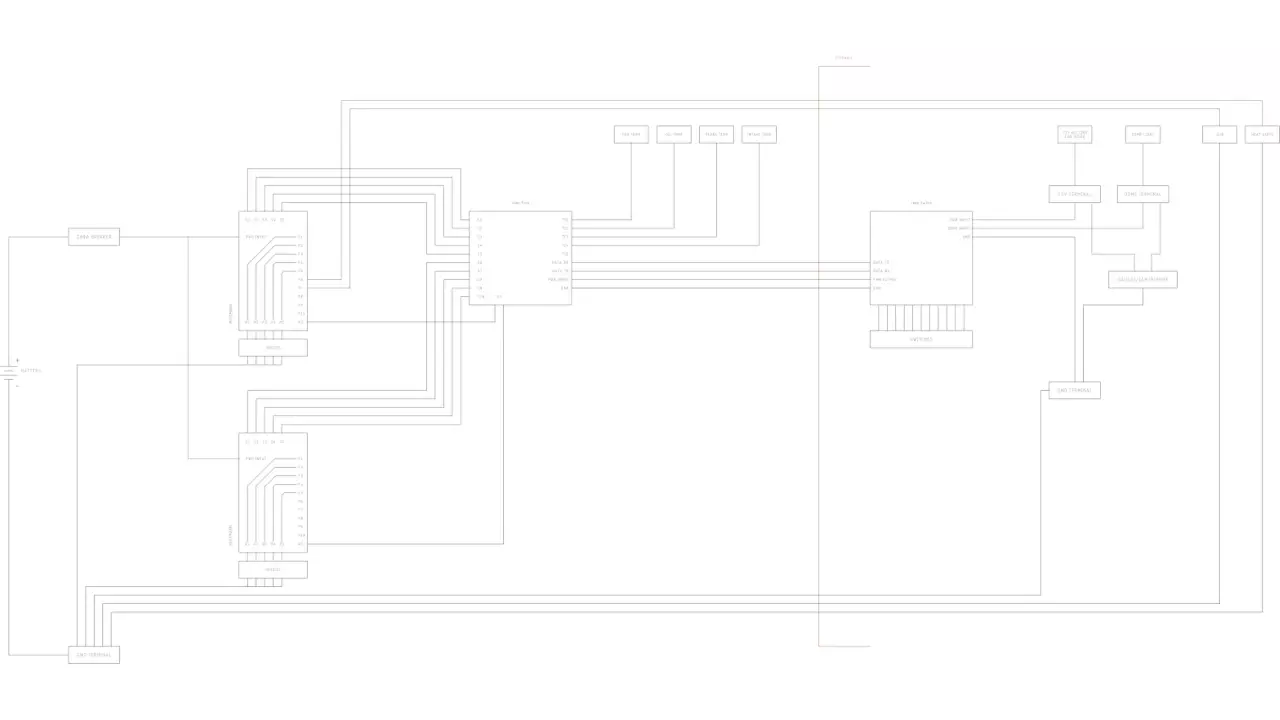
Figure 4: Block Diagram for the Jeep’s new auxiliary electrical system.
Parker is an Electrical Engineer with backgrounds in Embedded System Design and Digital Signal Processing. He got his start in 2005 by hacking Nintendo consoles into portable gaming units. The following year he designed and produced an Atari 2600 video mod to allow the Atari to display a crisp, RF fuzz free picture on newer TVs. Over a thousand Atari video mods where produced by Parker from 2006 to 2011 and the mod is still made by other enthusiasts in the Atari community.
In 2006, Parker enrolled at The University of Texas at Austin as a Petroleum Engineer. After realizing electronics was his passion he switched majors in 2007 to Electrical and Computer Engineering. Following his previous background in making the Atari 2600 video mod, Parker decided to take more board layout classes and circuit design classes. Other areas of study include robotics, microcontroller theory and design, FPGA development with VHDL and Verilog, and image and signal processing with DSPs. In 2010, Parker won a Ti sponsored Launchpad programming and design contest that was held by the IEEE CS chapter at the University. Parker graduated with a BS in Electrical and Computer Engineering in the Spring of 2012.
In the Summer of 2012, Parker was hired on as an Electrical Engineer at Dynamic Perception to design and prototype new electronic products. Here, Parker learned about full product development cycles and honed his board layout skills. Seeing the difficulties in managing operations and FCC/CE compliance testing, Parker thought there had to be a better way for small electronic companies to get their product out in customer's hands.
Parker also runs the blog, longhornengineer.com, where he posts his personal projects, technical guides, and appnotes about board layout design and components.
Stephen Kraig began his electronics career by building musical oriented circuits in 2003. Stephen is an avid guitar player and, in his down time, manufactures audio electronics including guitar amplifiers, pedals, and pro audio gear. Stephen graduated with a BS in Electrical Engineering from Texas A&M University.
Special thanks to whixr over at Tymkrs for the intro and outro!
Hello and welcome to the macro fab engineering podcast. We're your hosts Parker Dolan
and Steven Craig.
This is episode 92. So last week we had Kailyn. And Williams on developers of from macro fab developers of
development. Yes.
That was a pretty good podcast. I think it was. It was fun. Yeah, it was interesting. People are really liking that. We are bringing more people from McWrap on. That's the second time we've done that. The first two we had were the night brothers.
All we had we had Dustin on Oh, we've been on twice. Yeah, we had Dustin on twice way back in the day. Yeah, that was in like the 10s and 20s. Yes.
So yeah, that was the third time we've done it. Fourth time we've done it.
Yeah. And eventually, there's other people who have expressed coming on eventually we'll do that. Yeah.
Somebody got did more. Cool. Yeah. Um, so the last project I was working on that we talked about was the Jeep cruise control project. And it is done. Nice. My Jeep has buttons on the steering wheel. Now. It's like Speed Racer, and it actually does cruise control. Yes. It doesn't kill you in the process, either. Nice. But yeah, it feels like Speed Racer. Yeah, he's got all the buttons on the steering wheel. Yeah, well, the eight different buttons that he can do that do like ridiculous things. Yeah. Like make the car jump. Like stuff that window legs and Yeah, and like smoke screen. And it's like stuff that like they would never allow in racing. But he is allowed to
have Yeah, somehow it's okay. If it's him. Yeah. Well, I
mean, this show is named after him. So what buttons do you have now? So I've got cruise cruise control on off. So like basically just toggles the system on and off? Didn't they're set. So that's on the left side. Okay. So when you press it up, that turns it off, and on the bottom is set, so it sets the speed. And then on the right side, you've got accelerate, cancel, and coast. And so if you click the accelerate button when you're engaged, it like bumps up in speed. Okay. I don't, I think cancel just like, just just turns it off. But it doesn't turn off the cruise control system. Well, it is like just off the threshold. Yeah, it's just like an arms it or something, right. And that's what it feels like to me. And then Coast basically, it doesn't really, it's not like the exact opposite, accelerate where some cars, if you hit like the coast button, it just drops you a mile an hour down. This you just press it in, the car just starts decelerating. And then when you let off, it just picks up where it was at. So if you like if you go in 65, and coast, and you coast down like 55 and then let your finger off the button. Cruise, it'll stay 55 That's the Okay. It's kind of weird, cuz it's not like you press a button. Like the ones I've used. You press it like once, and it'll drop a mile an hour. And like, accelerate, you press it once and it goes up one mile an hour. This is kind of like it's kind of like analog II, I guess because you'd like to hold and accelerate and the Jeep go. And then it will keep accelerating till you take your thumb off the
acceleration, but it's nice.
But so how I did this is some people I'm not gonna do like a step by step how this is a couple people out there that done it. But the easiest way in the cheapest way I've seen has been that had been able to do this was I've ordered on eBay used wiring harness, I think we talked about that. Yeah, but the one I picked wasn't for my year of Jeep. I picked a TJ harness, which is my model. So it was all the right connectors and stuff, but I have a 99 so I picked like a year 2004 harness. And the harness look for is the one with the fuse box on it that goes under the engine. It's like one big long harness that goes into the firewall near your left foot. Okay, so that's the hardest look for it's the one with the the engine control fuse box basically, that goes under the hood. So you want that one and you want a later model because the later model ones actually have the cruise control connector built in. So in, in the early years of the TJ Jeeps they had two different basically model numbers for that harness. One was with cruise. One was without it actually there was another one which is without ABS brakes as well. Okay. So basically you just need to find one that's got this the later model ones they basically just consolidated all into one harness. And so if you had abs or didn't have ABS or you'd be had crews and didn't have crews, you got the same harness. I guess there's probably just they figured, you know, the bean counters probably figured out that, hey, if we just made one harness, it's actually cheaper probably then would it be for different skews for? Three? There'll be two options for different skews.
Right, right. Just pay one guy build more one,
and it has a little bit of extra material costs. It's just, it's three less skews. So it's probably cheaper in the long run. So I went with the later model, one. And I took basically took the the cable, the harness, and I tore all the sheathing off of it. Big big mess. I was wearing gloves, because it's just nasty. Just goopy. Yeah, well, no, it's like goopy. It's just, you know, you got like 15 years of engine grime over it. So I cut it all up. And then I took apart the connector, because you have to basically you have to take the pins out of the one of the connectors that's on the engine control module. And then I took those pins out, and then pulled all the wire out of the harness to the other connector that goes into the firewall. And to your, to the bed and to the under dash basically, um, harness because that's there's two harnesses there. And so I pulled that wire out. And that the weird thing about the connector for the engine control module, I'm glad I had a spare, because I destroyed this one taking it apart. That's I'm glad I didn't take my one I needed it's in my jeep apart first, because I would destroyed it. Yeah, it's basically got this plate, it's blue. So the connectors help it's gray. Okay, I'll try to take a picture of it for the podcast. But it's got a blue plate. And it's that it looks like you would basically push it in and then it would pop out like, you know, like it's not fits in from the back. Sure. But this plate actually is a sliding plate. And so you push the plate over and then it unlocks the pins, did you not? Well, I tried to pry it open. Oh, look like I tried to back off in the back part snaps in like that, it pushes straight in and snaps in. Yeah. And then I saw I pulled that part off. And then I saw this blue piece of plastic. And it's kind of it when you look at it, it's like when you actually look at it like, you know, in your hand, it's obvious that it slides sideways because it's got like a logo, which looks like a shortened old school thermostat, what's got a big hole and then a slot that comes off the side. So that way, the big holes where you put the pins in, and when all the pins in, you slide the plastic piece over and holds them all in spot. So all you have to do is basically move that slot over and then yank the pin out and know that that's better. And you just broke through it. Yeah, well, I'm the first one because I didn't need to use it. Disassembly trying to figure out how it works. Yeah, because I couldn't figure out how to get the pins out. So the one in the jeep I carefully took it apart and slid it over and was able to push the pins back in. Sure. So I put those pins in, ran the wire all the way across. And I like redid the harness, so I put new bloom on it. So it looks brand new. You can't tell I put four extra wires in it. Put the new connector in for the speed control stuff, wired it all up. And it worked nice. It didn't work first try, though. What, what? So in 99 was it's a change over here. And so most people don't have this problem, but they change the resistance values in the switches on the steering wheel.
Well, from what to what? Well,
it was because it's the there. It's they say it's multiplex. It's not multiplex. It's a analog read. Because it's one signal its power in and then analog out. Okay. And so that's basically, when you press a button, it goes across resistor of different values for each button. And they just read whatever. Okay, so that way they can do five buttons on one wire. Right?
It's really cheap way of doing this. Yeah.
So what they did is in the earlier Jeeps they had if no buttons were pressed, it was floating.
Okay.
Or open? Yeah, it was open, I guess is better way to say it not floating. Right, it would be zero or nothing. Yeah, it's open connection. And I'm guessing they had to change that in the later model, I guess for EMC or something. And they made like 19k is no button pressed. And so when you press all the buttons that all the values are actually slightly different because of that 19k loading resistor now Yeah, I think the values are actually the same. It's just the switches have that built in loading part now.
Well, it It makes a little bit of a mix of different voltage divider, right? Yeah. Yeah. So wait, what did it actually do something just Okay, so it didn't even do like it didn't like mix the functions. It just didn't work. That
doesn't work because completely different numbers. The engineers that did it actually did a good job. In terms of if you put in a different model switch it just straight up won't work.
So I guess they windowed each button. Yeah, Each button has to be within a certain voltage range. Yeah.
And so I, I've got, so I was in 99. And so I had a, I bought 9098 switches. And I bought the later model switches. I'll get to that in a bit. But so I put first put the 98 switches in, and I couldn't get the cruise control turn on at all. Okay, and so I'm like, Okay, what's up? So I checked all the pins I, I basically unplug the you know, the the connectors, you know, extended leads in my multimeter I'm reading everything on my test, beep test, everything beat test, great. The solenoids were getting power, all that good stuff. And I'm like, okay, maybe it's the switches. So I had all the switches wired up and I unplugged the two connectors on the on the harness, no, on the the ECU gain control. Yeah, so that's got the two pins that the switches use is one on the C connector C three connector, which is the gray one, which is I had to add all the pins, and the other ones on the A connector, which is the black connector, which is the ground and that wire already existed. So I actually, I think that was a four was the Connect connector on the C one, which is the block connector. And the other one was C 32, which is on the gray connector. I'll write it into the notes. While I look at my schematic I made there anyways, I picked up those two pins, my multimeter. And but my multimeter leads were not long enough to like, bring it into me. So I can bring it into the driver caps like push the buttons. So I just landed on the windshield and was looking through the windshield was pressing the buttons. And it was reading all the resistance values correctly. So okay, that's all good. Yes. And it's all I'm like, maybe, maybe, for some reason, the the I need to use the light Amal switches. And the reason why I bought the later model switches was my idea was I've got a later model steering wheel. So I need the later model Switch Design. Maybe Yeah, because they changed. No, they changed the physical dimensions of the switches. So I needed delete them all switches, but my idea was I was just gonna go in and change the resistance values to the correct ones. And then I would have the older style resistance values with the newer style switch bodies. Sure. So I plugged the new ones in and it worked. Like right away, like I pressed cruise control on and the cruise control light turned on. And like that is weird. So my jeep has a 98 engine, but a later model cruise control program on it. Hmm. Which doesn't make any sense. Because if you looked up like 99 interior, like 99 jeeps with cruise control, and look at the interior pictures, and it's the old style steering wheel with the old style buttons on it. Hmm. I have no idea. Maybe they made a special button that was for that or that's weird. Yeah, I had no idea. I don't know what Chrysler was smoking in 1999. When they did that,
how long did it take you to figure that out? About an hour? Okay, so this wasn't like beating your head for a whole day?
No, cuz, well, I beat tests. It took me about an hour to test all the harness, make sure everything was good. Sure. And, and the reasons values? And then yeah, I just spent like, I was like, what if I just did this way?
Well, hey, at least you knew that you needed to check resistance value. Yeah,
I checked everything. And everything worked. So what you need is you need to get an older if you want to add cruise control to your 99 TJ,
I'm sure there's so many people in this world that want to do it manually themselves. Yeah,
order a late model TJ wiring harness because we'll have all the crap you need. You need to order the right switches. I can't remember the part numbers just Google or eBay like TJ cruise control buttons. You'll get those, then you need a speed control servo which is part number 4669979. Then you'll need the cable, which is 4854156. And then you need a vacuum line because the whole system's bones all vacuum course. And that's 52109525 ad and then you had to fab up a bracket to mount that servo because I couldn't find a part number for that. But I think you can actually just go online, it might be easy or you just pay someone to do all this for you. Right? I actually don't think anyone would do this for you. Someone can buy aftermarket, like third party's cruise control stuff. Yeah, that's about 300 bucks. This was about $100. And about about $100 worth of labor. No, no about a week's worth or like research. And then because like trying to, this is the worst thing now.
So at $150 an hour for engineering time. How much did you spit
over? 10,000 This is the worst thing about doing the research now on this on on vehicles I've been finding out is people you use Photo bucket. back then. It was like really big. Yeah, it was the big there's before injure. Do you do you have a photo bucket account? Yeah,
I still have my old one.
I actually have three because I had to get around. They're like, limits on how many images you had. Oh, really? Yeah. It's like three photo bucket account.
I used to use Photo bucket just so I could post pictures and forums back in the day.
That's what I used to for. Yep. Yep. So the problem about that, though, is Photobucket changed their, like embedded stuff where you have to pay now. Yep. And so now it basically broke every single form from back then. Yeah, so like, I'm like looking at like a post from you know, year 2002 of like, how the like, like how the cruise control and the Jeep works and he's like, default this diagram and just like Photobucket account like unauthorized use hotlinks and I'm like It's like that Viper things. Worse now cuz corporate Viper. Yeah, I got
I will never know you do to corporate?
Yeah, it was Oh, man. Yeah, and it used to be there's a plugin now that you can like put in Firefox and Chrome that gets around it. But then Photobucket figured that out and banned that too, so you can't even Yeah, it's brutal. Like you can't even like makes you
wonder why they did it because they were already kind of on their way out. Why would you go out like by screwing everyone?
Yeah, and that's the other thing too is even if they just went out of business that would have been horrible as well for all this old. It's like we just lost this whole photo bucket thing. We just lost a ton of internet knowledge.
Overnight, but ancient internet and by ancient I mean like
a decade old. Yeah. Well, the internet time. That's a long time. That's ages. And it's not it's not like stuff that you can just go and get a book of either it's like wisdom that's been passed down Leeson like car forms. Everyone use Photo bucket. Oh my gosh. And so it's like, like, I'm going to try to get a you know, late 60s Chevy pickup truck. And I started looking to forms of like older posts and stuff. And everyone uses photo bucket. I'm like, Well, I'm screwed. The fortunate thing is I know so much about Jeep stuff. I don't really need pictures to know what they're talking about. File New stuff, you know? Yeah. So yeah, the crucial works. I'll take some pictures of it.
You'll upload them photo bucket.
Yeah, in the photo bucket. So they, you know, no one can see them. Yep. And so the next project on the Jeep because you know, it's a jeep and so as a project well for you, it'll it will never end. Yeah. So I want to fix the electricals crap that's in their old electronics.
Okay, I was about to say, like, explain what you
mean, like accessory, accessory stuff that I put in? So I've owned this Jeep since 2005. Okay, I bought it used when I was a kid. I was 15 years old bought it? I think it was like $4,500 Something like that.
Wait, you weren't 15? In 2005? Yeah. Oh, wait, you would have been 18 in 2000. Why did I think 2005. You bought it in high schools who would have been 2002? Yeah, you're right. You're right. There you go. Yeah. Semantics. This is what engineers care about. Yeah, exactly. I don't remember. I don't remember who knows the good cuz we're the same age. And I'm like, I wasn't 15 in 2000. Yeah.
Okay, anyway, longer than the patent for a long time in my proud promise of like, electronics has evolved greatly since I was in high school. And so all the wiring, all the wiring that I did back then is solid. It's just like this. When I look at it, I like cringe. I'm like, Oh, I do it that way. A lot. I wired that way. So I'm like, I've been redoing some of it. As I get like, I'm like, Okay, I need to do this thing on the Jeep. And it's near this thing that I did 10 years ago. So I'll just redo it. Oh, yeah. Yeah. And so now it's at the point where I'm like, I got everything else done that I want. And so I'm going to fix the wiring. Yeah, make it all up to snuff now. So I've drew up a wiring diagram of how I'm gonna do it. I'll put it in the blog
post, and you've given me a copy of this one. This is the first time I've seen
this is kind of like just a block diagram. Okay, I think. See, the idea is, right now there's a lot of wiring that goes between the engine compartments, and where the relays are at and these switches that are in the cap, because each switch has to be connected to a relay. And the problem with that is whenever I need to add an accessory, I have to basically pull the dash to get to the area to run the wire through a pain in the butt. So what I want to do is set up two boards, one that's in the jeep cabin and one that's inside the engine bay. That's right next to the relays. And they just talk over you know, so we talked about this for talks over serial Bobby Rs 45. CAN bus if I feel happy, but probably not because the Jeep doesn't have Cambus? There's no point. A local cannabis. Yeah, local campus. Yeah. There'd be no point cannabis, right. So it probably actually Rs 232. Because I don't need even 45. Right. So they'll talk over cereal. That way. And then that way, if I need to add new stuff, all I need to do is just write an extra piece of code and push it to the two boards. And now it works. You don't have to yank the dash every time I blink yank the dash and run a wire?
Which Oh, that sucks. Yes, it does.
So the board inside we'll we'll have a display it will have basically we'll have a whole bunch of switch inputs. I'll probably put built in GPS on it. If I'm feeling you know, happy happy about it. And that satellite rock I've been working with, I might put that on to the what is it? Rubidium? No, it's a radium iridium. Yeah, Iridium rock module, I'll probably put that on there too. And I'll probably put a lithium battery on it like 18 650 cell for. So when you turn the key off, it lives for a little bit before it decides to turn yourself off. Sure. That way, also, you can wake up and you know, do functions. So like, being about making like, you know, you'll wake up every so often pull GPS data and then send data out on the rock. So you always know where your Jeep SAT. So you know where you parked? Cars, cuz you lose your Jeep. Yeah, how bright red that jeep is losing the parking lot, y'all. Yeah, it's just fun stuff. You
sure? Yeah. Do it because you can. Yeah, exactly.
So and then the board. And so then that's information, what switches are pushed, all that good stuff goes to the RS two through two, it'll go into the engine bay, where there's another board that basically controls all the relays and gets temperature data from the engine. So I'm gonna do like, I'm gonna get coolant temperature, oil temperature, I'm going to get air intake temperature, that's actually easier to get than just random. Because I want air temperature, like what's going across the radiator. But that's actually really hard to set up correctly. Because when you stop, airflow stops, yes, temperature spikes. But if you have constant airflow, ie in the intake of your engine, you get actually pretty good measurement. As long as you're far enough away from the engine, we can put it right at the intake intake can take yet that's actually correct intake of the intake, the intake of the intake, that's where the temperature sensor will be. And then there was one more temperature I was going to do. reading my sheet. Oh, yeah. transmission temperature. That one's important. Good one to have. Yeah, it's a good very good one Jeep because their Jeep lease TJC severely undercooled the automatic transmissions. So
that's like the verb to your real differential temperature.
Don't need to don't care about that. Now. I got like, the default one the differential and Jeep. They don't really overheat too much. And I've got like a ginormous Ford 8.8 On the rear too. Now, that's like that thing whenever we heat. Sure. Plus, it's like, what do you do if it was overheating? Stop?
Yeah, yeah, just
ignore it ignore. So I've made some interesting design decisions on how like this whole thing gets powered up. I'm going to run it off the trovo auxilary line. So when you turn the key to on this power is up. Yep. And so the that power goes into the cabin board. So I'm calling it and then along with the RS 232 is going to be a ground wire and a power line 12 volt line that goes into the board that's in the engine bay. Okay. And then when it turns on a relay, the return path, the relay is not going to go directly to to the chassis ground like most people do. And we're actually going to have it come back into the control box and then back up into the cap on that Rs 232 wire and then
to the chassis. What do you do in network?
We could sense it no reduce ground loop. Oh, instead of having this you know, loop cabin ground to frame ground. Right be returning that path straight back.
Yeah, you you don't want a ton of extra crap flowing in the chassis. Yeah, yeah, sense. I mean, even if the chassis is a big, huge piece of metal, it shouldn't matter.
Yeah, it probably won't matter, but it's one of those. I'm like, I can do it. And it's a nice attention to detail. Yeah, yeah. Yeah, should be pretty good. You know, are you happy?
Okay, so funny side note that I think you'll you'll I was watching this earlier today. AV the guy Yeah. Funny YouTube guy. He's got a video coming out here soon where he's testing. Like bolts. He's basically testing like, oh, bolts can be reused, will he? So he rigged up a new kind of device that'll basically pull on a bolt until it breaks. He just has this hydraulic ram that just grips it and yanks on it till it breaks. But I think he's also going to like Twitch, break them and find shear strength, shear strength. Yeah, things of that sort. So, when I was over at your house a couple weekends ago, we're working on my motorcycle. And you mentioned something about anti seize, putting anti seize on all your bolts. And you were saying like I put anti seize on all my books to make sure he is actually gonna test anti seize it. He's like, does it actually work? So of course, he has some like, really crappy, like, method of actually testing. But but it's gonna be worth watching
I from this experience, I know it works. Yeah, yeah, um, you do have to. Remember, if you increase or decrease the amount of torque you put on the head, though,
I'm sure you'll go through,
I think you reduce it by 10% is the rule of thumb because it basically you adding a lubricant to the threads. And so you have to change what the torque value is
you're adding a lubricant and you're actually adding things in between the threads. And there's something there now.
Yeah, I think you reduce it, someone's gonna email it and say,
like, you are absolutely wrong. I think we increase it by 500%. Yeah,
no, it's actually a very small percentage. There's actually a, I was watching some people build engines, and they were actually talking about this is for connecting rods connect a connecting rod is the part that connects the piston. I think most people know what the piston is. And it connects to the crank, which is the part that actually spins around in your engine, right? So it makes the piston go up and down. More the piston makes the connecting rod Yeah. Which then turns the crank? Yep. So but the connecting rod, the most important thing about the connecting rod is the bolts that hold it to the crank. And there's a company out there that sells aftermarket bolts for like almost every single engine. And they actually give you a specific torque rating with and without their special like
lubricants. Oh, they have some kind of they have a primary goop
hoop that you put on the bolt and so when you torque it in, you can increase the amount of torque and make it better I guess.
But it's just a big sleeve bearing on the bottom end of the the arm, right? Yeah. So why would extra torque well no
extra torque holds the connecting rod end cap onto it better and with so when when you basically what is when the heats up, you don't want that connecting rod connection to expand. Because if it expands the now your sleeve bearings got a little more wiggle room and now you might throw a bearing
you might throw bearing or if it if it gets even a small bit of angle in it, you you're wasting energy as heat heating up the bearing
and your bearing will throw the rod eventually. You're making you make a nice window inside of your engine block. Yeah, yeah. So that was the that was the automotive macro in the macro automotive podcast. Yeah. 30 minutes. I try not to do that again. No, no, that was cool. The next time we talked about the jeep. Um, hopefully we'll have the board does at least one of the board designed all the way you already have one design. Okay, um, that was back when I was gonna do a combined board. Okay, so I was going to run all the wires into the cab. And now I want to do this to whiteboard thing because I want to not run wires, because that's that's a pain in the butt. Yeah, yeah.
I actually did some dash wiring this last week in my truck. I still haven't seen it yet. i Yeah, but I bought a new stereo because I'm going on a trip here soon. And I have the 2008 Toyota Tacoma. And it that was the year right before they added Bluetooth or auxilary to a truck. So I for years I was still struck stuck with CD audio and that's it. That's my only option. Yep. Or radio. And I'm going on a really long road trip coming up here soon with a buddy of mine and I was like, You know what, I'm not gonna have him just either listen to my five CD knees or me talk so I got a new Oh your Disney CDs? Yeah, yeah. All of my Disney CDs every single well and I listen to a lot of metal and he doesn't so probably wouldn't work out well for so you know I put a new stereo in and it was, you know surprisingly I thought it was gonna be a pain in the ass. I was totally prepared that I was gonna be like I'm gonna spend half a day working on this thing. Now I had the whole thing installed in like an hour and one beer. No, I did it. I did on a Saturday morning I woke up and I was like, Okay, well, half the days dedicated to getting this in there. Taking the dash out getting everything in was just wasn't that hard. But I bought like a wiring kit where it every color was like it was a it was it fits into the Toyota factory connector. Yeah, and breaks it all out into like a standard color code that stereos and you use nowadays. So it's just like the purple wire goes to the purple wire, the black wire. It's just like, it's mindless. It's yeah, yeah. So it was really easy. But I took a look at the harness that goes in the back of the Yeah, right in front of the firewall. And I was like, I never want to touch that. It looks like there was at least 300 wires and oh, yeah, it was since
then my Jeeps? Oh,
I mean, it was it was a bundle of wires that was easily an inch and a half by an inch and a half. And all the wires look like they were about 24 gauge. I know it was just like, oh my god, like there's not enough colors in the rainbow to fit all of those.
Oh, yeah, speaking that it's like I wrote down like all the color combos. It's like light green with red, and then red with like, green strong and like, Ah, it's terrible. Yeah. You know, where do you find that kind of wire though. So because before I was doing all my research for this stuff, I was going to actually use the proper wire color. And so because I was gonna order a harness and then pull the pins out and re solder new wire on, that's the right color. Fortunately, didn't have to do that because I got a harness that had all that crap in it. So only had to do is pull the wires out and it was the right color. What do you buy that works? I looked on Mouser I couldn't find stuff like that. I wonder if you have to go to like a specialty wiring place that deals in color combo.
Well, okay, so I can I can actually speak to that because I have a little bit of experience. In fact, okay, so So in Mexico, in Tijuana, they actually do a lot of audio, enough certain audio cable harnesses ourselves. Yeah. And, and a lot of the shops down there will sign like 567 year contracts with an auto manufacturer to do 100% of their harnesses. Yeah. And so they're getting spools of wire by like the tonnage. So I mean, when you buy wire and that much bulk, you didn't contact the the wire manufacturer, and they're like, What colors do you want? Yeah, that's how you get all of those different colors.
So I need to be able to build like, like 1000 Actually, probably more than 1000 of these harnesses and
no talk about like, promising 40 million harnesses in five years. Yeah. Then you'll get whatever color Yeah, you could pick any color shirt truce in purple. Yeah. Yeah. And then the other one is purple. incharge Yeah, that's how it always goes. So yeah, that's, that's what Parker has been doing. Yeah. So yesterday, I spent some time back at the science museum. For those who haven't heard some of the podcasts where we've talked about it. I've got some projects that are going up in the science museum right now as part of the New Energy wing in the Houston Science Museum. And so we're kind of at the very very tail end of that the we're in the commission mode where we're doing some slight modifications and things like that so yeah, yesterday I was I did a little bit of reprogramming of my my project and I will go back one more time and kind of shake hands and say It's yours now. Have fun Have fun when it comes to maintenance good luck
and you leave and just burns down yeah, just burns the whole
museum good god I hope not you know, okay, so here's the thing and and I was actually really excited this happen so the the guys at the science museum we've provided them a manual on how our project works. It's like a one page thing because it's like press button and it does thing. Yep. You know, but regardless, they they haven't been in a method yet of like turning on and turning off things properly. So they just left my project on for like weeks. And I'm actually happy they did that because it stress tested it and not only did they leave it on for weeks, what that what that means is my stepper motor that holds the entire weight of the Project held that wait, like, bagging in 1015 feet in the air for two weeks straight? Yeah. Just burning away juice. And it was fine. I literally walked in. I was like, Oh my gosh, this has been on for a long time. And they're like, oh, yeah, it's like, oh, okay, so I just went press the button, and it just operated like it should. I was like, that is how I want this to work. Like,
yeah, but you just reduce the lifespan from like, infinity to like, to like a week. Yeah. To week now.
Yeah, yeah. Yeah. Cuz I mean, I have I have a big monster nema 34 stepper motor, that that was just holding torque for which probably, I'll admit is probably not great for it. And that's not its normal operating mode, it will be turned off every day. So it has, it has eight hours of runtime every day. So really, what that shows me is that, like, I was able to stress test both the motor, the driver and my power supply and code and my code. Yeah, yeah, you're right, it sat there listening for two weeks straight, and it was able to instantaneously jump into its code. So that makes me happy like that. Okay, great. This has some long term capabilities. But the thing that we're actually doing right now is we want it to have even longer term. So we're counterbalancing the whole thing. So as of Monday of next week, the stepper motor will actually not even hold any weight. Or if it does, it'll be very small, because we're just going to put an equal amount of weight on it. So really, the stepper motor will just be moving the thing as opposed to holding it. Yep. So, and hopefully, right now, the goal is Monday, it'll officially be the property of the Science Museum, and kids will be able to go and hammer the button and watch it do things. So I took a video of it and pass that off to Parker. And he'll upload then.
Yeah, I'm wondering how interesting kids will actually find it.
So as just a quick overview, is a logger and a logger is a device that measures the resistance of a hole, effectively, like a drill hole. And so that the device that in this video, it goes down, it opens up, and it moves up. Yeah, that's that's all it does. Yeah. But so kids will find it as interesting as they find everything else in the Science Museum. You know, like, because when you go to the Science Museum as a kid, it's like, you've got four hours to go run around and push every button you can and stare at computer screens and get like, go on an earthquake simulator or whatever your sides knees, you
remember that? I'm at it was at that museum? The way you got into the elevator and it went like down a
drill hole. Oh, Parker. Yes. I need to take pictures. I'll take pictures on Monday. Is there a new one? Now? There's a brand new one, and it got to be like $4 million. It's called the geo Vader. Geo Vader and yeah, okay. So Parker remembers this from you probably want an elementary school to that. No, my Oh, you won't? Yeah. You weren't in Houston at that time. Okay. But But you went on the old ride. When I was in elementary school. I went to it. And it was this cheesy little. It was like a closet that you go inside of. And yeah, and it was like this guy who takes you in like a ride down to the bottom of a drill. Yeah. And it was like the video screen. It looked like the guy was like a bellhop. Yep, yep, yep, yep, yep. And the floor would start shaking when you're drilling stuff. So they've completely revamped the geo Vader. And now it is like this monstrous room that you go inside of. And it looks all like super spacey and crazy stuff. And so it's going to like shake and take you on a whole ride and things like that. This is what this is what companies in Houston spend their money on? Yeah, like a giant ride to the bottom of a well. And we actually, we have a second piece that's directly next to the geo Vader. And it's just a drill. It's it's pretty boring. But whatever. Yeah. So yeah, science museum project is almost done. That is like eight months in the working.
Yeah, I can't wait to go see it. Yeah, I'm actually kind of excited to like, go and press the button.
Yesterday, yesterday was the first time I saw it in in what the the museum calls its final state, because I've always seen it, where it's surrounded by like, raw plywood. So it look, it's always looked like a homemade thing. Until yesterday. It was all painted all the graphics were there. And they put Plexiglas around it. I was like, oh, yeah, it looks kind of professional.
It does look pretty good. And yeah, okay.
I was actually talking to the other guy that I did the project with last night at the museum. One of the things that makes me happy is like, we got paid to do this project, but we're not like, we're not getting paid gobs of money. And it's a it was a pretty thin budget for this. We made it all work within the budget, but it's not like we didn't get a million dollars to make this. Let's put it that way. And so you know, a lot of this stuff is, you know, we pulled it out because we know how to work within a small budget. And so maybe if we had more money If certain aspects of the the mechanisms would be a little flashier, or a little bit more, I don't know, maybe we'd use titanium or something like that. But one of the things that was cool was I, I've been able to see the guts of everyone else's projects. Yeah, they're just like ours. Even though that half a million dollar projects, there's a guy who's like, swear to God, I saw one of the panels over there, and there was a guy who was using speaker wire to hook up. Oh, it sounds like I love it. Yes, you know, because it's just like speaker wire. It's perfect. You know, like, all of these things are done professionally, but at the same time, it's also like hobbyist, well, I mean, there's guys who just get it done. And the speaker wire just gets it done. I was like, ah, that's great. And you know, it also on top of that, there was a there's a piece that is in the same kiosk as one of our and they were programming it in Arduino. There's an Arduino that there, the science museum decided that's what they're gonna choose to do all this in. So it's like, hey, that's cool. You know?
So speaker wire. Anyways,
I actually don't have speaker wire in my control box anymore. I rip that out. It was a temporary thing, but still like to see someone else using it was like, ah, that's great.
I remember going to a pinball festival. And this guy made a one off machine. I can't remember what the theme was. And I looked inside and it was all speaker wire. And I'm like
it's really flexible.
Oh, it's terrible. So crummy cheap. Yeah, it works. Yeah. Alright, so our faux RFO. Yeah, we are going to have to go to the Science Museum and videotape it when it's all up and running. Hopefully it works. Yeah. So the RFO we have this week, beverage coaster reference design by intercell. Okay, so this is i I'm on the intercell like, I guess mailing list or whatever site.
So they're sending RFPs to Yeah, they sent to me today.
This is a like a reference. They call it a reference site. It's basically a project one of their engineers made probably, like using basically all their chips are a big part of their chips. Selection. It's a beer coaster. Okay, that lights up and stuff. So it has batteries and stuff. But as you put your beer closer to it, it lights up faster and faster until you contact and then it plays the chicken dance over its piano speaker.
You know, okay, okay. I now we're, I'm thinking about the same thing here because I saw an article on E web. And it said something about like, Oktoberfest coaster, it must be the same thing similar probably. So is it like a fireman where it's detecting the distance between Yeah,
it uses a proximity sensor. Like what's in your phone? Oh to distance, and then it's got a temperature sensor. So it will know how if your beer is? Well, they say drink or beverage is acceptable temperature.
Oh, acceptable. So it's the electronic version of the mountains on a corps cam? Yes.
You know, when the LED turns blue, it's cold as Iraqis. Yeah, and it's got like a strain sensor in it too. So yeah, yeah, strain sensor. So like it can weigh how much stuff's on it. It's pretty interesting project. I was actually looking to see if you could just buy it. I wanted to build it. Yeah, I couldn't find it. And if I think the files are on the website, and I might just try to toss them into the like, macro fab thingy and see if I can just buy one. And because it'd be kind of cool thing to have. Yeah,
I might I might have all the programming files and everything. Yeah, yeah,
they do. I might change the chicken dance or something else though.
Yeah, what is it? Does it have just like a ROM on there or something like
that? I have no idea. It probably is actually a an array filled with values that it pumps out. PWM to the
Oh, it's got a buzzer. Yeah, it's like
Yeah, yeah. Alright. Sounds horror. Horrible. Yeah. Yeah. But it's cool, though. It's for good project. Yeah. It's kind of interesting to see. You know, bigger companies do goofier little projects like this. Finally, now. I like it.
Well, remember our IoT. Beer? coasters? Yeah. You could add IoT to this. Yeah. Especially if it weighs the beer. Yeah, like you could you could put a fresh beer on it. And then, you know, indicate that like, this is a fresh beer, and then it would weigh it as it goes down and then flag the waitress. Yep. When
it gets really low. Yeah. It's a good idea. Yeah, I was actually thinking about instead of Wayne bear. Well, no, I was actually thinking like, if you can shine a sensor up, and so when it gets empty, it would be clear
they'd like shut up into the beer. Yeah,
like just a, like a, a color sensor. Oh, so when it detected, like, clear or nothing, it would be empty. Because it might be cheaper to do it that way. But then I'm like, can you put Budweiser? And if not,
I'm gonna just always empty by more. Yep.
Or any really light colored beer you have to calibrate for like, dark and light you have to cut yet? you'd pretty much have to calibrate it per beer. Yeah, yeah. Are you just made a cut off for like empty is like this clear glass. But then if you had foam on the bottom, weight is a much easier, because you would know how much empty glass would weigh plus a little bit of beer. And that liquid would be about the same weight no matter what beer it is. Yeah, this for the principle of this thing. You know, we should build that thing eventually. Yeah, yeah. Yeah. So we'll make that a project that we'll get to in like 80 years after the SSPs is done, and the resistor resistor is done and all the other projects that we want to do.
Yeah, there's a stack what we were looking around the engineering department right now. And there's just like, a graveyard of project synthesizers done. The synthesizer is I'm gonna parentheses right now it is done. We declared it should call it that it needs wire management. It needs wire management and more stuff. But still it is done. Yes, it is done.
Okay, so the second RFO, it's not really an RFO. But whatever. It's, I've found this on the Reddit EC subreddit today. Its thoughts on high volume through whole wire soldering. So if you have a product that goes inside of the case, and you need to wire it up to some wires that go to the connector, or whatever, and how do you do for volume, soldering wires to the board? Or do you go connectors? Or what? Ah, I'm asking you this because you're our production manager. You know,
that is an excellent question or director, production. Director. Yeah, my new title is Director of Production. Yeah. Okay, excellent question. Because we go through this, basically daily,
yeah, with every single volume customer,
right? And here's, here's the, here's something to keep in mind. If you can do it for one, that doesn't mean you can do it for 100. And that certainly doesn't mean you can do it for 10,000 or a billion. So if if you have an idea for a product and you know, you think you can save a couple pennies here and there by like, oh, I'll just manually move this pin out of the way or like cut this little thing or wire this. When you start moving that into high quantity stuff. It it gets to be way more of a pain in the ass. Like, why didn't Why do connectors exists in at all? Why don't you just solder everything to a board?
Well, so you can remove it later. But connectors are pricey.
Right? Connect? Yeah, connectors are pricing. So it labor is to
Yes, but labor is too. So would you say if you if it for for? Is there a cut off point like for low volume stuff? Is it better to do you know, solder straight in or do connector? Because then you could talk about doing enter recharges with like a harness manufacturer? Do your wires made with the connector?
Sure. Sure. Well, okay. So first of all, this is this is something to consider that will that it's a little bit different, but it may impact the idea behind it. If you're going to have something that needs to be soldered by hand, not by machine. In fact, even if it is by machine, try to make all of the through hole happen on the same side of the board. If you can change your design, if you can change your packaging, if you can do whatever have it all happened on one side of the board. In fact, it's it's difficult for most designs, but it's awesome. If all the SMT can go on one side and all the through hole go on the other side that makes a product fly through manufacturing, because you can do one side pick and place one pass through an oven and one pass through a wave solder machine or selective solder machine and talk about reducing labor there you've got three operations there that don't actually require human being to touch any of your parts other than stuffing for through hole. So when it comes down to that, you know if you're kind of if your design by default means you have a lot of through holes that go in multiple different directions, then it's you're you're setting yourself up for paying more for hand soldering. At that point. Adding wires doesn't really cost much more. It's just another operation. Yeah, as soon as you decide that a through hole needs to go in from the top and another three hole goes in the bottom you've guaranteed raise price on your board, because there's just a whole nother operational issue. might require jigs that might require assembly instructions that might require all kinds of stuff.
Next, even just wiring like let's say, if you can do all your connectors or through hole parts with a wave, you're not going to be able to put a 12 foot wire on the board and hold it in place through the wave solder machine.
Yeah, wave solder machine is like 1520 feet long. Yeah,
well, just like what do you do with all the wires, it has to kind of like float behind it. That's right, you'd have to manually solder in that wire no matter what, right. And
if you want anything to go through a wave machine, there are height requirements, or minimum, or I'm sorry, maximum height requirements. And anything that goes through a wave has to be held down. You can't just like put a couple of wires in a hole and send it through, you're pretty much guaranteed the fallout. So you have to be really careful about these these kinds of things as soon as you start considering the project. Also, you know, yes connectors, you might spend a little bit more on a connector. But think about the long term impacts. If you ever have to service whatever your product is, or if there's an RMA on it, if someone returns it, and you ever have to disassemble that pulling a thing off of a connector is a second, or desoldering 20 wires is absolute because in the end,
this is the thing is when thinking about this kind of stuff. I like to look at other consumer products. Yep. Like if you take apart TV, it's still connectors. Oh, yeah. Yeah. They still use they put all the electronics go into one board that has all the ports that you plug in, like the outside world, HDMI, composite, VGA, blah, blah, blah, power. And then the screen plugs in with connectors. Still. They don't manually wire in that stuff. So someone has done the math to figure out that was cheaper?
Oh, absolutely. Yeah. Especially in consumer products, where every penny counts, every half penny counts. I mean, like the difference between a resistor that costs point oh, two cents and point oh, one cents, actually matters. So ribbon connectors are awesome. You know, custom harnesses are awesome. No, no. Like, there's there's a lot of other things to consider. Also, when when kind of approaching it. It's more about like serviceability. How long does it take to assemble? How long does it take? If there is an issue, that's actually a big thing, too. All of these things are worth considering. I think
the big thing is people, when they are starting to spec out their product, they see oh, that connector is $1. So they say I don't want to use it. I just want to solder it in while the labor is like $1.50 to solder. So yeah, those 12 wires then right, but they don't see up front when they're designing.
So here's here's another thing, this is the I wouldn't call this a pet peeve. But this is something that I think it's just really important for people to know. Headers, pin headers are awesome. For prototypes. And for low volume stuff. They're absolute garbage for high volume stuff. And what I mean by that is like a pin header is is easy to solder for a guy to just slap on. But in high quantity, they become an absolute nightmare. And getting them aligned and everything is just difficult. So why why is it not just alignment, alignment, a lot of times people will, you know, there will be a three pin header, and they'll select a 40 pin part because they want you to kind of snap it off and break it into that that kind of thing doesn't really work well in high quantity because it starts gumming up the numbers and then you get all confusion in there. And most of the time with these pin headers, you get a guy who wants to solder from the backside. And then he wants to put another board on top and solder from the top side, when you could have built those as two separate assemblies with connectors that fit together.
One point on one board,
right, right. So I mean, like consider consider a header where you have a pin header or a row of nails. Don't Don't, don't have another board that just fits holes through and then you have to solder to that put the motherboard with a female connector such that they just slide together. Because the if you have this whole like board to board solder connection that has a lot of labor behind it that has a lot of time, that's not wasted, but it just cost money. It just cost a lot of money to do. So connector to connector is almost always cheaper than just board to board soldering. So headers are kind of we all use them and we all love them just when it gets to higher quantity. And you know, I don't have a number for what that higher quantity is. But everyone knows what high quantity is. In general. Like if you're talking about 10,000 boards, really heavily consider not using headers. Yeah, use something that actually like snap together connects together. And here's the thing, there's connect companies all over the place. And they really, really, really want you to use their connector. So if you if you find a connector, that's expensive, and you're, you know, you think it might be good. Call those guys. I bet you they'll send a sales rep out to you. And you can chat for a little bit, and you'll get it cheaper. They still cost. Sorry, connector companies will work with you on price for sure. Absolutely. I've dealt with them for a long time. And what you see on Mouser is not the price that you will actually pay it's that's way more than what you would actually pay.
I think it's because a lot of times is you you basically Mouser has to break the parts out. Yes. And that's, that's where it for parts like that. It's probably more expensive for them to do that. Mm hmm. Because when we do the pin hack, like we buy basically boxes for Molex. Yeah, and they just come in trays. Yeah, no, they come in just a straight up box. Well, yeah, but I mean, yeah, it's not gonna work. But um, unopened boxes, like it's like 10 fold cheaper. So,
right. Also, it doesn't even another thing that people don't really understand is, it doesn't take a huge amount of quantity to get a custom connector mate. You know, if for depending on your application, I mean, I've worked with customers in the past, where we've only made 100 of their product. And we had a custom connector made, like from scratch, and it wasn't that expensive. And so that's also an option to think about. Like if you have to think about this, if you have a product that you want to make 10,000 or 100,000 of, and you could either go with five off the shelf Mauser connectors, or one custom connector made for you. That one custom connector is likely to be cheaper than all five of those. Well get all packaged together cheaper. Oh, yeah. all packaged together. Yes, labor and other stuff. And that is an option. So when you're in the Design mode, like in that now we're getting into industrial design, and that's a really creepy topic. You know, that's a really like, ooh, things start to get real weird there. But, but no, that's an option. And keep that in mind. Don't just think like, oh, I can just slap 45 pin headers and then solder my boards together. Well, yeah, you can. It's just it guaranteed to cost more. Yeah. So there's my thoughts
they go. And then we'll have to have like, some music that's like, thoughts from Stephen. Oh, no, no, no. Yeah. Some like like ATS keep. Oh, yeah.
Rainbow goes across my says now, you know, the more you know, the more you know. Cool. Yeah,
Joe. Yeah. Um, so, thanks for that, Steven. You know, it's actually really funny is I saw thanks. And that's actually leftover from last week's notes.
Oh, yeah. Thanks for being on the podcast, guys. Yeah. We write our thank yous to our guests
for that when we remember it. Yeah.
We've probably forget it every time. Yes.
So with that, that was episode 92. Right. Yes. 92 of the Mac fab engineering podcast. We are your hosts, Parker,
Dolman and Steven Craig better everyone take it easy.
Thank you. Yes, you are a listener. Thanks again. Right, Stephen. Thanks again, for listening to our show. If you have a cool idea, project or topic that you want Steven and I to discuss, tweet us at macro fab or email us podcast at macro lab.com. Also, check out our Slack channel. The link is in the description. If you're not subscribed to the podcast yet, click that subscribe button. Our new website has a subscribe button now that I think you can subscribe through Google and through iTunes. That way, if you subscribe, you get the latest map right when I click the Publish button, which is around 11 o'clock on Friday, central time, or Texas Standard Time. That's a NPR show I think. And yes, please review us on iTunes and on Google because it keeps the show visible and helps new people find the show. Later, everyone
This is the last installment of Stephen's 'Adventures in Injection Molding'. We are going to recap the entire two year sage and close the book on it.
The Jeep Prop Fan project rides again! Well some iteration of it at least. Lets design an open source PCM (Power Control Module) for automotive apps!
The quest for the right connector for a project! The right of passage for any hardware electrical engineer starts with a connector catalog.