They may be known for being electrical engineers but on this episode, Parker and Stephen dig into the more mechanical aspects of their current projects
How low can the power consumption of the Cat Feeder Unreminder go? Parker and Stephen discuss leakage current on this episode of the podcast!
Parker and Stephen discuss Chat GPT-3, a language processing AI system, and what it can mean for engineers and society.
Parker
Stephen
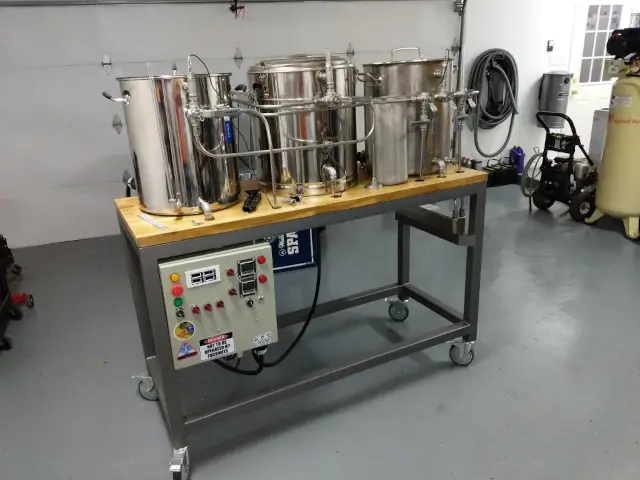
Parker’s brewery in its almost completed form! Pre test boil.
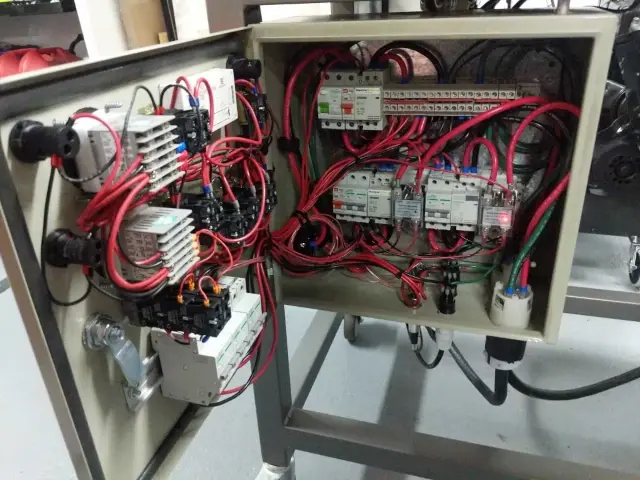
Inside the electrical box. Breakers all over! Even had to put a din rail on the cover to fit everything.
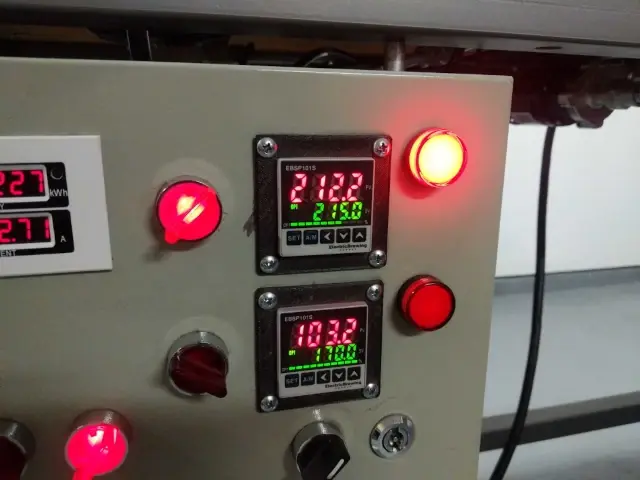
Boil achieved!
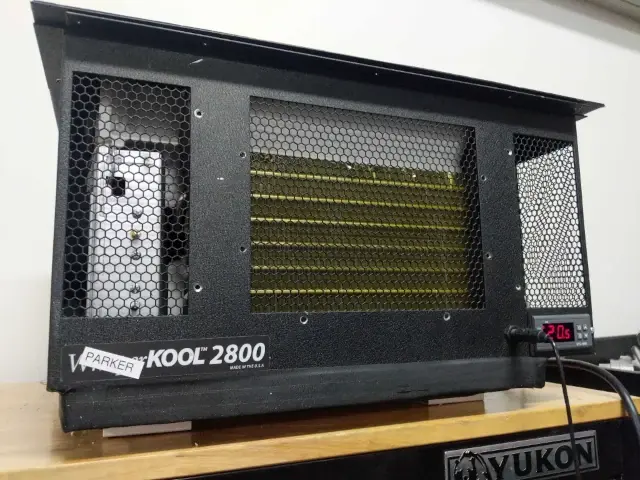
The Parker Kool 2800 which is a hacked up Whipser Kool 2800 with a $100 A/C window unit.
Parker is an Electrical Engineer with backgrounds in Embedded System Design and Digital Signal Processing. He got his start in 2005 by hacking Nintendo consoles into portable gaming units. The following year he designed and produced an Atari 2600 video mod to allow the Atari to display a crisp, RF fuzz free picture on newer TVs. Over a thousand Atari video mods where produced by Parker from 2006 to 2011 and the mod is still made by other enthusiasts in the Atari community.
In 2006, Parker enrolled at The University of Texas at Austin as a Petroleum Engineer. After realizing electronics was his passion he switched majors in 2007 to Electrical and Computer Engineering. Following his previous background in making the Atari 2600 video mod, Parker decided to take more board layout classes and circuit design classes. Other areas of study include robotics, microcontroller theory and design, FPGA development with VHDL and Verilog, and image and signal processing with DSPs. In 2010, Parker won a Ti sponsored Launchpad programming and design contest that was held by the IEEE CS chapter at the University. Parker graduated with a BS in Electrical and Computer Engineering in the Spring of 2012.
In the Summer of 2012, Parker was hired on as an Electrical Engineer at Dynamic Perception to design and prototype new electronic products. Here, Parker learned about full product development cycles and honed his board layout skills. Seeing the difficulties in managing operations and FCC/CE compliance testing, Parker thought there had to be a better way for small electronic companies to get their product out in customer's hands.
Parker also runs the blog, longhornengineer.com, where he posts his personal projects, technical guides, and appnotes about board layout design and components.
Stephen Kraig began his electronics career by building musical oriented circuits in 2003. Stephen is an avid guitar player and, in his down time, manufactures audio electronics including guitar amplifiers, pedals, and pro audio gear. Stephen graduated with a BS in Electrical Engineering from Texas A&M University.
Special thanks to whixr over at Tymkrs for the intro and outro!
Welcome to the macro fab engineering podcast. We're your hosts Parker, Dolman.
And Steven Gregg.
This is episode 229. Ah, so finally another mean you only episode we can talk about projects, you actually accomplishing things? Yes. But we've had like, what, three, four guests in a row?
Yeah, I think three and I think next week is a guest also.
Yes. Next week is a guest as well. So on our last Steven and I only podcast, I promised that brewery would actually boil water and it did last night.
Last minute, like very less,
like seriously, like after work. I'm like, wait, I have to boil water with this thing. And I had everything done. I finished everything on Saturday night, this past weekend. And I just never got around to actually filling it up with water. So filled up with water fired it off. Did a test brew day in like, an hour basically, instead of like, Go and take like three hours normally, we're just like, simulating the valves and yeah, like moving the valves and and, and just testing everything like, does this process I came up with my brain actually work. So yeah, it tests a test boiled, and I did it with the garage door closed. So I made a quite a good sauna. It seemed like the whole garage, but it worked great. Now, this is where, you know, thinking about all these things is great. And all but yeah, to actually do it and practice it. So you can actually find the issues, right?
Oh, of course. Yeah. No, the issues show up after you've built the entire thing,
right? Yes, exactly. And there's no going back because everything is thread locked together.
So so what what issues have you brought into for? Okay, so
the main issue is the main issue is, after you're all done brewing, and you clean it everything because because that's the whole point of this system is so you put cleaner in your first vessel and then you just cycle it through your brew cycle. Basically. The main issue is when you're all done, you rinse everything with water. But when you have what's left over is you have standing water in your vessels. At the bottom, you have like an inch of water or half an inch of water, depending on how high the outlet is basically on the kettles. And I actually like finished up last night, I think it was like 10 o'clock last night. I was like, crap, how do I get this water out and I texted you and Roz about it. And Rawls actually had a really good idea is just use the Shopback to suck the water out. And I'm like I'm brilliant. So
that, but it's not the most
elegant. No, it's not the most elegant because the great thing is the my shop vac has a separate unit, that's a water separator. And so you don't have to like convert your your wet vac over like five times you you either have it set for dry, or you have it set up for wet. You can't do both at the same time. Because it ruins the filters and all that stuff. So I have a separate base, it's a bucket that a tube goes into two comes out, and it separates the water out. So that's great. That's easy to do. But yes, it's not an elegant solution. But at least it's a solution for this and it's gonna work fine for it's actually an easy thing. I tested it last night. Very easy to do. Not not a big deal. And the second issue I have with it is remembering where the turn the valves
because if you turn it the wrong way, then you're sending you're sending hot liquid where wherever, right, yeah, wherever we're
shooting to go. Now there's not there's only a couple different paths. But yeah, when you need to transfer fluid. The great thing is you can just turn a valve shuts the flow down to zero and then you can adjust the valves and then check your valve work because usually at the adjust to valves to change the flow direction
and probably you would want to do those in a sequence right?
Well no, you just turn the flow off and then you can turn them wherever way they need
because because each pot has has a cut off valve right at the pot.
Yeah, each pot well each pump does. So each pump has its own cut off valve so you cut the pump off.
We do not have valves right on the pots.
Going into the pots Yeah, but not coming out of the pot. Not coming out of the pots.
That's interesting though. So like on your boil kettle. Some of the liquids not boiling because it's because I mean, if you don't have a cut off alpha right at the boil pot, then some of the liquid is in the tubing. Right?
Yeah, it's a to me. It's actually cycling though. Oh,
that's right. I forgot because yeah, you're right. Parker does something very interesting that I'm trying something interesting. Oh, well, yeah. Neither one of us have really seen this before. But it's it's pumping the wart while doing the boil on on a in the boil kettle, because typically, you just, I mean, fundamentally, you just put all the liquid and sugar and in a pot and boil it. And that's that's it. But and both Parker and I do it vigorously enough that it doesn't, you doesn't need to be recirculated. But
no, but I'm gonna try it see what happens. I'm expecting to get better hop utilization, even though it doesn't really matter for humpers. You just have you noticed that you don't have enough hospitalization, you just put more hops in it doesn't end up costing you that much more money. Not like a industrial Brewer, where like, oh, yeah, adding, you know, 100 more pounds of hops actually is more expensive. In the end, we're, we're spending $6 extra. So yeah, the knowing wire to turn the valves is kind of, it's not really an issue. It's just one of those, I have to write a process down of like, turn this valve do this, do that. And then because I have three temperature probes, and two PID loops, basically you have one PID controller that controls that has two inputs, basically and you select which input you want. You either want your your Herms coil or your hot liquor tank temperature, or you want your warm temperature. And then the other one is just in the boil right boil temperature. And the problem with that is you have to change the PID setpoint on the from the hot look, you got to set to your strike temp, right. So you said to your strike temp, which is let's say 170 degrees Fahrenheit, said to the strike temp, it gets 170 and then you pump that fluid into your your wort or your not your work your grain, your mash tun, right. Yeah and your grain and then you have the Senate to your yet the set that controller to your mash temperature, because you want to cycle the cycle the wort into the Herms coil and which is in the hot liquor tank and do that and then you have to add water back in because you got to cool the water that's in there because it's at 107 degrees, and your your mash temp is 150. So you got to cooled down 20 degrees by adding some cold water to it. That's not that hard to do.
Well, let me just put a caveat in there. Because the first time I used my recirculation system, I did it exactly that way. And the whole idea of the strike temperature is to get it such that once the hot liquid meets the cooler grains, they stabilize at whatever your target temperature is, yeah, in your case, you were saying 150. So what I've found in just brewing with this, my system a handful of times, I just set it for whatever the target temperature is. And so I don't do the strike temperature, I don't do 170 I'll set it for 150. And it only takes like one or two minutes for all the grains to come up to whatever that target temperature is. So then I don't have to cool down the liquid in my hot liquor tank. It's just, it's just there, you know?
Okay, so you're saying is just set the, just set it to your target temp. And don't worry about strike temp.
Yeah, just just set it straight for you, whatever your mash temp is. And the recirculation does such a good job of maintaining the temperature with the respect that it'll come up. Any any temperature difference that it drops will just get corrected really fast.
So you can change that 20 degree differential probably really quick.
Well, but that's just the thing. Like there's not even really a 20 degree differential. It's less than that. Yeah, yeah, it's I mean, and you so if your match temp is 150 I mean, if you really wanted to, you could, let's say your match Temp was 150 You could start at like 155 and like set that differential a lot closer and and it'll even out even faster.
So yeah, it's just about learning your your rig so to speak. Yeah, that's how it, how it handles temperature fluctuations and that kind of stuff. So I'll get that shot. I'll try the strike temp. That's right, the the just mash temp and try that out for my first
group. Try that out and if you have, if you have like a thermal pen or something like that just like monitor or you you are able to monitor the exact temperature of your mash? Right?
It's the temperature of the mash coming into the ton.
Okay, see if you can somehow measure the temperature coming out of the ton. That that might give you. Oh, actually, if you know the differential between the in and out, then you can know what the basically what the ton is consuming in terms of, you know, thermal performance. Yeah.
Warms, I guess. Um, I don't think it really matters, though.
No, most of all of this doesn't really like it. We're splitting some really serious errors. Yeah.
So yeah, that's the current problems I foresee with the brewery system. But all these have ways to fix them. But I am not going to fix them right now. My iPad is functional, it is functional. And I don't I haven't made beer with it yet. Right, right. And so my goal is to spend, I want to say a year, or at least a whole like fall apart, we actually a year probably won't touch it. And change anything until next summer, and just brew beer, figured out this process out and see what improvements I can make on it. But the the future, I think of this system is one motorized valves to simplify the fluid transfer process. And this is not for automation. In terms of like, like, you press a button and it does everything right, like you hit go, this is for, I need to transfer fluid from one vessel to another vessel, I turn this knob, and then hit the button on it, and it will transfer fluid until I tell it to not transfer fluid. Because I'm not, I don't want this to be automation, I don't want to be like I want to put 5.862 gallons from the hot liquor tank into the mash, I don't want that. I don't think at this size of a homebrew system, I don't think that matters so much. Then your actual like, you know, your process and your recipe, I think those are more important at this this size, then making sure you're hitting the correct you know, exact number of of fluid volume. I know you were going the opposite way for a little bit with like your flow controllers and stuff. But I don't think that I think being, you know, an eighth of a gallon off on your mash out of you know, 10 gallons is not a big deal.
Maybe I say that. Honestly, the funny thing is like, I think volume, I'm a lot more strict about measuring volumes, I'm a little less strict about temperatures.
I think temperature has the bigger, bigger impact. Well, the biggest reason why
I like monitoring and measuring my volumes really accurately is really really hate spending an entire day on a new recipe and like doing the whole thing and then coming out with like, four gallons as opposed to five. And difference though, but like it is it is but like, I mean, I'm being a little bit, you know, extreme here, but I've had that happen one or two times where I'm just like, Ah, man, like, if I just measured my volumes a little bit more accurately. And one of the things I've found, you know, I'd maybe this isn't like super accurate the way I did this, but if you buy a gallon of water from the grocery store, it's not a gallon of water, I actually found in general, it's more than a gallon most of the time. So if you're counting, you know, if it's if your recipe says put seven gallons into your mashed and you put seven of those things in it, I guarantee you, you're going to be way over on your volumes. And if you're way over on your volumes, then that means that your concentrations are going to be lower, and you're going to get a less strong beer than you shot for.
And you just how I fix that is you just boil more at the end.
Just boil it till you're happy, right? Yeah,
I mean, you've had my beer. It's very good.
Oh, of course, of course. Honestly, the biggest thing and I discussed this with my wife, actually, right after we first got married, one of our goals was eventually in our home to have like some beers on rotation. Such that like when friends come over, they always know that like this one will be there kind of thing. Yeah. And so the biggest point was I want my rig to be repeatable. And so that's where I'm really kind of anal about it. And I don't want to have to like change things on the fly to make it repeatable.
I can see that. I think you can get to a point with the with your brewery rig and not have to be so critical about the volumes where it will taste the same at the end. If you're an eighth of a gallon off.
I mean it's it's kind of like You know, it's kind of like the the someone who's, you know, making biscuits. And they've done it so many times that they don't have to measure anything. They can just like, feel the dough and know that it's, you know, wet or dry enough. No, seriously. I mean, it is it's kind of like that.
But, I mean, I still measure the water. But I'm like, you know,
but you measure in one gallon? Yes. Oh, no, I'll
do like, I'll do one gallon increments in terms of pouring it in. And then I actually, when I have an increment at the end, is, by all my old rig out, because I was using all the water at each time, is I would just weigh like, if I needed half gallon, I would weigh that and what and I'd weigh that in water. Yeah, but this new system, though, I have a hot liquor tank that I have to pull from. And I have to transfer liquid out of that into other vessels, which a flow control would be useful for. But I think just using a sight gauge on your hot liquor tank and say you started at 14 gallons, and you need to pull four and a half, run that pump until it hits, you know, nine and a half gallons on the site gauge and then close the valve off. Right, that's gonna be good enough for the system for sure. Yeah. And while I was getting out what the temperature is, especially on your mash, a cig your, your your window of mash temperature is like six degrees at the entire spectrum that temperatures could be which is from from absolute zero to theoretically infinite. Right? No,
no, no. The the the temperature of the entire universe.
Yeah. Okay. So yeah, there is a top end. Right, right. There's only six degrees fair on the Fahrenheit scale of that, that is useful for mash tun?
Well, and there's different flavor profiles in between that six. Yes. So it's not like you're just trying to hit that window. You're trying to hit something inside that window?
Yeah, yeah. You're trying to hit that? Yeah, inside that window. So you like being that? 148? Verse 156 44? Yeah, like, we're the same recipe you're gonna make, like, it's actually amazingly how different those beers will be at the end. One's gonna be super multi one's gonna be super dry mouthfeel. And that is where and home brewing, in my opinion, that's where you should put all your effort into is making sure when you hit your mash tun temperature window, whatever degree it is, that's the most important thing,
I think. Well, and, you know, earlier, I was mentioning, you know, I said, I don't care about temperature as much as I do volume. I think I think a caveat to that is both are important. But temperature relies a lot or is connected a lot with time. So like in your mash tun if you're off by two or three or even four degrees on your mash tun but you get to your target within two or three minutes. It's not a big deal. Yeah, but if but if you're at the wrong temperature for 20 minutes, then yeah, you got a problem.
Yep, I totally agree. So yeah, features motorized valves make it simple to transfer the fluids. And then the second thing is having the output of all the vessels, instead of being on the bottom of the side, put them in the actual bottom in the middle. I don't know how to do that. Because with these pots, they're try clad bottom. And they're like, they're seriously like almost a half inch thick bottom. Yeah. Now, I don't need that for electric because the elements in there, this is for like if you had a flame in the bottom. So I would probably have to get new vessels, which is fine. They're not that expensive. But I have to figure out some way to do that. And it's like, well, if I'm doing that, do I do I put a cone like a slight cone at the bottom? So I actually do drain all of it. I don't know that's in the future. So
I just don't know the answer to this. I'm assuming you can't drill through try clad bottom.
You can because I've tried. I've ruined a pot. Really? Well. I tried to I thought it would be only like maybe a quarter inch thick. And I could try to sweat a connector onto it. You can it does suck so it does what it's designed to do with heat away, right? Yeah, it spread the heat out. So you cannot at least with a propane torch cannot sweat silver solder. Sweat the fittings on
i You could probably thread it. Well, okay, so that's what I was thinking I was thinking about this thread. So, yeah, here's the thing, drill a hole like a one inch hole right in the center of the bottom of your pot, and then do straight pipe thread on that. And then thread a, you know, thread a valve on that with a jam nut, you know? And then could that work?
I would just do NPT. So it's tapered? Well, they will.
But the problem with NPT is where does it bottom out, you wouldn't want it to bottom out with some of the pipe inside the kettle.
Does that mean you just grind it off, and just grind it off?
I mean, that's not a terrible idea. I was thinking about doing something similar with with my rig. So my mash tun does have a conical bottom, and it has a spout right out the middle. I purchased it with that. Yeah, I originally got that one. It drains 100%. And it's amazing. But I really wish my hlt and my boil kettle did the same thing such that I could just take a hose to them and spray out all the guck. And that's my cleaning, you know, yeah.
So that's definitely something in the future I want to change. And then it's a better way to set the set points in the PID controller, when you get the swap. Now that might not be a big issue. Now since I can just set it to the mash temp from the get go. Now I you do have to raise it for when you mash out because I do mash I do. Batch was called sparging. Spark yet batch sparging. So it's not a big deal. You only have to change it once. It's still not a big deal. But we'll see.
You know, and adjust what we've seen just a moment ago, the temperature and time being connected thing. Now that you have an electric brewery system and your PID controller, you can just say you're mashing at 150. And you need to mash out at 170. You just make that differential when it comes time to mash out and it will go from 150 to 170. Pretty damn fast.
Yeah, I'm gonna have to play around with that. Because yeah, so one of the things
that's kind of important I found was to make sure that your your your PID controllers, you run their auto tune function.
I didn't do that. And I was running into some issues with that, like it wouldn't. It would ramp up really quickly to like 10 degrees away and then like, not quite get there. Like, it takes like Baby steps. Baby step up and it just wasn't working. So yes, I need to Auto Tune it might try that tonight. Just run it some more.
So I was reading about it just the other day actually. So I did an auto tune on mine with Jess water and it worked great. It was fantastic.
But some people were saying do an auto tune with water and then re Auto Tune it when when you're on your first brew day and have it auto tune with, you know, something that's more than just water, you know, and then and then you get an auto tune in the actual setting. You know,
now, since I have one PID controller that's doing two jobs, is that going to affect it because one is you're just heating the hot liquor tank up. And then one is actually running a Herms coil. It's still in the hot liquor tank, right but it's running a Herms coil that's trying to it's trying to indirectly heat up a pot, the mash tun shot do that system or shot do the other system as the auto learn. So
what So the Okay, the first one is just getting the water to whatever temperature in the hlt. Right, that's its whole goal. But the other one, the other one is still controlling the exact same element, it's just reading a different temperature right.
Yes. So that in the system and the system is different is instead of because on the in the hot liquor tank, the water comes out through a pump back into the hot liquor tank and that output back into hot liquor tank is the is the feedback the temperature reading right now on the other one, the reading is out of the output of the Herms coil that goes into the mash tun. So you have this different system, thermal system, which I'm thinking set that as the system that it auto learns because heating up the water with a big coil, it does that no matter what, like you can just set it to like 100% and it's going to do it right.
Right. Yeah, well, so whichever one they Herms coil. That's the more critical one. Yeah, the the other one is the very first thing you do on brew day, is just get the water hot, right? Yeah, that's the very first thing and it like there's nothing critical about it just needs to get hot. And I bet you the same Auto Tune profile will basically do the same thing, right? So you can it's the same element. The only thing you want to watch out for in that case is because you're you're measuring an indirect temperature, you don't want it to gush. I don't I don't remember which one of the, the PDI, or the D would matters more in this case, but you don't want it to just freak out and like, try really, really hard to get the temperature. If it's not going fast enough, I guess that would be D, right? You don't want that you don't want it to make extremely rapid changes go really, really fast. And, and because it's going to be slower. The it's going through the coil is a lot slower than just monitoring the actual temperature of the water.
Yeah. We'll see what happens. Yeah, I think what I'm gonna do is I'm just going to set it up where I have, I'm just going to heat up the pot liquor tank, transfer fluid to this, after the podcast, transfer fluid into the mash tun. And then auto tune that. Yeah. And then make sure it stays at 154, whatever. And then, then I got to auto tune the boil, which that's the easiest one, which is, it's like the hot water tank coil in there. In hot water. See if it gets up the boil. It did take quite a while to get to boil. But yeah, the problem is the auto tune or the tune that's built into it. Is it doesn't, it really doesn't want to overshoot at all like, its its rightful its entire job is like never to overshoot. And so the problem though, is it gets within a couple of degrees and then start cycling. I'm like, No, you should be like so hammering that elements. Right? They get there. Yeah,
no, it should be at 100% until it's close.
Yeah. And it's not close enough. I
first time I did an auto tune, I noticed a significant difference in how fast it was.
Okay, so I'll do that tonight. Yeah. All right. So Steven, I've been sending you all these pictures of my brewery? Yeah. What's going on?
So actually, we should we should post some of your pictures of your brew box. Because it's pretty damn cool.
So it's not perfect, but it's good enough. It's good.
Yeah, good enough. So I know I have so many things going on and everything but but Parker get really ramping up all this brewery stuff has got me super, super jelly. So. So I kicked off a real quick. I call it the jelly project. So I'm super jealous about the brewery because I'm like, I would have brewed too. So I ended up just gutting my system. And I'm doing a new one real quick. Because I want to brew I would agree with Parker to in fact, my goal was to brew this coming weekend, but that's just not going to be the case. I'm
going to try but I don't know if that's gonna happen either. Because I pushed it back one week. That's, that's the thing I didn't get to is. So let's finish up this again. Yeah, I'm talking about that. Okay, cool. Yeah, well, okay, so all said and done. But to boil it all down. I'm, I'm getting my ring back up and code.
So they the biggest Honestly, my system was is functional. It's just what I was always brewing right next to my stove in my kitchen.
And I don't have that capability anymore. And one of the things about it is just from a functional standpoint, I needed the ability to control two things at once, two pots at once. And my rig was always only capable of one, because I only had one PID controller, I actually have two pots with two elements. It's just at any one point in time, I could only do one. Well, so I got a second PID controller. And I ended up getting all the fancy switches and illuminating. You know, felt like mine. Yeah, yeah. Yeah. So so like, I've designed this whole system and, and so I'm building that now. And the cool thing is so like, I feel I feel a little bit. It's unfair, in my opinion, or I feel I guess I should say I'm really blessed because I have the I have the ability to have, I have two CNCS at my disposal one that does aluminum really well and then my CNC at home that does wood. I'm not gonna say anything well right now. No, but it does it does. I'm hitting 10,000 to accuracy and that for what I'm for making a little box that's more than enough. So I am I am incorporating a little bit of wood into this. This box just because I wanted to. I'm going to stain it like I stained my blue card because my blue cards are all made of wood because I want it to match. Normally I would just buy a box like Parker did. But in this case, I'm like I have this aluminum CNC that I can use at work so I can cut everything and I can engrave on it and stuff. So all the text is going to be engraved on it. So I've got I've got it like 99% of the way there. My hope is to finish it tonight and cut it tomorrow morning all the I'm sorry not tomorrow but tomorrow evening. I cut all the all the pieces for that. So I have actually right next to me right now I have a box just filled with like contactors and breakers and illuminating switches and all that stuff. But I'm just like, I'm so excited because I was gonna brew this weekend, but this whole weekend is, is now going to be done dedicated to just wiring a box,
which now don't do what I did was that is leave those contactors and switches and relays in the box for two years.
Oh, no, no, no, no, no. Like, this is I'm devoted to this pretty heavily right now. So. So actually one of the things I wanted to talk about, just because I mean, the actual, like inner workings of my box is nothing particularly special. It's literally just switches that flip contactors on or off that just things Yeah, I mean, the biggest thing is like I one thing you and I haven't talked about is how did you go about designing the box? And and like figuring out where things go? Did you do it in like a like, just put it in the box and be like that's where it goes and then drill it and
I did a circuit diagram. Yeah, long time ago. Of like, it looked like an appliance diagram. Right. So like, like, this is a contactor just big rectangle, right. And I did all the wiring that way. So I drew that all up. And then basically based off that I redrew it. But with everything next to each other of like, Okay, this one needs to be connected to this guy. So they should be right next to each other. And then I put it in the box. There you go. That was it. That's all I did. I did. I didn't know I ran out of room. Oh, no. And so if you actually open up the box, there's a whole bank of breakers on the on the front door on the inside. All the motors now I went way overkill with breakers. Everything has a breaker. Almost everything's got a breaker. I've actually yeah, everything's got a breaker on it. So yeah, it's probably pretty overkill. But I really wanted to make sure like, if a wire is was only SPECT to carry a certain amount of current. So like a 10 gauge, I like I have my pumps hooked up with 10 gauge wire, which is way overkill way. I could probably done it with 16 and been fine. But I might okay. And the pump is only going to pull half an amp. We're going to put a one amp breaker on that. So that that circuits ever bad anything bad happened, it would trip before anything really bad happened, which is melted wires, right? Yeah. So that's how I did it. It's probably way overkill, because I bet you if you shorted that 10 gauge wire out, the main breaker would probably flip immediately. Because sure, 50 amps could totally float that 10 gauge before it caught fire, right?
Yeah, yeah. For a short period of time. The breakers should break before that.
Yeah. But I wanted to have more redundancy. And especially since you have 240 volt and you have 50 amps, and you have you know, drunk people operating that's, that's what people don't remember, drunk people will be operating this thing.
Or any breed I should say. Yeah, not not not drunk. not drunk, inebriated, though.
And so I want it as much redundancy as possible, which is also why it has this built in GFI, all that good stuff. So you don't have to remember that you have to have GFI hooked up or whatever. Everything's built in.
That's that's one thing. Mine does not currently have a GFCI. But I have plans to install that. It's just those are so damn expensive. did not give you one. No, we've we've we've we've actually had this conversation like five or six times outside the podcast like you did give me one. But I left it at your house. And it's still there. Oh, well, I'll just tell you it. Well, that'd be great. Yeah, cool. Now,
only rooks works on 240 though. That's fine. If you have a 120 leg it might not
work. No, well, okay, so my system is a little goofy, admittedly. So my whole system runs on 240. But I just want the system to run on pure 240 I don't want to split the legs for any reason. So but but check this out. I've This is so stupid, but I'm totally fine with it. I'm actually running a separate 120 line into it. So I plug into my 240 outlet but I also have a one.
Well, you have you have a four wire 240 plugged in right I
have but I'm also including a separate 120 leg. And so the whole thing is what I'm doing with that is I have an auxilary switch. So basically I can plug this if I want I can plug my box in to a 120 outlet also. And all it does is it switches with a contactor to outlets that are 120 such that if I have something that I want to be able to control at the box, I can just plug into my box and then just control it. And that's entirely separate. And the whole reason why I want to do that is because I wanted my GFCI when I actually install it in there, I want it to only service to 40 ever, I don't want it to be offset and have a separate leg. So the whole point was like, basically, I want to be able to plug my pump into my control box and just control it with a control box, but only do 120 by itself with so yeah, it's yeah, it's goofy because my box I have to plug it into two separate outlets, but I really don't care. You know, like,
I'll send you this, uh, this RTD then
that. Yeah, that's a that was a GFCI for a jacuzzi, right?
No, I tried that. The problem with those is those wants a 120 leg, they want you they want they need to be hooked up with a four wire style 240. So people who do not know what how residential wiring in United States work is you have because most of our plants are things work on 120 volts. But to get 120 volt is you have, you basically have four wires that come from the pole, you have ground, then you have a you have a hot, hot and neutral. And when you put the two hearts together, you get 240 volts. But if you go hot, the new to the neutral, you get 120. And so that's a four that's a four wire plug. And that's what I thought you were explaining.
Well I do I do have a four wire I'm doing a four wire and a separate entirely separate 120
Yeah, so mine set up three wire. Yeah, like a welder. It's actually I plug it into where my welder plugs in. Yeah. Which is it's 240 only. So it has for basically from the breaker box to hot, hot and then ground. Oh, just gotta get Yeah, just ground. And so the the problem with the jacuzzi ones is they want the 120 leg, and they will not operate at all without the 120 leg, which is the neutral leg. And so I had I actually went overseas and I didn't go overseas by searching overseas and start and I got a DIN rail mounted GF GFCI. They call them something else like residual. I think it's RCD residual current device, which is what a GFCI is. And it's actually an industrial rated one, which actually it trips at a lower current as well. So it's like, I think the ones in states they chip at the ones that go on your wall, do like 10 million amps. This is 6 million, so it's almost half. So it's safer in quotes. Yeah, but they only will work with two with two hot legs here in the States. Okay, so you can't you can't pass a neutral throat. And you can't round around it. Because if you try to put any current on that neutral leg, that our RC D will trip right away. Well, that's the point. That's the point. It's like, oh, there's an imbalance here. Let's trip.
Well, and that's exactly why I wanted to have my pumps on a fully separate line. Yeah, because I want I want my elements and my PIDs and those things to just purely be on classic 240 You know, yeah,
that was that was interesting when I ordered my pumps, because I ordered sugar brewery prompts. And the I ordered 240 volt ones. And the guy was like, Are you sure you want 240 volts? Because I he's because most people, you know, buy 120s Right? That's probably the only person that bought 240s That year from him. But I'm
just throwing this together. So that one of the reasons why I was kind of asking you about how you kind of like envision your boxes, I've been spending the last like two or three days, figuring out the way my box goes. The biggest difference is I'm building my box from scratch. So I get control over everything. And I find it kind of, I don't know, convenient and nice when when the box is already decided for you pick the size and you're done. Right. But with mine, it's like well, I mean anything goes so so basically I used Inkscape in CorelDRAW. And I just drew outlines of like, I know my contactor is x by y size and I've just made a whole bunch of like random parts and and sort of inside each one of those boxes just just wrote text on like, Oh, this is three inches high. This is two and a half inches high. And then graphically just kind of like slapped everything together and threw it around and basically said like, I can put my contactors here I can put my PID here I can put you know switches and things here. Uh, until I got something that I liked, just like, it's, it's super nice, I don't know, I like the playground idea of like, I've got a box, I know my DIN rails can only go here. So I'm just like, that's it, I don't have to be creative anymore. It's just like, everything just falls into place. But with this project, it was just like, I mean, I'm, I can cut it to be whatever I want it to be. So I'm
gonna spend two years trying to figure out what shape your box is going to be.
You know what I just made it really simple. I was like, it's two feet wide, it's one feet high. Okay, and then it's about six inches deep, like I just made it like I ended up because if you have too much control, or too much ability to do anything, then like, it'll never happen. So I just said like, this is what it has to be, I've would now play within this playground that I set for myself. And as soon as I did that, like everything fell into place. So, so much easier. So yeah, the idea is like, I'm just drawing it in Inkscape such that I can do the graphical aspect of it and make sure that it looks halfway nice. And then I can just export DX F's into Fusion 360. And all the holes and all the graphics and everything are already taken care of, then I can just basically press go on the on the CNC. So yeah, the hope is that I can cut it tomorrow. I don't know I'm I'm crossing my fingers on that. But that's only cutting the aluminum pieces, I still have to cut all the wood pieces. So that's probably, you know, cutting all the aluminum is the easy part getting my CNC to do what I wanted to do is, is harder. That's the hard part. But But luckily, like I mean, all I'm really asking you to do is cut rectangles, like the the border of the of the box, like the depth part is wood, all the all the plates that go everywhere is it's all aluminum. And I decided to do the, you know, when you look inside of an industrial box, a lot of times they have a secondary raised plate off the back plate a backplate. I decided to go with that. So that I didn't have to just like put tons of component holes in the backplate of the of the box. I don't know it looks cleaner. It's just there's no. Yeah, I mean, whatever it works. So yeah, I'm hoping to my this coming weekend, my project is to wire that all up and give it a go.
It takes a lot longer than you expect to wire those boxes up, though. Yeah, yeah, the nice thing would be two years. Well,
I hope I can get it done this weekend. Minus minus significantly, I shouldn't say significantly minus minus, I feel easier than yours. In terms of like, I don't think I have as many bells and whistles. But mine has four switches, it has a power switch, it has an auxilary switch, such that I can turn on that 120 And then it has two other switches that turn on the two other elements. And then, of course, there's lights involved in all of those switches. And things you know, the biggest thing that I really was shooting for on this is I didn't want to have tons and tons of terminal blocks. Like I wiring terminal blocks is super annoying. So basically like the contactors I have have quick disconnects that can actually handle the current stuff. So I designed most of my system off of how can I get power and neutral and ground around such that I don't have to put a bunch of terminal blocks in there. In fact, the only place I think I need terminal blocks is for my ground connection I've got everything worked out such that I don't have to put extra DIN rails and terminal blocks in there.
Yeah, I did. I did most of mine, I got the DIN rails, DIN rails, I got the terminal blocks and DIN rails for the big stuff. So like when I need a jumper, the six gauge wire around, I'm like, Yes, I need to have a terminal block to do that, right. But like for the low amperage stuff that's on like the one amp breaker which basically there's a one amp breaker that controls the that basically allows power to the lights and to the PIDs and all that stuff. And that actually that just jumpers around so that it goes out and then when it hits the terminal, it just has a new wire that comes out and goes somewhere else. I really actually kind of didn't want to do that. But that ended up being actually the best way to do it for me. So we're gonna do Yeah, it all works. Out works. So what's next on the brewery project is first I got to take inventory of my brewery equipments. I'm gonna do that tonight. I haven't even like looked at it's in the cabinet down here. I don't remember what cabinet it's in. So first first quarter is like where is it right? Take inventory, make sure I have everything I should buy. I want to make sure nothing got broken in the move from years ago stuff like that. And then I make a list of spare parts I need for the brewery. So like, if this part failed, can I replace it and salvage the brew day. So like solid state relay, having a spare contactor, that kind of stuff, I don't think I want to get spare elements. Because you'd have to drain everything to get the element out anyway. So it's like, you know, it's
game over,
that's game over, you're done. So I'm not going to get a spare element, but definitely spare electrical parts where like, I can unplug it, and change it out in like five minutes and get back, like get a spare PID, just in case the PID blows up, stuff like that. Maybe some spare switches. Yeah, that kind of stuff. And then I want to build a storage, storage for the brewery equipment on the cart. Because right now it's like all spread out and boxes and stuff. I'm like, No, let's put a like that bottom area is just open. So I want to put a some wood down there, I don't know what kind of wood yet because I'm out of that countertop I used. So I gotta find some new material to put down there, probably just get some like one by fours or something like that, and then screw it down onto that steel. And that wagon, put all the storage down there, like all the equipment, spoons, and the racking cane, that kind of stuff. And then gotta clean and fire up the fermentation chamber. Because that thing has, the great thing is I've had it plugged in. So it's not I actually opened it up last night, it's not nasty in there. But I still got to, you know, open it up, bleach it, clean it up, get the controller fired back up for make sure that all works, then I gotta clean the brewery, because I just ran water through it. And so how I'm going to clean this brewery because everything's hard lined. So you can't scrub inside the lines because everything's connected each other. And so I was actually talking my brother who actually worked with a lot of local breweries up in Colorado, in in Houston, when he lived here is basically you clean it just like how an industrial professional brewery system gets cleaned, is use a 2% Lie formula. So you run that through and that kills that basically eats everything that's organic, and softens it all up, run that through and then you run an acid cleaner through it. And that gets every that will get everything else out, and will help brighten up the stainless. And then you just run water, the flushing and then when you're all done than then vacuum out the water, right. And so I gotta get the, the acid star saying makes it stars. And number five is what's called Star stains a company that builds cleaners for for breweries. So but the thing about that stuff is used to be able to buy it individually from like online stores, they stopped selling it. So you basically have to go to a brewery that buys it and then get some from them. pretty pleased. Yes. But the good thing is, I know, a couple of the smaller breweries here so yeah, my brother does too. So I've been on that
you might be able to sneak some Yeah. And
oh, then get ingredients and then brew.
So it's that simple. What when do you think is brew day?
Like you I want to do it this weekend. I don't think that's going to happen because I definitely want the spare parts before I brew and cleaning the brewery getting the acid is going to take a I probably go get that this weekend. So hopefully next next weekend.
Let's let's try to plan brewing together. Cuz I was gonna try brewing social distance. That's right. Yeah. Long distance brewing.
It's gonna be the July 4. No. June 27. Weekend,
June. Let me let me Yeah, June look at my calendar real quick. Yeah, yeah, let's, let's try to do that. And, you know, I'm gonna try to do two five gallon batches. So that's a full day,
I was gonna do a 10 because my systems pretty much really set for 10 gallons. Yeah, so I was gonna take one of my recipes and basically, just double it. I'm gonna do the calculations, but basically double it. And especially since like, I've been cutting way back on losing weights. It's been very successful, but it's like, Okay, I'm gonna start brewing beer. So I'm gonna have all this beer on tap now, which is gonna this make my my diet. So I'm like, Okay, I love brewing and I can't drink all this beer because it just goes over my calorie limit. So I'm like, okay, basically, I had to have other people drink it. So I'm going to be burning for tailgates and stuff for football. And so Mike, okay, the best way to do that is to have 10 gallon batches because I always would only bring one five gallon keg, and it would be gone in like 30 minutes. Yeah, it just rips. I'm like, Okay, I gotta have to. Yeah, at least that works. Yeah.
I think I want to go a little bit more for some of variety.
Yeah, well, eventually, I want to fill up my full imitator, not for my Kegerator set, six taps on it. But 10 gallon batches seems to be how I kind of set up this system. There's not really any, like I was trying it out with five gallons and five gallons kinda will work. And this is because you basically need six gallons at the end, right? It kind of work, but it's really gonna try it out. Yeah, it's around the edge of the system working 10 gallon is super easy, because I kind of, I guess I, I was just eyeballing where fittings would go. And I'm like, Yeah, this looks right, drill a hole. That's how this whole brewery kind of came together. Like I planed out, like the process and the electrical, but like, when I actually built it, I'm like, Yeah, that looks better. I had no idea. Yeah, sure. That's probably in the future. There's those changes I want to make right already. Already. But again, keep it this way. I don't want any scope creep. feature creep in his brewery. I want to actually brew beer and see if it works.
Okay, Saturday, the 27th We're both going to try to knock out some some Bruce.
Yes. Cool. Yeah, I should have everything done by then. And for ready for brewing. Man, it's been a journey. So I have one more project that I completed. Yeah. And now this is that wine chiller? The the hacky watch? Yeah, the Whisper cool. 2800. That didn't work, which is so my parents had bought a wine chiller on on Craigslist. flag number one never buy anything that requires refrigeration on Craigslist, unless you can test it, right. So we couldn't test it, picked it up. It sat this assembled for eight months. Finally put it together didn't cool down the wine at all. So like golf crap. So I started looking online, I WhisperKool 20 100. A replacement unit is like three grand to do so. So I'm like, That's expense that seems expensive for what basically looks like a fancy window unit window AC unit. So I went on Amazon bought $100 window unit, hacked it up and put it back in the original WhisperKool box. And I put a label so it says Parker cooled 20 100 on it. And it works great, actually, we installed it and it got the wind down the 55 degrees Fahrenheit about what 15 and a half Celsius and cycles works great. Now there are some gotchas that if anyone else replicates this in the futures those those window units are awesome because they're inexpensive. And they can you can easily hack them into other things. I've seen people turn make them into like homebrew glycol units. Yeah, stuff like that. They these are all mechanical based controls, there's no electrical controls. And so it's got a a basically a little probe, that little gas probe, basically it measures the temperature differential between it and the controller, and it decides if it needs to turn the compressor on or off. Basically to keep it from freezing over. In my my first thing is I was going to put I put an electrical controller on it. So I can set it to 55 Fahrenheit, and it would just turn on till then and turn off. The problem with that is the electrical controller doesn't know when it freezes up. Yeah, because I took the I took the the gas line, basically and I put it on the hot side of the AC. So in the mechanical brain thinking is good. It's thinking like man, crank that compressor full blast. And that actually worked great. It got really cool really fast. It just it would freeze the coil up. And so then I put it back on were supposed to go which is on the evaporator and it wouldn't get cold enough because it would get down like 60 Fahrenheit right above where it needed to be. And so then I took it and then I bent it up just a little bit. When the coil just fine to did that I fine tune the mechanical side by doing that. That worked great. But it was it took some fiddling. So it would be nice, basically to have to a controller electrical controller that had two probes. So you can have one on the evaporator and then one where your setpoint is reading from and it's basically Okay, run the compressor until that you sense that it's free. Going up, right? Or a way to be able to kind of fine tune the mechanical side, I wish I opened up that mechanical controller to see if there was basically a set screw that you could adjust. I know a lot of them do have those. That would be probably the best way to do it. But it's assembled and the fact that you had to lift this unit and like set it on the back in the in the unit and like hold it there as you're like, screwing it assembling the unit together. It's never coming back out. Yeah, it works great. Definitely a really good way to do a project like that, because it was only $100. I was about to say it's cheap. It was very inexpensive. And I use gaff tape to like hide. So like when you open up it actually looks completely fine. Doesn't look like someone took a took a solves off to the metal chassis. I just covered everything again,
you put a little bit of extra effort into it just to make sure there's no apprentice marks. Yeah, yeah,
I covered it with the apprentice marks the gaff tape. Better than Sharpie though.
I don't know. Sharpie Sharpie can save your butt. For sure.
SRP statement. Although
I saw a I saw something come in the other day. It was I don't I don't remember exactly what it was. But it was like a a unit from from another company. And I noticed that somebody had marked a blemish with a sharpie and it was like really, really bad was the solution.
If it came from a factory, I would expect at least a paint pen.
I mean, it was it was a Sharpie. It was a small blemish and a Sharpie could do it. I get the I get the mindset, but like that shouldn't pass QC you know? Yeah, yeah. I don't know someone was just being cute.
Sure, cute. So that was the macro engineering podcast where your host Parker Dolman and Steven Gregg, get cute this weekend or something.
Take it easy.
Parker and Stephen discuss Chat GPT-3, a language processing AI system, and what it can mean for engineers and society.
They may be known for being electrical engineers but on this episode, Parker and Stephen dig into the more mechanical aspects of their current projects
How low can the power consumption of the Cat Feeder Unreminder go? Parker and Stephen discuss leakage current on this episode of the podcast!