The quest for the right connector for a project! The right of passage for any hardware electrical engineer starts with a connector catalog.
This is the last installment of Stephen's 'Adventures in Injection Molding'. We are going to recap the entire two year sage and close the book on it.
The Jeep Prop Fan project rides again! Well some iteration of it at least. Lets design an open source PCM (Power Control Module) for automotive apps!
Have an idea for a podcast episode? Maybe a question for Parker and Stephen? [Hit us up!](mailto: podcast@macrofab.com)
Did you enjoy this episode? Let us know in the comments below!
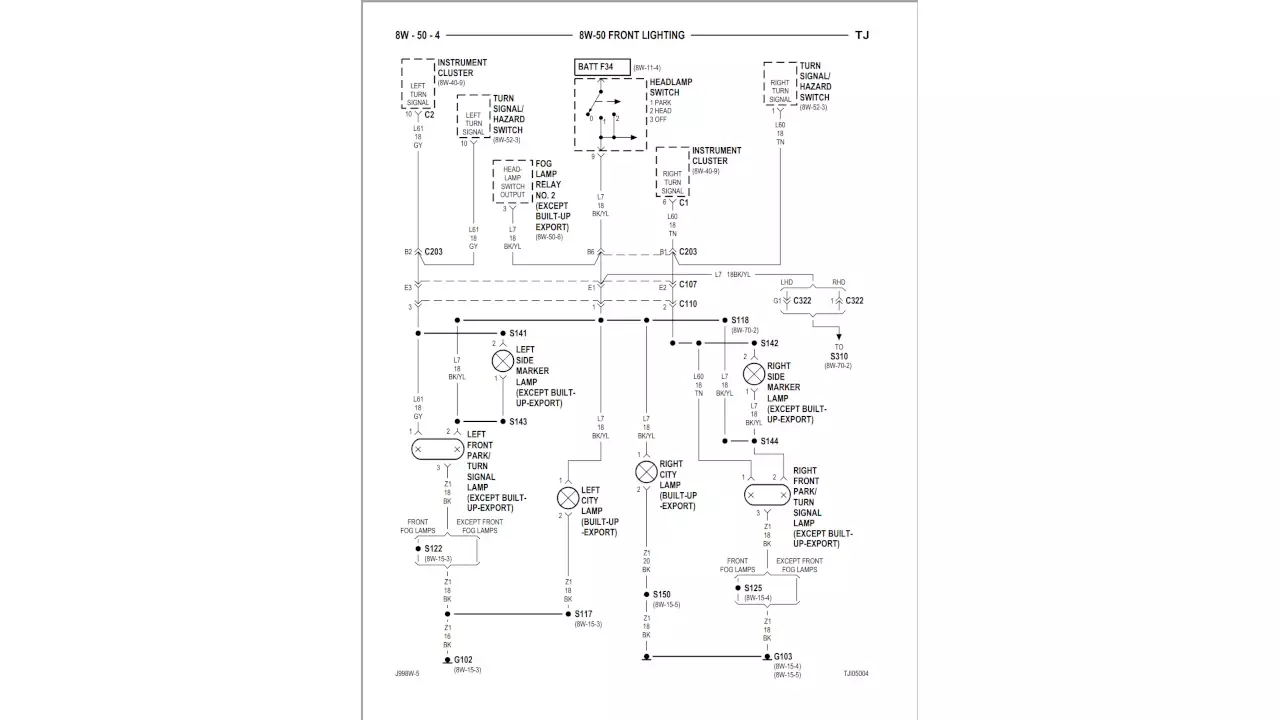
Figure 1: Schematic ripped from the Jeep’s service manual.
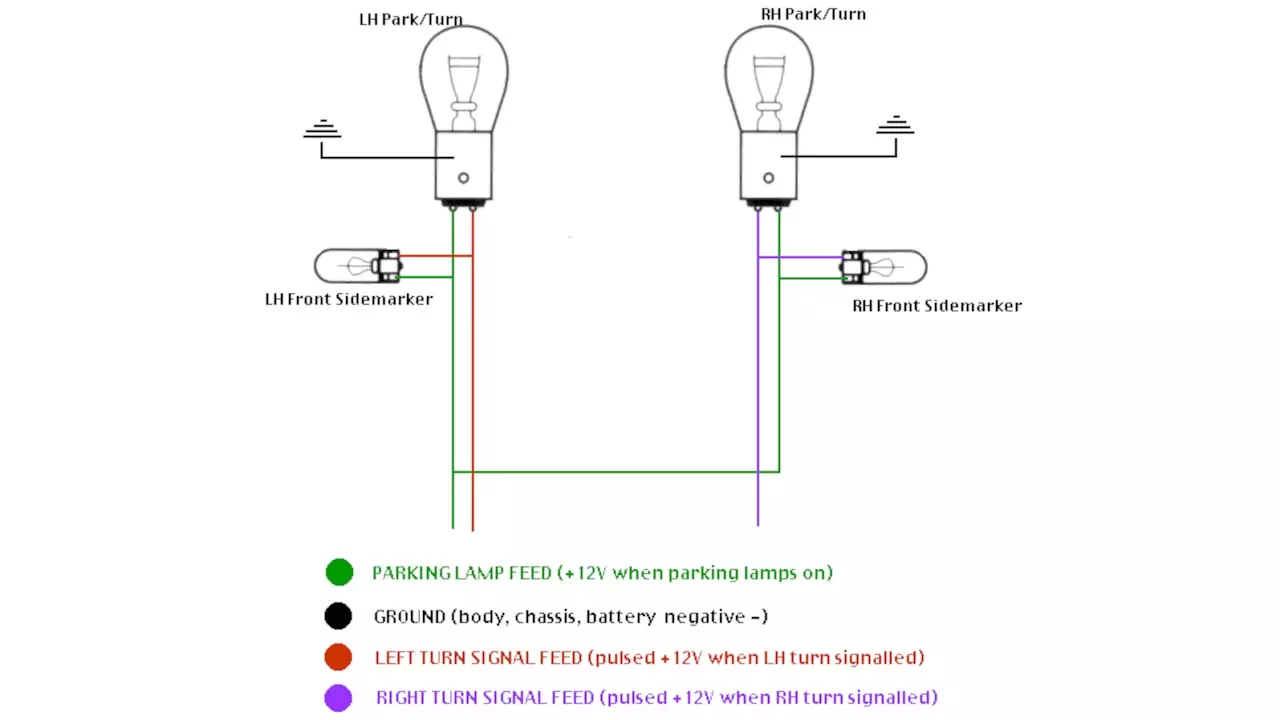
Figure 2: Simplified wiring diagram for the turn signals.
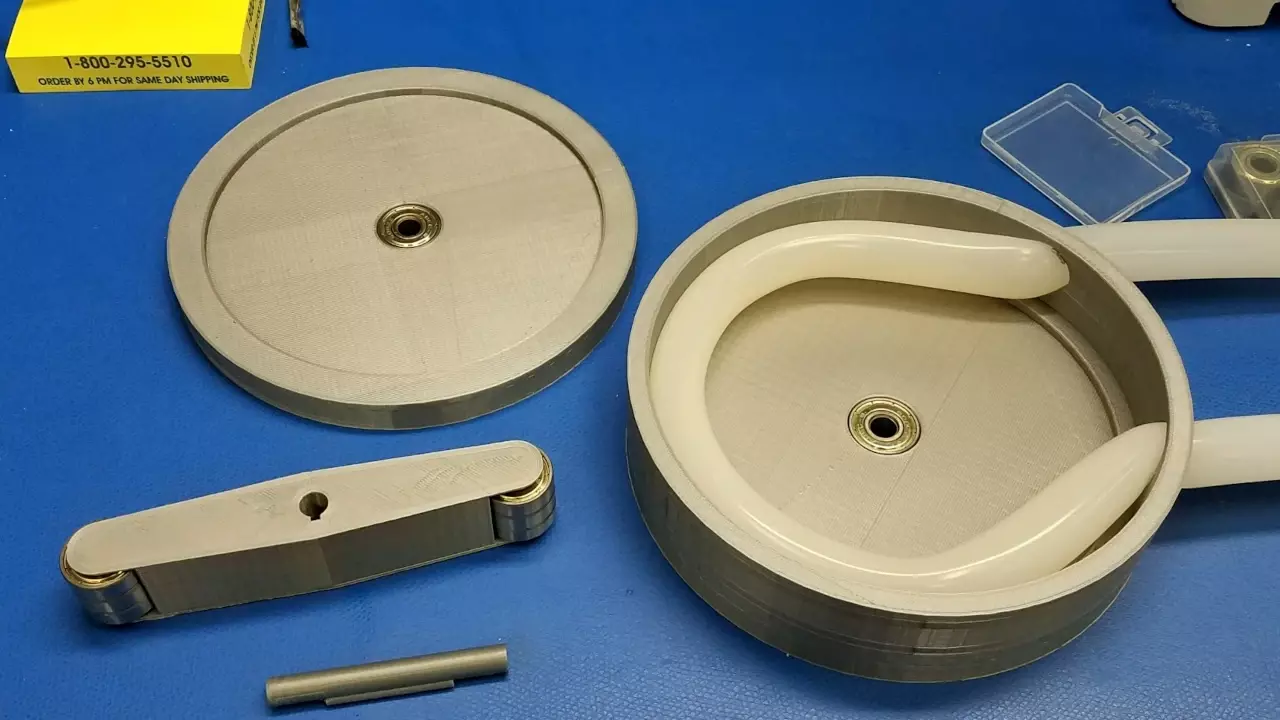
Figure 3: Stephen’s peristaltic pump! SOIC-8 for scale.
Parker is an Electrical Engineer with backgrounds in Embedded System Design and Digital Signal Processing. He got his start in 2005 by hacking Nintendo consoles into portable gaming units. The following year he designed and produced an Atari 2600 video mod to allow the Atari to display a crisp, RF fuzz free picture on newer TVs. Over a thousand Atari video mods where produced by Parker from 2006 to 2011 and the mod is still made by other enthusiasts in the Atari community.
In 2006, Parker enrolled at The University of Texas at Austin as a Petroleum Engineer. After realizing electronics was his passion he switched majors in 2007 to Electrical and Computer Engineering. Following his previous background in making the Atari 2600 video mod, Parker decided to take more board layout classes and circuit design classes. Other areas of study include robotics, microcontroller theory and design, FPGA development with VHDL and Verilog, and image and signal processing with DSPs. In 2010, Parker won a Ti sponsored Launchpad programming and design contest that was held by the IEEE CS chapter at the University. Parker graduated with a BS in Electrical and Computer Engineering in the Spring of 2012.
In the Summer of 2012, Parker was hired on as an Electrical Engineer at Dynamic Perception to design and prototype new electronic products. Here, Parker learned about full product development cycles and honed his board layout skills. Seeing the difficulties in managing operations and FCC/CE compliance testing, Parker thought there had to be a better way for small electronic companies to get their product out in customer's hands.
Parker also runs the blog, longhornengineer.com, where he posts his personal projects, technical guides, and appnotes about board layout design and components.
Stephen Kraig began his electronics career by building musical oriented circuits in 2003. Stephen is an avid guitar player and, in his down time, manufactures audio electronics including guitar amplifiers, pedals, and pro audio gear. Stephen graduated with a BS in Electrical Engineering from Texas A&M University.
Special thanks to whixr over at Tymkrs for the intro and outro!
Hello, and welcome to the macro fab engineering podcast. And we're your hosts, Parker Domon.
And Steven Craig. And this is episode number 79.
So I'd like to give a shout out to a listener that wrote in Sam from Australia emailed in earlier this week. He's a electrical systems lead for the local solar race team that they have down there called cleanse, cleanse, energy, Team Arrow, clean energy, clean energy, something like well, it would be clean energy if there was an A. It's CL e n e, R, G, y, energy energy. He's designing a system that can control up to basically six times 50 Watt loads, which is a lot of power. Yeah. And the board was only like in the pictures that he sent was only like, two inches by three inches. Hmm. But he's probably confused since I used inches. I don't know what that'd be. It'd be like five centimeters. No, six centimeters. It's 2.54 centimeters per inch. So yeah, it's five centimeters by two inches by Yeah, whatever. And also has like CAN bus and stuff like that. So I can monitor what's doing Now the whole idea is to reduce how much wiring they have in their solar racecar to lower the weight. The fact that they're going through that much work to lower wiring, wiring, wiring rates, weight in their vehicle is kind of impressive. Everything counts. Everything counts in a solar racecar. Yeah, you
put the skinniest, smallest person in there. Yeah.
Cool. But um, one thing I want to know is actually like, how light is this vehicle? And how fast it goes?
I bet you it is very light and not very fast.
So Sam, if since you're listening to the show, hit us up on Twitter or send an email of how fast and maybe pictures the racecar people see. Yeah, yeah.
And how much wiring you actually
save, save? Yeah, like, oh, a week difference?
Oh, that'd be nice.
That'd be cool. Cool. So yeah, that's, uh, Thanks, Sam, for writing in. Yeah. Thanks him. So that article I was talking about last week and gave a presentation on it's not done yet.
The article about how to turn on your off your device. Yeah.
So basically, I had to fix a lot of stuff to this week at Makram.
Yeah, this has been a wrench turning week.
Yeah. Fortunately, you didn't have any, like, machines down or anything, but it still was like a brutal week. It's I didn't get the article done. But didn't help that WordPress decided to cut out like half my work on Tuesday. That doesn't help. Yeah, I mean, once I go upload an image and the image upload froze. Yeah, yeah. And I lost all my work. Please. Up to that point. That's painful. Yeah.
So you'll so you'll have it out soon. It should
be out tomorrow. Okay, cool. When this it'd be after this. This podcast lands.
Anytime after this podcast. Anytime as
his podcast lands, the article will be done. Yeah, there you go. And I finally got my jeep mostly back together,
which for those who've been listening, this is a year
in the May I bought, I just put the hardtop on last weekend. I bought that hardtop a week a year ago, like almost to the day.
Yeah. Did the the hard tub. We brought it over to my shop. Yes. Sprayed that. And it sat there for like a month and a half.
Yeah. And then it basically went to my storage shed until I got the rest of the Jeep ready for the top? Yeah. It's been a while. But that's not what I want to talk about. I want to talk about wiring, and vehicles, who is actually kind of with what Sam does. And want to talk about the turn signal,
except Jeep isn't going through a lot of effort to get rid of No, I've probably
added like 400 pounds of steel. And yeah, so the turn signals on the Jeep are kind of interesting. In the mid 90s, there was this thing where they were adding basically amber lights to the sides of vehicles like side markers. And the law is kind of like funky on whether or not they should blink or not blink or what pattern they should blink in. Okay. Like the doc for the dot rules that are DMVs and stuff out the follow. And so basically is the law how the law is written, and in most states is only the front linker needs to blink and the side marker just has to light up when you have the headlights on at night. Okay. But in the mid 90s, when the law was kind of new, they would blink the side marker, or sometimes they would alternate. The front would blink in the side would blink. You know, that seems confusing, but that's actually less wiring to make it work that way. Okay. Yeah. Because what they do is that side marker is, is isolated from ground through the front turn signal filaments.
Wait, oh, yeah. So
so there's a, I have the schematic okay. So go. If you're listening, go on to the blog, and go look at the picture. So I'll have the official schematic
so that Parker's given me a printout of this now, this is really, I've looked at this for a second. So this is really my first time to see it also.
Yeah. And so we're looking at the bottom right hand side. Okay, which is the right side marker and, and, and turn slash Park signal, right. And the other side, just left side.
Let me just comment real quick that this looks like garbage.
Yeah, it's really bad. I think this because most people work, or most mechanics don't like electronics. And it's because how schematics are written in service manuals. Yeah, awful. Look at you know,
uh, okay, so funny enough. My little bit of a side note, my father has an old 72 Yamaha enduro, it's a it's a Gosh, 75 cc little motorcycle. And in the service manual, they have the entire electrical wiring wiring diagram on a two page fold out one of those ones that like double folds. Yeah, right. They put all of the electronics for the entire bike and remembered this bike, even in 72 was street legal, so it had turn signals. And it has front and rear lights, but it also has the magneto and it has all the other the spark generator and all that. And they put it all on one triple size page. And it is just packed with with lines going everywhere. It looks like this. It looks like this. This your yo
is terrible. Yes, two pages, right, the 99. My 99 Jeep has like about 70 pages of wiring of wiring diagrams, not including the connector diagram. So it has like, like all the connectors have pin outs. Yeah. Which is really nice. And then they have one for splices. So where the splices are in the wiring harnesses a whole section for that. And there's a whole section for ground points or at, oh, official ground points for the vehicle.
It's just a big ol wad on the chassis somewhere, right?
Yeah. Well, it's all over the place. It's where they are. There's a there's a there's a handful of Yeah, so you, like actually go on this, it'll say at the bottom right corner says g 103. So you can go look up the ground point, you're on point. And so you can go and it actually says the page eight w 15. Five, we can go and see where that ground point ties to the chassis. Is there an image of the ground point? Yes. Okay. Okay. So it's, it's actually really good how the service manuals are laid out. The problem is the actual diagram. Yeah, yeah, this is confusing. And it's just confusing of just how everything goes back and forth. So there's another image that someone I can't remember the guys name. DSL torque dotnet is the website I found it off. And they just wrote a, a simple image basically, or drew a simple image of how this actually works
in a way that for electrical engineer makes sense. Yes. Or no? Actually, no one.
Anyone? Yeah. So the, you can see the side marker is not connected to ground? No, no, it's connected across the terminals across the terminals of the front marker, which is the parking and turn signal. Yeah. And so what happens is, when you turn on the parking lamp, 12 volts trouble toes into the park. Turn bold, right? Yeah, that goes to ground, right. Then it also goes through the front side marker there. And then the basically like the purple or red line, if you're on the left purple on the right, the purple line goes into the filament of the bowl, and then grounds out. I see I see. Yeah, so the using the basically because that front turn signal is such a high wattage it's like 24 Watts and turn signals like three or four
right so you can turn it on without turning the other guy that filming on exactly right. And then when when you it's sort of cheating, but sort of not.
Yeah, and so when. And so when you turn the turn signal on, it powers up both lines that go to the football, right? Yep. Which makes the voltage potential cross the side marker zero, because 12 minus 12 is zero point, right? So you have that turns off. And so you have an alternating on off. Blink.
Gotcha. Just by controlling effectively one line. Yeah. And
so basically you save one wire that has to run to those. Hey, when it comes to something like this, that's a lot when you're building 10 million vehicles. You know what that's like? 10 feet of wiring. Something like that. Yeah. A lot of wire. Yeah,
I'm gonna check my notes. Make sure there's nothing else i Oh, yes. Hey, Sam from Australia can tell you. Yes. One one wire can mean the difference, right?
Maybe in the solar vehicle bought in a 3600 pound jeep? Yeah. But in terms of cost, so that's all good when you using normal filament bulbs. Okay, so I switched over to LEDs. Yeah. Which actually works, this circuit actually works really well with LEDs. Except if you look at the actual Jeep schematic, that signal, the turn signal goes up into the instrumentation panel. So if you go up, it'll say instrumentation panel, right?
instrument, instrument cluster cluster.
That's right. And that's the indicator on your dash that tells you when your blinker is actually lighting up. So in modern cars, that's a different signal than your your CPU sending to your dash. Yeah, in the jeep. That's an that's an actual wire that goes from that bulb to your dash. Oh, okay. It's an actual Yeah, physical connection wire. Well, what happens is, since that's the filament bulb, the diode drop that you see is like, you know, 1.7 volts is enough to barely illuminate that that dash indicator. Oh,
lights on, it's really annoying. It's like, Ah, it's not supposed to happen. Just add some resistance in line.
You could, but then it makes dim and or you have to hack the transportation panel at that point, or modify the harness on the dash side, which is annoying, because that's horrendous. Yeah, so I fixed it by basically, making the side marker have its own ground.
Okay, well, that works out fix it. So instead of going across
the line, yeah. And so going across into the other diode, right, which well, in the normal bowl, that would be across the filaments. Whereas if it was led, it's crossed the diode, which creates that 1.7 volt drop and messes everything up. So I was bit by diode now.
So welcome to the club. Yeah, welcome to club with your sense
a little bit more low tech.
Actually, you know what's funny? So you were bit by the same general reason that I was a bit. Yeah, it was slightly over the diode to ground it. Yeah. And it was slightly on what a punk. Yep. So I'm looking at your schematic here or one? I don't know. The the bad one. Oh, the Jeep wanted the service manual schematic. Okay, I shouldn't say
bad because it was really good. If
you Nope, they know this. It's probably really
diverse. Chapter Eight, a so at the top you say is you see eight W Yeah. Eight A is the beginning of the logical who w w is getting towards the end. So say a actually explains how to read everything. And it's like 10 pages long. But it teaches you how to read like, what the symbols mean. How to what all the color because you see, like, you know, BK YL, which is black with a yellow stripe. Yeah. All that stuff. So if you actually read that, you can understand this really easily. Sure. I will. Okay, so
you have you read it that way. So help me out here. A a circle with an X through it is a lamp, right? Yes. Okay. So then the oblong circles, the ones with X's on either side.
Are those also lamps? There's a Lancer two filaments. Okay, a dual filament lamp. Okay,
so on this page, we've got 1234 single filament lamps and two dual filament lamps. Yes. Now what are the braces down at the bottom like s 122 and S 125.
splices. Ah, that's where multiple things come together and get splice together.
And what's the mechanism for splicing? Is it like to
heatshrink Okay, okay, I was
thinking more of like an actual terminal of some
stuff. And a wiring harness for vehicles. It's usually just eat drink together. Okay.
So that makes it easier. Now, you did kind of spill the beans to me earlier and this is ridiculous, at least in my mind. So a dashed line on this represents what
I connector sometimes, sometimes on this, like, if you look at where it says C 10, a C 110 and C 107. Yeah, those are connectors basically. Well, those parts of the parts of the connector because it says like to say 1234 This C 110. But there's there might be C 110 456. Somewhere else on the schematic. Sure.
Okay, so then up on the top, we've got five, six, we've got six dashed squares modules.
What is a module? Modules are basically it's explained somewhere else. It's like a black box on the schematic. That's why it gives you the page. So you go to that page like eight w 52, three, God, then you can see the turn signal hazard switch.
So in the PCB world, we would call that an Off Page connector or a page to page connect each page, okay, like a bus or something, it looks similar to what you would see because it has up at the line, it's got that little V. Yeah, back sort of looks like a page page connector, although, in what I've been targeting what I see on this page, though, well, that's true. That is true. But in the PCB world, what I've always seen is PAGE PAGE connectors happen on the left and right side
of a page. This happens everywhere, by the way.
Yeah, this looks. So uh, you know, given you know, if you had if you really had to dig through this, it would probably make sense. But just looking at it. It's a cluster. Yeah. So then why this is a good question. The very middle top dash square looks like either a switch or relay at some. Yeah. And well, okay. Yeah, it says headlamp switch right next to it. Why if that is an Off Page thing, would it have a switch diagram in there?
Probably because it makes sense on this page.
Oh, okay. It tells you something about how this page operates.
Yeah, like how the park? Headlights and off work?
Gotcha. Yeah. And, okay, so the thick lines are like bus lines in a way that
you talk about the horizontal, the horizontal. Those are cyclists? Yeah, those are splices because the UPC, the horizontal dark lines go across, it says s 118.
Interesting. Yeah. Why do they have two different forms of splicing? That's the same, same. Well, they have the brace form. And then they have just the whole
of the brace form is for if there's like, fat like special things. So if you look at the brace, this is like the bottom right, which is s one. S 125. You see, we see front foglamps and then except front foglamps. So those are options. Like my deagle doesn't have factory fogs. So that splice doesn't exist. I got you. Okay, well, that makes sense. That's not That's not terrible. Yeah. And then grounds happen when a line touches a dot. Right? Uh, I don't know if that's a hard fast roll. But on this page on this page, it's true. Usually says it states start with G.
Well, that wouldn't make sense. Okay. So I feel confident enough to talk about this page.
They'll post that page up on the on the podcast notes especially and also with the simplified MS Paint version as well.
Well, and then Ms. Paint version really only shows a small portion of the page.
Yeah, it just shows the stuff that matters for the turn signals. It doesn't show that wire going back up into your dash and affecting your indicator
light No, I wonder if this kind of schematic has a name. It might just be automotive schematics. Yeah,
I suppose way every single automotive schematic I've looked at is looks like that's like this but I've only really looked at Chrysler schematics well blash Mopar but
you know, I Yamaha Yamaha motorcycle. Their service manual looks like this. I have a service manual for my I have a Honda three wheeler, an 85 Honda three wheeler and its service manual looks like this to the service manual for my 2001 Honda cruiser motorcycle had its servers made it looks like this too. So I think this is kind of like a standard.
I'm looking up and there's an autumn automotive schematic like trace stencil
looking it up on your computer phone. Yeah, my computer phone. Yeah, no, I bet you I bet you this is a standard that isn't taught in engineering school. You know it's like a mechanical Yeah, they probably go over all this crap and mechanic school. Which is funny because now we're trying to dig through it.
But it all makes sense. Yeah. If you looked up automotive schematic stencil, the first image the symbols are are very similar not identical for the very similar to on that page. I I really, really like the fact that they label the wire color. Yes, that is unbelievably awesome. Well, that's the only way to actually figure stuff out. Oh, this would be terrible. Like my rewired the steering column. Oh, boy.
How many different colors are on that?
Uh, like, I think there's like 40 wires in there.
Yeah, yeah. So it's a whole bunch of black with yellows, and then yellows with black.
Yeah, sure. But they're like half and half. Yeah, yeah, right. Right. You'll
never guess. Is it a black
with yellow stripes? Or yellow wire with black stripes? I don't know.
Oh my gosh. So I was I was the past couple of days, I've been building a handful of Ethernet cables for our manufacturing for getting hardwired Ethernet to our manufacturing benches as opposed to using Wi Fi. And so, you know, building ethernet cables is not terrible, but it is. With cat six. You got eight pairs, twisted pairs, and you got to bend them all out and all that crap. Well, today we were doing I don't know, we were we were jacking around with something. And I tried to make a one of the crossover cable where some of the wires get flipped. Yep. And for some reason, it took me like 15 minutes of just staring at a piece of paper be like, what? Like, how do I even do this? Sometimes the simplest things give me just like, oh, you know,
channeling your inner Tim Allen? Hmm. Oh, yeah. Oh. That would be the code word. channeling your own Tim Allen. Your inner Tim entertainment. Yeah, Alan. Yeah.
So that is the secret code word for this episode. If you email that code word into podcast at macro fab.com along with your home address, we will shoot some cool Mac fab swag your way. Yep. channeling your inner Tim Allen. I want to see how many of those a week yeah,
exactly. Oh, that's great. Yeah. So yeah, that's, that's been me wiring the jeep. So you actually
took some time off to do all this? Yeah. Well, mainly the painting of the
painting most of the wiring. It didn't take too long. Yeah, cuz I basically just hacked off the old connectors and said, Screw it. I'm grounding everything properly. It works. Cool. Yeah. So you've been working on a 3d printed thing? I have, you know, like, because 3d printers are like the worthless tool, right?
You know, I don't know how many times I have to say, Well, okay, so I'm not printing. Now, I'm not even gonna go down it. Let me just go. Let me just tell my story. So, the other day, my good buddy, who lives actually up in Connecticut, was talking to me about getting his beer brewing rig back up and running, because now he has a basement up in Connecticut. And he has a place to brew. And he was asking for my help with, hey, you know, how do I convert my blue rig from a propane rig into an electric rig, so I was kind of stepping them through what I've done. Minus the whole, put all your electronics in a USPS box? Yeah,
I didn't really tell him about that size box,
nobody. And so we started talking about potentially collaborating on some some ideas. And one of the things he was really keen on doing was making a pump that is controlled in a loop with a proportional valve and a flow meter, in order to dose a particular volume. So basically, what he wants to do is fill one pot with water. And then he wants to take a portion of that water and move it to another one, but be generally accurate. And if you've ever really worked with volumes of liquids, it's hard to get out like weighing it or putting it in a measuring vessel. It's hard to get a specific amount unless you use a peristaltic pump.
So it was really funny. We mentioned that earlier this week. I said parasitic pump. Yeah.
Yeah, I set
it on like wait, that's not right.
Yeah. No. leeches off some of your, your precious liquid. Liquid. So yeah, peristaltic pump. For those who don't know, it's a pump that effectively works by pinching a hose. Yep. And and moving that pinch along the hose. And that creates a vacuum and pushes liquid. The cool thing
moments are also self priming because of that.
That's right. You can you can run them dry. They won't. That doesn't damage them. But they will self prime because they pull a vacuum actually. And what's really nice about that
it's a displacement pump.
That's right. Yeah, yeah, yeah, yeah. And one the cool things about them is their, their pumping action is based off of the rotation of a motor, as opposed to the speed of it going. Yep. So you can actually run a peristaltic pump at zero RPM, effectively, you can, they can go all the way down to effectively nothing and still pump in a way. In other words, you can run them very, very slow.
How does something pump at zero rpm?
The point is, you can go just above zero rpm and still pump up is what I'm getting. But the thing is,
it's electric motor has like infinite torque at zero rpm. Exactly. Yeah, exactly. And someone like is gonna be like, angry on keyboard right now.
Read these guys for brawl. Which we've had before, not read it. But we've had guys be like, Yeah, you were wrong about that. Yeah, I'm probably wrong about everything I'm saying right here. Regardless peristaltic pump, the rotation, the amount of liquid it doses is based off of its radius and its rotation. And so it will, it will dose a certain amount of liquid every time it completes a rotation. So in other words, if you want a certain volume of liquid, you just rotate the motor a certain number of times, and you get that if you want it faster, just rotate it faster. Yeah. So you can control both the flow rate and the throughput. Yep. And so we, we thought like, oh, it'd be great. Let's go look at Amazon and let's go buy a peristaltic pump. Well, they suck. For the most part.
Well, most of them are designed for MediCal. That's where like dosing medication into
very small amounts. And generally pretty slow. Like the fast ones are like 100 milliliters a minute. Yeah. And we want something like seven gallons a minute. Yeah, minimal thing ripping. So it was like, why not just design one and print it on Parker's 3d printer?
We did. So I did. Yeah, yeah. It took I printed it. Stephen designed
it. Yeah, I just Google sketched up some some crap and sent it to park and said, Please prove it. And so we spent the past couple days printing some stuff and actually today, got it done. Yep. So there's, there's a handful of simple issues. But this was kind of like a proof of concept version. Yeah.
Like your your, your you actually designed to key shaft. That's right. And so that tolerances too tight.
Yeah, I guess we're gonna shrink that a little bit. Luckily, the shaft prints in like, no time flat. It's like, about 30 minutes to print. Right? Yeah, that's, that's really, really fast. Everything else fit really well. Everything else. Yeah, fit. There's there's a handful of just like, Wish List parts that that I'll change for a future design. But but I hope to just kind of hook this up to a stepper motor, and be able to turn it a very specific amount. And so I did a simple test. Earlier today, where I put one of the input tubes into a bucket of water.
I was actually just putting the toilet and
maybe that's what I would have made. Yeah, maybe tomorrow. And I just I just rotated it by hand. And lo and behold, it's started sucking water up the tube. So works fine. Got a couple of pictures for that. Tomorrow. Once we have the actual a shaft that'll fit in the hole. Yep. Without being like a ridiculous friction fit. I'll actually hook it up to a drill and turn it. So I kind of have to
Oh, we should make a GIF. That'd be great. And so we can have it up on the blog post. Or and we should do just a YouTube video.
Uh, let's, let's see if we can have that thing printed. And together for the release of the podcast. Okay. Oh, that's gonna be that's gonna be
because I'll be able to finish the notes by 10 ish am so we have one hour. Okay, maybe,
maybe, maybe just keep an eye on our Twitter accounts, then. Yeah. And we'll post it up. Yeah, we'll post it up on macro fab yet at macro ninja near as mine. Yeah, it will be on macro
fab Twitter and we'll put it on the macro fab YouTube channel. Cool. So yeah, even if it fails, you'll see it. I actually really hope it pumps and then immediately catches on fire.
Just it's just spinning PLA and it catches on fire. Well, I used to I used I actually got a little fancy and I used skateboard ball bearings. For the pinch roller.
I actually said it was a really fancy fidget spinner.
It is it is it's very it's a really fancy fidget spinner. That's actually pretty big too because Parker's 3d printer can do big ish. Yeah, it's a the, the the the diameter is six and I have six and a quarter by in the so it's that it's a disc basically. And the thickness is like one and three quarters inch so it took a lot of filament Now
should we should we actually record it pumping water out of the toilet or actually just get a bucket?
If Chris the CEO walks in, and we're pumping from one toilet to another I'm like, get fired.
I'm like, I'm just recording it. Don't mind me.
Yeah. I don't know what I'll just look at and be like it's for the podcast. Yeah,
marketing. Yeah, we?
I don't know. We'll see. Yeah, yeah, that's right. But it's been a really cool, very fast turnaround project. I mean, I had the conversation with my buddy, like four days ago, and I have something that will work tomorrow.
Yeah, we were printing it like nonstop the past three days.
Oh, yeah. Like 11 hour prints kind of thing. Yeah. So. And kind of one of the end results? Have you heard of craft beer pie? No. So there's a lot of beer controllers or brewery controllers that are popping up for Raspberry pies. There's brew pie, pie, and there's a handful of others. And they're all trying to accomplish the same thing in the same territory. However, craft beer pie, is there one of the new S ones. And they just seem kind of promising. I've been looking at their their stuff, I'm going to play around with it, hopefully, this weekend, just like install it on my PI and and give it a go. But I hope to potentially be able to use this pump with their interface such that I can just click on a touchscreen and say I want three gallons from this pot to that pot. Yep. And this thing will turn the appropriate amount.
So because I've been since my jeep is pretty much done, hmm. Siemens actually gonna come over this weekend helped me finish some of the last, like, making sure body panels fit right and stuff.
And Parker is going to help work on some speakers. Yes. We should
like take pictures and post those too. Sure. But after that, I was going to fix up my brewery because they've been getting theirs together. And I was going to go a different route. Yeah, yeah, I'm, I'm gonna wait.
Oh, for it to detect volumes. Yeah, that's fine. I'm gonna do Wayne. So which, which works if you know the density of whatever. You're weighing water.
Yeah. I hope we know that. 8.35
pounds per gallon, right? Yeah. At 68 degrees.
Somewhere on there. Yeah. Yeah. So it can even be faster. It can take the temperature and then do the density. Oh, and then recalculate? Yeah. Yeah. Recalculating.
I, you know, I had actually thought of that, doing it that way myself too. But I want my, I don't want the top of my brew cart to have scales on it. So I was like, well, and then if I didn't want them to be visible, I'd have to get really fancy. I was like, You know what, I'm going to just design a pump.
Well, I'll think about that way, because that's actually, I was gonna have my controller basically read the scale. Yeah, yeah. That's how I was gonna go. But I actually really, I've enjoyed trying to figure out how to make this pump print. So
yeah, and once the, what I really want to do is Okay, so right now, the pump is completely proof of concept, you would never actually use what has no mounting point exactly. There's no way besides gluing it together, so you can't maintain it or anything. Right. And and a peristaltic pump. The part where, yeah, so after X amount of hours, you have to replace the hose, which is cheap, but you have to be able to do it. So the result of the plan is tomorrow, we'll prove if this works at all. Yeah, which I expect it to. Yeah, it should then I'm going to redesign it with proper bosses with mounting
screws and use a like stainless metal shaft.
I'm gonna Yeah, mcmaster carr has a perfect shaft that fits right through skateboard bearings. And it's already cut for a key and you can just cut your own key lengths. Yep. So all of it can just go together real smooth and real easy. So I would like to reprint it but with all the fanciness but I also want if possible to have it such that a stepper motor mounts directly to the body of this Yeah, so the whole thing is like an all in one pass.
So you screw it, it will probably be printed at like you know, almost 100% infill and
right Skookum Oh, yeah, yeah, like, like 24 hour print jobs.
Yeah. And I take the printer home and just print it on the Saturday. Well,
and the thing on top of that is the tubing that I have going through that is a really thick wall silicone tubing, which is great, but it doesn't necessarily prevent the hot liquid that's going through there from you know, it's not an insulator a real great way. And so there's a chance that boiling liquid would be going through this for extended periods of time. So it's got to be able to withstand hot temperatures also. There's a lot of there's a lot of fun design things like I had a lot of fun building this SketchUp,
yeah nylons pirate with the printed out. Yeah,
it'll be it'll be fun. Regardless, we'll see. We'll see if it actually does something tomorrow or if it catches on fire. Yeah. And you got it catches on fire. I owe you another six pack of
what's this? D S 18? B 20 temp sensor.
Have you have you seen this before this temp sensor. Okay, so the
actually I almost Google, because you gave me the notes you want to talk about? Almost Google that and I'm like, Ah, let's even talk about it.
Great. Okay, so explain. I've heard of this temp sensor before the is Elias 1820. Sort of, sort of in sort of not, it's kind of a popular one, but at the same time, a little bit not. So regardless, this this temp sensor, what's special about rotors template is unbelievably cheap. It's made by Maxim. It's a three wire temp sensor, you've pi power ground, and it just spits out one wire data. And it is programmable from nine to 12 bits. And it is guaranteed half a degrees Celsius accuracy from negative 10 to positive 85 degrees Celsius. So that works well for your mashing temperatures. The thing is, in singles, it's like $1.85. I bought five of them off of Amazon, fully waterproof at one meter long for 12 bucks. And it plugs directly into a Raspberry Pi. Without
anything in between someone's already written the driver software for it. Well
craft beer pie already has that. Basically all you do is in the interface, you just pull up, you just click the Add button and you add a temperature sensor. And I name it and tell it what GPIO GPIO pin it's on or what addresses it. And bam, you're reading temperature rise. It doesn't require any kind of signal conditioning. And so for 12 bucks, I can have five extra sensors right now. And that's pretty freaking out
the post that yeah, in the Amazon link. It's really cool.
Or like I said if you want them in in singles, they're like $1.85 off of I think Newegg was selling them actually. But so the the brewing community has started to get into these things. And you can find them now in half inch NPT fittings. So you could screw them directly to your on your pot. And you get you get digital information right from it
for our international listeners. NPT is national pipe thread.
It's the tapered thread such that it seals Yeah, it's
a pipe. Yeah. So as you tighten it, it gets it basically compresses the threads. Yeah. And and tightens up.
Or, or if you're in America and go to Home Depot. That's what FPT and MPT is because I think they I think it's, I think it's purple and blue is the way they
go home depot was the only one that calls it. female pipe thread in mail pipe thread, which is absolute garbage. Stop doing that. It's not called that. Yeah. National pipe NPT.
There is also a BP T was British pipe threat right? Which is a difference, which is a pain in the ass. Well,
if you're in the UK, it's probably not. No, of course not. But you NPT is a pain in the ass over there.
Yeah, so we do what? Almost all brewing stuff is, is NPT? Yeah, yeah. So
there's some straight thread stuff, but not much. Yeah, it's rare.
If you buy if you buy a valve, or if you buy a pump fitting, or if you buy anything, really, it's going to be almost 99% of the time, half inch NPT. So in other words, you can get this temp sensor such that it screws into and whatever port you have, and it's almost guaranteed to work. Just slap some pipe tape on it, and you're good.
Anything you can buy at the Homebrew shop. That's right. Cool. Yeah, we'll go into the pic of the week, the pow. And this is not a product or project or anything. But it's a cool question that I want to ask Stephen. I found on Reddit, and it was on the eceee subreddit. It is a how to measure an op amp input impedance. Hmm. So like how, like if you had to measure the input impedance over a sweep of frequencies? How would you do it? I have no idea.
Measure the input impedance Yes. Of an op amp of an amp up across a handful of
let's just say let's start with DC. That's probably the easiest.
Well, okay, I would say you DC Okay, so DC isn't going to the reason why DC won't really count is because that's already called out on the datasheet. If you look at is
if you just got an op amp and it has this the laser etching is saying it off. Okay. So you know, these are the inputs, and it's powered up. How do you measure it? Obviously, you have to measure the current
will, okay? So take a step back and like, look at what the x of the input of an op amp is. two transistors, Yep, you got one transistor for an inverting terminal and one for a non inverting terminal. So you're, basically the inputs go right to the basis of those. Now, those could be FETs. Those could be BJTs, they could be J FETs. It could be a handful of things. They could be Darlington connections, you have no clue. Each one of those has unique characteristics about it. However, the goal of almost every op amp out there is for that impedance to be through the roof. Yes. So without without, like, knowing what that op amp is, the first thing you can take in, like just know is that it's going to be really hot. Yes. Until you get high in frequency. But regardless, just take it on faith that it's going to be high.
Yeah, let's say you're, you're talking about audio. So you're going up to 20 kilo hertz.
Okay. Okay, so, so, okay, so here's what I would do, I would take a, I would, I would configure the op amp, such that it was in a buffer configuration. Okay. In other words, I would take the inverting terminal, and I would connect that to the
output. Yep. So it's a voltage follower mode, voltage, follower
remote, right. So my, the input that I'm measuring effectively would be at that point, the non inverting terminal, the plus side, I would put a resistor in series. With that, with that line, then I would take two really high impedance, voltage probes. And I would inject a signal through the resistor into the op amp. And I would measure the voltage difference across whatever that resistor I put in there. And by measuring the voltage difference in the current going in, you can calculate the input impedance, and then you sweep the frequency to get a response. Yeah. You wouldn't know what value that resistor would need to be. So you'd just have to play with it. Yeah. Because certain resistors would give you probably just garbage data. Especially if you're talking about, you know, if you put 100 ohms in series with a terror ohm, you're going to get nothing. Yep. It's not going to work well for you. So you'd have to play with what your series resistor is. But if you know its value to a really high precision, you can then get the rest.
Yeah, it's an in my I had an extension of the question. Okay. Is what if, because one of the big things with audio is matched? transistors? Yeah. What if you want to match the inputs on your op amp?
Okay, well, so here's
the thing. I don't know if that matters, but I just thought it would be interesting it is okay.
So, it is the goal of every op amp for those two transistors to be matched. Yes, there is no op amp on Earth where they are matched.
Correct. Cool, because manufacturing difference? Exactly. They are
very close. And one of the ways you Okay, so so check, check this out. This is this is kind of like electronics one on one, in terms of like, op amps, what does the output of a real op amp do the different inputs, if you but but if you take both the inputs, and you connect them together, so you connect just the positive to the negative on a real amp amp, what does the output do should be nothing, it should be nothing, but it is never, never
nothing. So you just have to measure what the output is. And if it's low enough, then you know your input and output or your your non inverting inverting is close enough to what you need.
Well, so here's the thing, yes, and no, that's, that's close. If you connect the two together, the op amp is gonna ping to rail, either one of the rails, okay? Because there is a slight difference between the two is whichever one wins, it goes that way, guaranteed. So if you fix one of those inputs, like I don't know, ground one of them, and then swing the other one, you'll be able to find the input offset voltage. And that input offset voltage is effectively a measurement of how non matched those two transistors are. So we would you know, if you have one at zero, and you slightly raise the other one, and let's say the op amp changes states at, I don't know four micro volts. The difference between the two transistors is for my criminals.
Yeah. So we should try building something like that. We should. It's hard, because it's like really remember that, um, that. ABC we found couple weeks back that was like a 24 bit
oh yeah for like three bucks yeah that'd be cool
Yeah Bill something like that and get some precision test equipment and like by got it by the cheapest op amp we can find
a ua 741 Okay
and then by a light the middle the road audio which is the 454558 Yeah that's why I'm using the Jeep Bluetooth radio switcher Yeah. And then by like, then by a primo one and then I
got it this this one will be a skills challenge. Okay, yeah, get this the OPA 129 It is a unbelievable op amp Opa 129. It was originally designed by Barb Brown, I think ti makes it now. So, this op amp get this. It is such high precision that they changed the internal pin diagram, because the standard op amp pin diagram has too much leakage. So the pins go to different different connections. It's like a $10 op amp in singles. But here's what's crazy about it, the input current into the op amp it for most op amps is is in like the range of like a couple micro volts. This op amp has a maximum of 100 Femto amps, which is a 10th of a PICO amp. Yeah, in other words 100 times 10 to the negative 15 amps. The thing about this, this chip is you most of the time you have to use it on a ceramic substrate, because fr for PC board material is too noisy. It conducts more than what this
thing. Okay. It has to it has to lower impedance than the input impedance of this chip.
That's right. Crazy. So it would be I don't know how we would measure 100 Femto amps, even with the Keithley ridiculous meter. We're getting down to nano volts, we'd have to I don't know, we'd have to work it out. But that would be a fun challenge. Yeah. It that's a that's a really cool op amp, I want an excuse to use that op amp.
You can get yours we have to get something that can measure that. I think
the datasheet says like applications for that thing is like photo detectors, you know, if you need to detect a single photon, this map is the one that like it's a good candidate for that
it has enough it has enough accuracy and precision. It's got it's got ridiculous
gain. It's got low noise. And the input offset current is is ridiculous. Yeah. So Opa 129. It's a cool one.
Yeah, that will be an interesting project if we can do it. Yeah, yeah. Alright, so I have another pic of the week. Okay, this is a project. It's the IoT of happiness, I tunnel for it. It's a Raspberry Pi tracks office happiness, found a project on Hackaday. Basically, it's a Raspberry Pi's hooked up to four buttons. And so when you come into work, you press how happy you feel on a scale of one to four. Or how sad it you feel, I guess if it's one, and then when you leave, you do the same thing. And so it tracks overall happiness of your office. Hmm. I thought it was interesting.
That's, I don't I don't know if four bits of resolution is enough. qubits are resolute Oh, I'm sorry. Yeah. Two bits. Yeah, two bits.
It's, it's it's like the civilized civilization. 445. I can't remember. Wherever, whichever one they introduce the happiness.
Yeah, yeah. Yeah.
I think it's an interesting project.
Yeah, it's, it's kind of like when your manager sends out, like, how satisfied are you at our HR review? HR? Oh, crap, but it's what it's like. It's every day. It's a tactile HR review.
Yeah, you can clip folio to plug into it. Make fancy graphs. Church will love those.
Put them up with the quarterly meetings. Yeah, quarterly meeting. That's great.
So I have the RFO ties into that. Okay, should we build one from macro fat?
Uh, but but it has the right buttons on it.
Yeah. So going back to the original purpose of the RFO. Rapid Fire opinion. Should we build one?
No. Of course not. Excellent. It's kind of cool. It'd be fun to it'd be fun to start gathering data on that. But yeah, but I don't nobody would take that crap seriously. Like, it's 00 or four. It's like is no in between. Now our devs would somehow hack into it and make it do negative one, that it takes away happiness
and then the other RF is so last December. It's coming up soon. Hmm. Then the year is last summer we did the first annual Star Wars Christmas special. That's right. Should we do a second?
Are you asking me or our listeners,
our listeners? Because there was actually a pretty popular podcast? Yeah, no one watched the video. Well,
I think it's probably more like nobody knew there wasn't
so this video on our YouTube channel of two hours with Steven Josh and I in named Chris a little bit talking about Star Wars in the castle
Bravo recording studio, if you want to see where the podcast goes down. Yeah, it's up on YouTube, on YouTube.
So should we do a second one? Like comment or subscribe people?
Well, if you say first annual then you then you know you're gonna need a
second second annual. Yeah. Well, I think it was kind of the joke is the first annual we never do it again. But there's so much stuff we can do.
We could we could absolutely do another one. Yeah. So if you guys like that, I guess let us know. Yeah. If even one person says do it, we will probably do it.
People seem to like the that that podcasts. Let us know if you want to do a second
one. Yeah, we'll prep up some more stuff. Yep. Cool.
And so that would end this podcast right.
Ah, everything. Is there. Another Star Wars coming up this this? Yes. This episode eight. Absolutely. Yeah. Okay, well,
and we get to talk about Rogue One that came out after this podcast.
Rapid Fire opinion. Rogue One Thumbs up. Thumbs down. Thumbs up. Me two best Star Wars ever. Really?
Are that here? Oh, okay. Yep. Oh, even better than than episode one.
Episode Episode. It beats up so five. Yes. Okay. I might have to put in a request for us to have a podcast Star Wars special just to talk about that. Yeah. Cool. Okay. Well, then that will be the Mac fab engineering podcast. We were your host Stephen Craig and Parker
don't take it easy guys later Thank you. Yes, you our listener for downloading our show. If you're not subscribed to the podcast yet, click that subscription button. That way you get the latest map episode right when it releases with and would love Should we just keep going? Yeah, we should just keep going right? And we'd love to hear you review us on iTunes. Why why did I say it that way? Anyways, lastly, if you have a cool idea, project or topic that you'd want Steven and I discussed email us at podcast at macro comm or hit us up at Twitter at macro fab and we're just keep that one. So yeah, that that that'd be it.
This is the last installment of Stephen's 'Adventures in Injection Molding'. We are going to recap the entire two year sage and close the book on it.
The Jeep Prop Fan project rides again! Well some iteration of it at least. Lets design an open source PCM (Power Control Module) for automotive apps!
The quest for the right connector for a project! The right of passage for any hardware electrical engineer starts with a connector catalog.