Earlier this year the FTC released a report on the current status quo of repairing manufactured items. Stephen and Parker break down this report!
Is grinding out math problems just busy work? Is the current state of Math class curriculum hampering the real life deployment of engineering skills?
A decade after graduating college, Stephen finally did a differential equation for his job! That is some real engineering I tell you what.
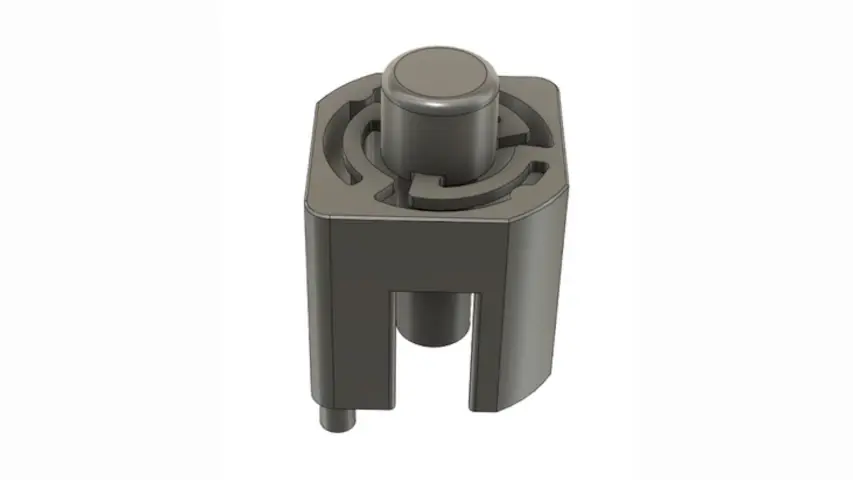
Actuator design for Stephen’s dome switches.
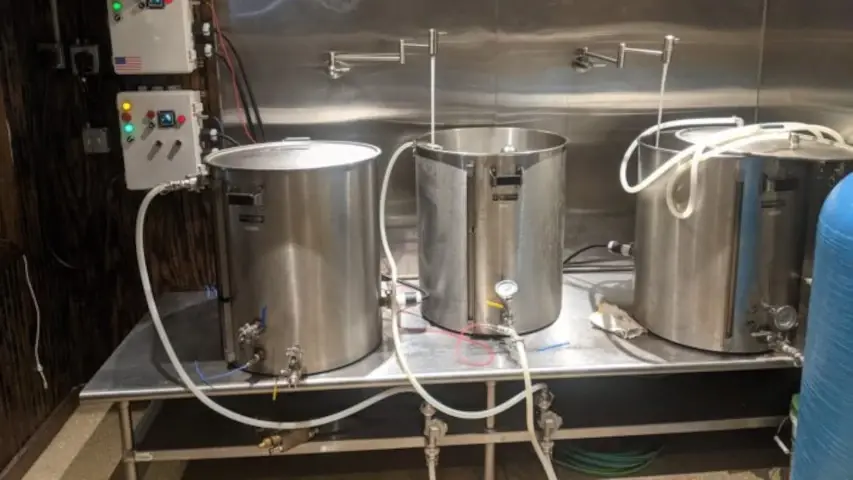
Brewery for Parker’s Uncle’s brewpub.
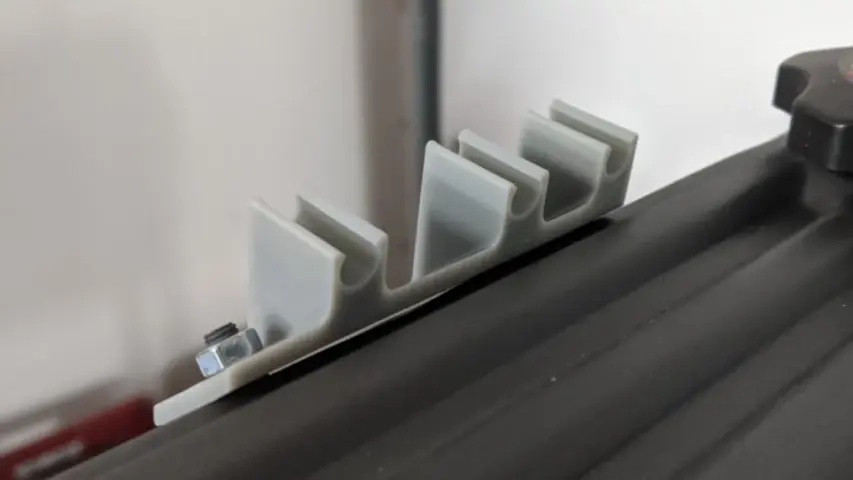
Bracket for the Jeep project that Parker printed out of Liqcreate’s Strong-X Resin. (View 1)
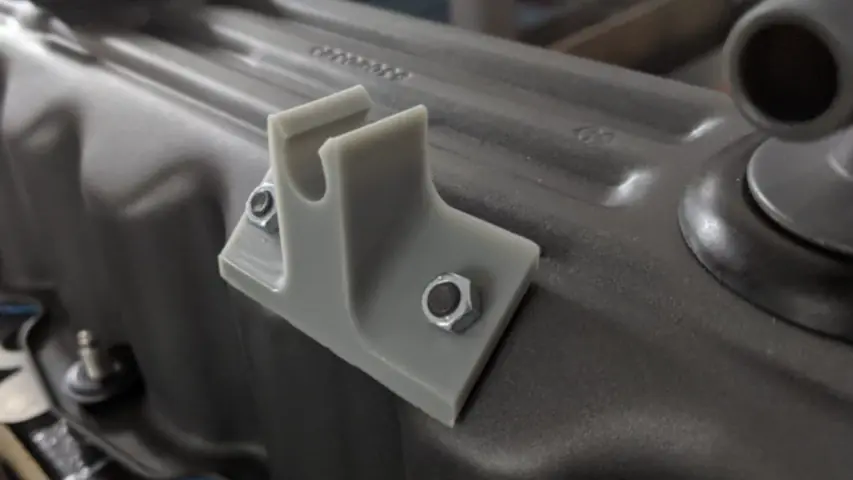
Bracket for the Jeep project that Parker printed out of Liqcreate’s Strong-X Resin. (View 2)
Parker is an Electrical Engineer with backgrounds in Embedded System Design and Digital Signal Processing. He got his start in 2005 by hacking Nintendo consoles into portable gaming units. The following year he designed and produced an Atari 2600 video mod to allow the Atari to display a crisp, RF fuzz free picture on newer TVs. Over a thousand Atari video mods where produced by Parker from 2006 to 2011 and the mod is still made by other enthusiasts in the Atari community.
In 2006, Parker enrolled at The University of Texas at Austin as a Petroleum Engineer. After realizing electronics was his passion he switched majors in 2007 to Electrical and Computer Engineering. Following his previous background in making the Atari 2600 video mod, Parker decided to take more board layout classes and circuit design classes. Other areas of study include robotics, microcontroller theory and design, FPGA development with VHDL and Verilog, and image and signal processing with DSPs. In 2010, Parker won a Ti sponsored Launchpad programming and design contest that was held by the IEEE CS chapter at the University. Parker graduated with a BS in Electrical and Computer Engineering in the Spring of 2012.
In the Summer of 2012, Parker was hired on as an Electrical Engineer at Dynamic Perception to design and prototype new electronic products. Here, Parker learned about full product development cycles and honed his board layout skills. Seeing the difficulties in managing operations and FCC/CE compliance testing, Parker thought there had to be a better way for small electronic companies to get their product out in customer's hands.
Parker also runs the blog, longhornengineer.com, where he posts his personal projects, technical guides, and appnotes about board layout design and components.
Stephen Kraig began his electronics career by building musical oriented circuits in 2003. Stephen is an avid guitar player and, in his down time, manufactures audio electronics including guitar amplifiers, pedals, and pro audio gear. Stephen graduated with a BS in Electrical Engineering from Texas A&M University.
Special thanks to whixr over at Tymkrs for the intro and outro!
Welcome to the Mac fat engineering podcast where your hosts Parker, Dolman. And Steven Gregg, this is episode 280.
So I've got an update on my adventures in plastic injection molding. So for those who've been listening for a while, I've been kind of working on a project, getting some parts plastic injection molded. And as I kind of go through the process, I'm sharing what I'm going through. So maybe you guys can learn something, or maybe not do the things that I've done wrong, which luckily hasn't been significant, in fact,
but aren't you supposed to learn from your failures? So have you really learned anything?
Well, you know, it's funny, I was talking with my contact at the plastics place. And, and he was mentioning, he's like, Hey, this has gotten really smooth. And it's, we really haven't had a lot of problems. So what I actually have a handful of Show and Tell stuff,
so on, it's kind of worrisome when the expert is like, surprised nothing bad has happened yet. Well,
I mean, I originally when I first came to him, or came to this company, I was like, Hey, this isn't necessarily my first rodeo with doing injection molding is just, this is the most complex that I've done. And so he wasn't worried or anything like that. But it was just one of those things where it's like, okay, cool. We, you know, maybe there's a tiny bit of hand holding that needs to be done here. And, and it's gone well, because everything that they've asked for I've done and I've done quickly. And that, you know, that's just really helpful.
Yeah, so Well, it's helpful when they're right down the street to,
you know, actually one of the things also that was really helpful at the very beginning, when I gave my design to them, I was pretty explicit about the things where I'm like, Look, these are the dimensions that must be like, I have to have these. And then I was pretty explicit about like, all these other things, we can we can change or modify or do whatever. And so I gave them a playground, to which they can change the manufacturing, because exit, you know, this goes to a lot of things that park and I've talked about before, I'm not the expert in injection molding they are. So I started off by saying you're the expert, you tell me what to do. And we'll we'll make this work. And it's lo and behold, it's going well. So, you know, hopefully, you know I'm knocking on wood right now, hopefully, this whole thing doesn't just crap the bed here. But so I've got some parts for some show until, for those who don't know, we do a live stream of the recording of this podcast every week. So if you hop on our Slack channel, we usually give information on that or if you follow Longhorn engineer or analog EMG on Twitter, we usually tweet out the links to come and visit that. So we'll have pictures of this in our show notes, which you can see on the microphone website. But if you want to see it all live join us for the live streams. So here is one of the parts that I have made. It is basically a four legged piece of plastic that's 10 millimeters by 10 millimeters by 10 millimeters. And it's got a nice fancy little spring mechanism on the top such that you can act. This is used as an actuator to press on a snap dome on a PCB effectively. So all said and done, I'm just designing all the parts of attack switch. Custom. So I've in our show notes Parker, I've got some pictures of the of my STEP file, if you can throw that up, such that the Twitch stream can see it. Here's here's a test PCB that I made. It's just a grid array, a four by four grid array that I can put these actuators on. And these are the footprints that the actuators or the the snap domes connect to. So the way this goes is there's a snap dome gets put onto the footprint and then there is a plastic film adhesive that gets pressed over this. And in the end result the the or the final product. We're going to have the snap domes placed on a an adhesive sheet that we can peel the whole sheet off and then stamp it to the board. But as of right now I'm just for prototyping. I'm putting each snap Oman with tweezers and putting one little piece of sticker on top of it. So once once you kind of put it all up into an assembly, you get something that looks a little bit like this, which is basically I showed a PCB that has the footprints and then here's the assembly which has a four by four grid of these plastic actuators. And are you able to hear this okay, I don't have my game turned up enough but they're nice and clear. DNS snappy. So the actuator presses against the snap dome which is down on the board. And you get a custom switch that we can customize like the throw of everything. But we can also customize how hard it is to press. Now it's funny but but here's one of the biggest things, because this is a musical instrument. Play ability and feel is almost the most paramount thing. But but really the ability to take your finger and run it across a string of
Oh, unlike hit all four at
once. Yeah, because in the main product that we have, the array is 16 by four, and we want the ability for your finger to just swipe across a row of 16 and turn all of them on or turn all of them off or toggle their state or whatnot. And that's one of the biggest things that we've been trying to do is get it to the point where you can run your finger across it, it doesn't hurt your finger, it won't rub your skin off. And you actuate all of them. And it's working. Fantastic for that. I have on this assembly here, I have different dome strengths on there, I think I have 260 gram, and then over on the end I have 400 gram and the 400 gram is painful. It was it was sort of a test. And it's just way too much like 400 gram and something high like that. I would I would I would make that. Like say if this was an industrial gear that was going outside. And I knew that there was like a tech that had to wear gloves. Yeah, I would put something like 400 or more because that's like, it's a cut chunk kind of switch, they're going to be using their thumb. Right, right. And they want to feel it they want to make they want to know that they get that feedback. But it's just like running my finger across the group is just that hurts. So in fact, the 260 gram press is probably even a little too much. I think I might drop that to 150. Because the 100 and more that gram press or that force required to trigger the the actual dome, you have to add the however much force it takes to move the spring on this actuator. So 150 is probably closer to like 175 or 180 Once you stack those together. And I think that'll be just enough that you feel it. But also not enough that you get fatigued by doing it too much. So it's interesting that in this kind of situation, the playability of it matters a lot. Because it's a musical instrument, you want to make sure that it feels good, because the product can all fall apart quickly. If the user is like, Oh, this product works great, but it feels like crap. And that'll just absolutely kill it.
I mean, that's the whole like picking up a guitar. But the whole point is, well, point number one is how cool you look. And number two is how well it feels when you play it. Yeah,
actually, you'd be surprised. The difference between guitars like In fact, there's two right here. The difference in guitars is huge. Like if you play guitar enough like and pick two of them up. Like they can feel like completely different instruments. So in this actuator, this is was the first round of prototypes that we actually got shot and there was a few issues with these. And I want to talk to one more question is, what materials that made out of this is I don't know the exact live in spices of this one. I think well, okay, so I believe it's polycarbonate, but it's but it's mixed with something else. And one of the things that's nice about these is because it is a spring mechanism. I want it to be flexible, but returned to its original position as much as possible. And you can see I can I can just flex and crush this thing. And it pops right. Oh, yeah. And that's that was a big kind of win on these, because I want these to last virtually forever. And an average user might press this. I don't know, 100,000 times maybe, I don't know. But but I'd like these to last a million presses is really what I'm shooting for. Now, the way that these were originally shot in the mold, lead to a handful of issues with them. So it's because it's an interesting design where it has this center pole, the springs around it and then the four legs outside the where the plastic enters the mold dictates quite a bit, the end result. And so I brought this up in a previous podcast and I got a bunch of recommendations from people about how to solve these issues. So the first issue was that the Center poll itself, the very top of it, let me see if I can hold this up to the screen, if you could see, there's a little bit of a divot in the very top. So the top is actually concave a little bit where I was hoping that it would be a little bit more flat, or maybe even convex, convex might feel better as you run your finger across it. Whereas concave you, you really do feel it, it's not pronounced, but it's enough to see it, you could see the reflections off of it, okay. And that was due to that center pole contracting as it cooled. So, at the same time, that center pole, as it as it cooled, avoid was created, I guess you could say, I call it I call it the bubble, but it's actually a vacuum on the inside of this center pole. And normally, that wouldn't necessarily be an issue for something like this, however, we have these backlit with an LED underneath it. And so when they get illuminated with the LED, it's kind of like a void highlighter underneath, you can really see it. So those are the kind of the two major, I say, Major, they're not game breakers, but they're things we wanted to fix. So those are the kind of the two big things, there was a third thing that that luckily, was was really simple. On two of the legs, the smaller legs here, this thing is so small, it's really hard to see. But that's where we put the ejector pins that push the part out of the mold. And the ejector pins were just not spaced in Word process far enough, so there was extra flashing on the end of those legs, that I really need them to be flat because that sets the dimension off of the PCB as it sits down. So luckily, that's a really easy fix, we can just push the ejector pins a little, we're actually going to embed them a little bit further into the device such that if there is any extra flashing, it doesn't cause it to sit higher off of the PCB. Now as for the concave top and the void in the middle of that center stem. Luckily, there's a really simple fix that we've come up for it. When When I originally gave this off to my injection molders. I said, you know, you guys choose the best best situation or the best manufacturing plan for this. And they went and did everything based on the sides of the part. So the gate, the point at which the plastic enters, enters on the side of the part. But what that means is the plastic actually has to flow through the legs of the spring to get to that center pole. And that that is ended up causing the issues with the void and the concave. Basically, that's
there's not a lot of pressure there and not heat.
Right. Right. And, and it cools from the outside in. And that that just leads to some problems. So I just asked them the other day, I was like, can we move the gate such that the gate is on the center pole. So it goes from the pole out the springs to the legs, because I don't care too much about the legs, I care about that center pole being dimensionally accurate and became transmit light. And they looked at it again, they're like, oh, yeah, we can actually do that. And the chance that it's going to contract and the chance that there's going to be a void in it is I'm not gonna say virtually eliminated, but they're pretty confident that both of those things will be taken care of with that. So luckily, the two biggest issues with this don't even require a model change or whatnot. So they just have to move the mold or the the gate for where the plastic enters in. So they're in the process of adjusting things right now. And hopefully in two or three weeks, I'll get some more of these. At the same time, these are just a little bit too translucent. So we're going to go to a matte nylon that will still transmit some light, but be diffused all the way through. And that's more of what I'm looking for. I want it to glow. I don't want it to like beam light through it. You don't want it to be a light pipe. Exactly. It's not a light pipe. And so there's there's sort of, there's different ways of addressing that you can texture the surface such that the surface diffuses the light, or you can choose a different material such that throughout the entire device, the material is diffuse and I went with the the second option. I think that's going to be better than texturing because if we find out we don't like it, then we can go back and texture. But if we texture the mold, then it's game over. We'd have to start over if we didn't start with a new mold and I want the top of this thing, the part where the users fingered I want that to be smooth. I don't want that to be textured. So So luckily things look like they're turning out. Well, I hope this next round is this God is really close to what we're already wanting. If we fix these two problems, I think anything past this would just be polish and icing on the cake. Looking forward to it.
Yep. So I went down to my uncle's place down in Alvin, Texas, to set up those those logical boxes for his brewery.
Right. Yeah, you've been working on that for a few months right.
Now, but yeah, yeah, not not, uh, probably only a couple of days worth of actual work. Just most of its has been waiting for parts to show up and waiting for time for because he also runs the restaurant. So like, he needs the day off to like, spend time with me setting stuff up. So we actually got that all set up. And see I got a picture here. Oh, my uncle actually replied. There we go. So I built two electrical boxes on the left. I'll post this picture into our show notes. But this is all running. Using a think we're, we were firing all four coils at the same time. 20,000 watts? Yeah. 20,000 watts. So we put in to 240 50 amp sockets to your handle at all.
Are those so there's three pots in this picture? Is this 15 gallon? 20 gallons? a barrel
system? Oh, wow. Okay, nice. That's big. Yeah, it's
a big system. Yeah, that's it, you're not going to be lifting that you're going to be putting
pumps move all the liquid around,
I lift my five gallon system. And I don't even like doing that.
No, I put it in a crane in mine, my garage, so I didn't have to lift stuff anymore for my brewery. Oh, yeah. So what we did is we set everything and this was actually a memorial day weekend, sent all the boxes up, got all the wiring cut, like, cut all the cables, because I basically brought everything uncut, so I can make the cables to length. Same thing with the hoses. And then we just filled them up with water and boiled it and made sure we could basically fire all four elements at once to make sure one solid state relays were going to cook themselves. And to that the wiring up the electrician did was all good. And everything was good. Nice. I was pretty happy. So next steps are going to be doing a mock brew day. But clean it at same time basically brew with lie. So make it like a 2% solution a lie and heat everything up cycle just do like a mock like, go here. These go there, make sure everything's working right. And then brew a batch of beer. Nice to be the first time that because that's actually a brew pub. And so they haven't brewed beer since like February 2020. So,
so if you guys know what your first brew is going to be, I have a huge
list of all his ingredients that he still has. And so I'm going to make something based on that as far as it's gonna be a paleo.
Yeah, yeah. Because at the end of the day, he needs to sell something he needs to Sell. Sell the beer, you're not going to make like a jalapeno pumpkin, triple ale. Ooh, well, you might like that, but I bet he has regular wood pineapple. Pumpkin pineapple grows.
He would drink it. Yeah, once. So yeah, I think it's gonna be cascade. I was looking at his hops list. And I think this cascade. What's three C's cascade? Citra and centennial? Centennial? Yeah, yeah. So I was gonna do three C, parallel. Something that be re Cumberbatch of it, make sure it's good. And he can easily sell it in his pub.
Yeah, that's cool. Nice. That'll be fun. Working on. That's probably the biggest brew. You've done, right? Like in terms of volume?
Oh, yeah, for sure. It will be. Yeah. I'm more worried about like, this is a lot of liquid. It's a lot of if one thing goes wrong. That's a lot of beer that can go bad.
Yeah. And a barrel of beer to make is probably I don't know what 200 bucks. 300 bucks.
Yeah, about 250. Yeah, so it's actually not that bad, right. But it's mostly time. Oh, that's also the good thing is his old setup. Basically, they could only run one element at a time. Each barrel had one element in it.
Oh, that that makes things take a lot longer. Yeah,
so they had to preheat everything today before. Okay, preheat everything the day before to get everything hot enough. Oh God. So we were able to basically take room temperature water, I hope so barrels like 33 gallons or something like that. A barrel of beer because apparently a barrel of oil is like 52 gallons. But a barrel of beer is like 33 or something like that. Imperial measurements. Don't worry about it.
I think that's what America says to the rest of the world.
As converted we we did that in a little under an hour from time to boil
33 gallons in an hour that you were you were dumping a lot
of juice into that water. 10 11,000 watts. So yeah, so
you have two elements in it now, right? Yeah,
he's barrels got two elements. And I have it all set up to where when you because when you're doing your first heat up, you have to you have to heat up your mash water and your hot liquor tank water, you basically affected heating up like 60 gallons of water, right? Well, not that much. But rough estimates. It's more like 50, but whatever. Anyways. So yeah, so we have it set up to where you can do that by basically filling up your mat, your mash water and in the boil kettle, heat that up, while the hot liquor tank is also heating up. So you can do both at the same time. So you can use 22,000 watts. And then my uncle's like, and I was like, hey, if this isn't enough, we'll just put another box in and run up there and element thirds. But that was plenty. We were able to heat up in an hour. And it wasn't too big of a deal.
I've seen some some of the kettles at some of the bigger breweries and they'll have 789 elements hanging in there.
Yeah, well, I mean, that's when it comes down to it. It's all time because time, time is money. So the faster you can get up to temp, and then down in temp as well. The better.
Oh, the radiators at the big guys are like they're as tall as you are.
Yeah. And it's actually one thing is his his plate chiller is little tiny dude. It's about the size of a sandwich box, I guess. So not a bread box. A sandwich? That's a Parker Imperial measurement is a sandwich box.
Yeah, don't worry about it. Yeah, don't worry about is that the title of this podcast?
So looking forward to I'm hoping I'll get down there next weekend or two and do the mock brew day,
you know, actually, so I guess that's also a good a good time for you to do the auto tune on your P IDs.
Yeah, auto tune and I want to calibrate it. All the temperatures. Yeah. So
I was actually doing that last weekend on my brew rig is, is calibrating everything that I had. I had to RTDs from my Berberich I had to, I guess, their thermal couple like kitchen temperature probes. And then I had my multimeter with a thermocouple. And I made a whole chart of five different temperature reading things. And it's interesting to see which which ones actually agree with each other. Yeah, it's not which ones are right, which is just which ones how close are they is the question. Yeah, and it's interesting because like, they're all they all have a pretty decent spread. And okay, so here in Denver in the summer, my water boils at 202 degrees. Just we're a mile up and hey, we we get to boiling way faster than you do. You have to do a whole nother 10 degrees. But luckily we freeze at the same so I just basically got a little kettle out boiled water next to it and dumped all of my probes in there. And it and it is interesting to see all the all the huge spread on it. And in fact, one of my things I had to apply a negative 11 degree offset. It was that far off 11 degrees. Yeah, but as soon as you apply that offset, it works great.
The thing I want to ask about is to the the for the mash tun the I we had the probe on the outlets so when the war is coming out the cycle, that's where we're picking up the temperature. How should that be calibrated for off words temperature offset?
That's interesting because because when it comes to recirculating mashes most people put the probe at the inlet. Yeah, such that you see that? temperature that's coming in and such that your PID doesn't go nuts trying to heat the bottom of your mash as opposed to the top of your, the,
yeah. Is it the top going to be hotter? Or is it gonna be the bottom? That will be high rises,
but there's a lot of thermal goop in there. No, and the top will always be hotter because your your, your hot liquor tank is trying to heat up the water to heat the bottom of the mash, and the mash of the bottom of your mash is way slower than the top. So you'll get a gradient
in there. Yeah, you're gonna get a gradient. Yeah, I just want to know what is. So putting on the inlet is the best bet. And just and just so so say I want to mash at 152 which is parallel. Yeah, temperature, just set that make that 152.
Yes, yes, there. Okay, so I was actually researching just just the other day on this. There's different trains of thought, where you can set your mesh to the temperature that you want. And just pour in your grains, your grains will drop the water temperature, because they're at room temperature and you put them in, they'll drop your mash temperature. But if you have a good enough, fast enough pump, it should recover quickly. Now the other train of thought is that you go a few degrees hotter.
No, I'm, I'm going I always do a pre strike temp. So my temperature is hotter to account for the grain I'm talking about. I want to set my temperature to 152. Yeah. Do I calibrate that that temperature probe to be like the middle of the mash tun or just the fluid that's coming out of that with temperatures that Oh, I would calibrate it for the fluid that goes in? Okay, so when it's reading 152, it's 152? For the fluid moving through it? Correct. Okay, so when I set my master 152, it's that it's I don't care about what actually is inside the mash tun at that point.
Yeah, and I don't know, I in a barrel size thing. I mean, it's probably worth stirring, if you have the ability to stir. Because that will kind of demolish the gradient through the mash. So it's tough. But But yeah, like, I think I always lean on the side of calibrate to things that you can hang your hat on. And so if you want the match to be at 152, you don't want to have this secret knowledge where you have to put it
three or four lights high, put the probe there's one spot, and that's where my 152 actually is at.
Right. If you know 152 is going in. That's something you can hang your hat on. Because you want it to be 152.
Yeah, that's good. Yeah, good. So I can easily move the probe there.
So you're on the outlet. So if you put it on the outlet, I guarantee you your mash will be a few degrees hotter than you think it is.
Oh, yeah, for sure. Yeah. Fun, fun.
So I noticed a an article pop up on Hackaday, actually earlier today. And it's actually about right to repair which, which Parker and I had to podcast about just a few weeks ago. And this so this article is specifically about right to repair, farmers owning tractors. And the whole article is mainly about the fact that right to repair is getting a little bit bigger and a little bit more widespread. And NPR business had a whole bit about that we have a link up available for that. On top of that the National Farmers Union wrote a whole blog post about right to repair. And this isn't necessarily I mean, it's in the same category of things as right to repair your electronics. But mainly they're focused on right to repair farmers and tractors. Because what's happening with with companies like John Deere, these farmers are getting charged exorbitant prices to repair their equipment. And in in a lot of cases, it seems to be very simple fixes end up being incredibly expensive and incredibly lengthy to complete. Because you have to ship a giant tractor off, it sits there for a month, and then it gets a software update and a sensor gets changed and they send it back.
Yeah. And thought does that too. It's also like, even if you have to get a technician out, that's actually the biggest thing is like the cost isn't probably too big. I mean this, this has to be pretty words in someone else's mouth for sure. Because I'm not a farmer, let alone own John Deere tractor, but it looks like a lot of times where like, they can't get their tractor back up and running, and they'll miss their harvest. Right, and they can't get technician out there fast enough to fix their tractor.
So in our last few episodes, I know I had mentioned some some of the well I just mentioned my thoughts on if you don't like what those companies do, don't buy their product. And I still stand by that. But one of the points of these blog posts here is that there isn't another product to buy the, they called out the three major tractor suppliers and all three of them have this business model where in order to repair the thing, you have to ship it off, or you have to use their sanctioned repair technicians. And so it kind of changes the game a little bit if you don't have options, if if your only option is to play by these rules. And in fact, they were mentioning the the used market is exploding now for older tractors that can be repaired and don't you know, are not computer based on every little aspect of them.
The pre touchscreen error tractor.
I mean, it's super cool. I've never seen any of these new things. They're crazy. Yeah, crap flag wrote in here in the chat that they're so expensive. You can't buy farm equipment without some kind of financing. Absolutely. In fact, I saw something with one farm implement was $800,000 for, you know, probably a combine or something like that. But I bet you, you know, it probably links up to the mothership and, you know, has to have all this computer data just to even turn on and play the radio or whatnot. So
I don't know, I only listen to sanctioned farmer music.
It's just banjos all the time. So so this is nothing particularly new here. But because right to repair bills appear in our government fairly regular, regularly, but one specifically that was called out was the Nebraska Legislature, Bill 543, which was implemented or introduced by Tom Brandt, a senator in Nebraska. It's interesting to see that this is starting to go up to government level in the same way that it did with cars. Parker and I had mentioned that previously. And we gave a couple examples of that. I'm wondering if if farm implements are just going to go the exact same way that cars,
I'm actually reading the Nebraska one. And it is reading very similar to the right of repair, automotive, it's, it's, it's right to repair for agricultural equipment, right, and you start reading through it. And it's same thing, it's allowing third parties to be able to fix it, allowing people to buy the same stuff that the first party repair or the company has access to repair with that kind of stuff. It's just a find and replace right? Documentation, you have replaced your 80k 800k Farm combine right? When the seat adjuster goes out of whack?
Well, it's tough, like exactly like what you were saying. If, say, you're a farmer who's just trying to make it you have that one tractor and you're you're proud of it, you bought that thing, and it's great, but then it goes down. Does your entire crop go bad for an entire season? Can you withstand not having your tractor for a season if it if it does go out? And I'm saying like, if you have to send your tractor off for a month, like can you deal with that? Probably not. Right? So I don't know. It's an interesting read. Go check it out. We'll have the link up.
Yeah, actually, this this Nebraska bill reads just like it because like also in here is obtaining parts tools and documentation is fair and reasonable, which is really similar to the reporting in the automotive one.
Yeah, I'm I bet you it's really very similar.
That's actually interesting. On this topic is so my dad just got a new Chevy Tahoe. And I went to go look to see, I want to buy the factory service manual for because I'm gonna be the one maintaining it. And once the warranty goes out, because we weren't the most stuff is covered. But once the warranty goes on, we don't want to maintain it. And it's got a fancy dancy air ride suspension. So I want to be like, Okay, I want to make sure that we maintain that because because they require a little more care than a normal spring and shock combo. Usually there's like air dryers or something to drain or something like that some kind of filter needs to be looked at every so often. So to get that documentation, what it looks like is you have to get through GM, which is normal to getting the factory service manual. And it's only I say only you get you have to do have a subscription. But you can have a short term subscription of like three days for like 30 bucks, which is really weird. So how many things can you get in those three days? So I think you can get anything you want and those three days. Then afterwards, you don't have access anymore. So I think what it is is you can get like the factory service manual for your hardware and that kind of stuff. And then all the technical bulletins and that's that that's current. But you won't get any the new technical service world bulletins and stuff. Fair. Yeah, ish. And basically, but you can pay for like a whole year or whatever if you're like a shop. So if you're like an automotive shop, you would pay for the whole year, you'd have all the updates.
I mean, that's, that's kind of cool because it gives people sliding options based off of their needs. Yeah.
So it's, it's like buying a book, then basically, you pay your $30. And you get the current snapshot of the server. Right. Or Data database. I think that's how it works. I haven't tried it yet. I want to try it probably next couple of weeks. Just see what content is there. For the
home gamer. It's it's you're paying the maintenance fees? Yeah. On their documentation?
Yeah, for sure. Is that is $30 a big barrier of entry for people? I don't know. I don't, I haven't had to, in the past, buy books that know how to fix stuff that were like 50 $60 $30 Seems pretty inexpensive to have access to pretty much all the documentation for GM. Yeah,
actually come to think about how much is a climber? Book cost.
I know Hanes was like a 30 to $40 book back in the day, and those never had updates once you bought it.
Right. Yeah. Okay. So I'm looking at climate climbers, predominantly motorcycles. And they're between 30 and 50 bucks.
Yeah. So $30 for all of it. Doesn't seem too bad. For only a couple days, of course.
So but but the majority of people are getting $30 For one thing.
Yeah, you're getting one PDF, or whatever it is. I'm hoping it is not like a web portal and you don't have access to it anymore afterwards. Oh, that well, I'm hoping you can download it. Yeah. We'll find out. So yeah, my might have an update in a couple of weeks and just be like God damn, GM screwed me at $30. We'll find out though.
Just you'll have to memorize it. In three days.
take screenshots. Oh, man, that'd be awful. The Millennium Falcon owner's manual is $25 Is there? Does that does that tell you the right way to fix the hyperdrive? Which is bang it with a hammer?
Yeah, but but guaranteed. You don't have the right spanner for it, right?
Yes. Em all three.
Yeah, you're right. It totally is that. That's awesome. There's actually multiple of them.
Is it actually like an owner's manual? Like a factory service manual that it's actually well written? Or is it just a bunch of fluff? Just diagrams that are just drawn in there?
I mean, I'm sure it's a little bit of both. Probably.
There's kind of fun to read, like, technical service manual that would have existed in Star Wars universe. That'd be kind of fun to read.
There's the owner's technical manual for the Deathstar.
That must be like a couple million pages long.
All right. I don't need to spend money, but I want that. Super cool. So
Oh, yeah. Oh, and so back when we were having those two episodes of the right to repair act. We were kind of, I guess, not anti but we had good objective opinions on against and Ford right to repair. And so we did try to get some pro right to repair people. We reached out to Lewis Rossmann. He didn't respond to our emails. So if anyone else is like pro right to repair, I'd love to have someone on the podcast that is like, full in Pro. Because Steve and I on the other side, I want them to say on this offense, but we are in the other end of it. We like engineers that have to build this documentation and rebuild products and that kind of stuff. So I really love the IRS from the other point of view from like, a pro, or a pro consumer side of it. Yeah, someone from I fix it. That would be fun. Oh, yeah, that'd be great. Yeah. So yeah, if anyone out there, let us know.
Yeah. What is their what's their email that people can reach us podcast that Mac fab.com Yeah, send an email if you know somebody. Ah, so I've got I've got a little bit of a project that came in, you know our rule about can't talk about Something until it's 50%. Done, I guess this is 50% done because I got some PCBs in that I'll actually be opening after the podcast in our after hours with the live chat here. So it's interesting. I've gotten to the point. Now, I think you've been here a lot longer than I have Parker. But I'm super happy because I'm at this point now, where I've built out my PCB and schematic libraries to the point where I don't have to create anything new anymore. I shouldn't say that.
You usually create one or two new things, or maybe three
correct and specifically, when it comes to audio stuff, I've rarely have to create anything new now, because I have, like mastered libraries that are great.
I had it's like going to like, it's like going to the your PCB component library is like going to the mall to say subway because they have all those bins, but maybe like a, a buffet.
Pretty much. Yeah. You're very aware of everything that's on the buffet. Yes. Like, you know, what you like? And you know, some of the things that you're not really good at don't really like and some of the things you're like, I'm never going to eat that again. So I had a buddy hit me up last weekend or not, it was a little bit earlier than that. But it was pretty much last weekend. Who was he basically said, Hey, I'm looking, I'm looking for a 30 watt amplifier? Would you like to build me one? It's like, yes, yes, I would, I would very much like to build you one. But I don't have one. And and I thought about it for a second was like how fast could I crank one out, and just a prototype such that I can give him Let him come and play it. He could tell me what he likes and then doesn't like and blah, blah, blah. But also I want one just lying around for my own prototyping purposes. So I cranked out a 30 watt power amp in an afternoon, got boards on order. And now I have them. Hopefully I can have this built up this weekend. Because funnily enough, the biggest problem with this is not the PCB or anything, like I said, I knocked the entire electrical design out in an afternoon. It's the enclosure, which you know, 99% of the time, I don't even have the enclosure designed, I designed the entire PCB and I was like, I'll figure out the enclosure whenever the PCB comes. Because Because technically, I could probably even just set this on my table and have it work if I really just needed it to get by what class amplifier on it's a Class A B, it is a quad of LED for output tubes with a 12x Seven phase inverter that drives them. So it is I have a full I have a year ago over a year ago actually I designed an entire rackmount preamp, always with the intention that I would build a power amp that goes with it. But I never had the motivation because no one ever wanted to buy it. And I shouldn't say no one want to buy it because no one ever played on it. But then my buddy hit me up and he was like, I will pay you to build me an app and I was like I will make you a custom PCB because so yeah, I'm looking forward to this. Just a fun little thing. It whenever it's funny because like projects that you know you want to do, get put, like, front and center as soon as someone was like, hey, I'll pay you to do exactly, you switch. You switch your gear real fast. Oh, like that like that. Especially because I know now like I said in my PCB libraries, I was like, I looked at it for a second. I was like, I'm not gonna have to design literally anything for this. It's, it's, yeah, I went from nothing to an entire PCB layout in a few hours. I love it.
Yep. Alright, so one last topic for today. I have an update on my resin printer adventures as well. So you do in plastic injection. I'm doing like polymer UV goop dip instruction. Yeah. So I got a type of resin called Lit Crit, strong X resin. Liquids the brand. Yeah. The strength. So this is like I like one of the strongest type of residents out there for an SLA type printer. The strength is amazing once it cures. So I don't know if it's interest. So SLS SLA printers are kind of weird, where like when you pull the print off the base plates, you still have to like there's some post processing and you have to cure it's not too big of a deal. But I've been messing with with most of it was like water wash or it was washed with isopropyl not too big of a deal. This stuff kind of needs its own resin cleaner that they sell. Not that it's actually cheaper than isopropyl alcohol as well. So it's not that bad, and doesn't smell bad or anything like that. It's actually kind of pleasant to use The problem is you have to use an ultrasonic cleaner. And so I picked an ultrasonic cleaner. And then I'll probably have a chat about that once I started experimenting more. But ultrasonic cleaners are really good at cleaning car parts and been finding out. Oh, and it's like, it's not as fast as like, let's say a wire wire brush on like a drill press or whatever, or dust. But there's zero elbow grease, but there's zero elbow grease, I toss everything into a jar of cleaner and toss that thing in the ultrasonic cleaner. And just hit go and then I go do something else. And an hour later, I've like it takes rust off of parts. How much energy is
being emitted hours a long time in the bath? It usually takes like five or 10 minutes.
Yeah, I ran a some rusty bolts and it blasted all the rust off. That's awesome. Yeah, so it's awesome. Anyways, we're not talking about ultrasonic cleaners yet. This liquid stuff, even after all the post processing, it doesn't seem to be perfectly like you can smell it like still feels brittle. But then after like sitting out for a day it toughens up. I don't know if that's something to my settings, or I'm doing something wrong yet. I'm going to contact the company and ask them for any pointers on that. But once it's fully hardened, it is just as tough as the polycarbonate stuff I print. So that's nice. So I'm thinking at this point, I can probably sunset my FDM printer and not worry about it anymore. probably put it put it in a box and put it on the shelf somewhere and not worry about it anymore. Nice. By now you get a bigger SLS print SLA printer now. Keep want to say SLS, which is the center NASA thing.
Right selective laser sintering Oh,
that does that too. I was thinking like the the space shuttle alternative thing. Oh, sure.
I mean, SLS is pretty awesome. If you want to make like metal gears and things like that. He
Oh, yeah. So next step is I mentioned this last couple of times. But next step is the chrome, try chromium, I'm putting chromium quotes, a 3d printed part over here. I don't know what I'm gonna print yet, I'm probably just gonna design like a radio knob for a car and then try play the unit. So the first step you do is you, I'm going to try doing this electroless copper plating which is very similar to the process or identical to the process that PCB manufacturers do to start plating the inside via holes. And like involves like, etching up, was it palladium, something like that into into it. It's a couple of different chemical baths, but it puts like only like two tenths of a mil thickness of copper on your surface. And so then you got a copper actually copper plate on top of that with electro electro process, basically, thicken up the copper. And so once you pick up the copper, you buff the copper shouldn't be nice and shiny. And then then you Nickel Plate that and you Nickel Plate it be for corrosion resistance and nickels, also cheaper than copper. So you can build that layer up even thicker. And then I'm going to try Caswell plating cells a kit called Copy Chrome, because chrome plating is kind of Chromium is not a very nice element to your body. So copy Chrome doesn't use any the crazy chemicals or whatever. So I'd actually don't know what's in that. I guess I should look up the material safety data datasheet. But they say it's fairly safe compared to Chrome, which is not saying much. Yeah, it
was about say like, it could still be crappy.
Yes, it would be really bad. I am going to wear gloves and do it outside and have a fan and wear a respirator and all that good stuff.
So I'm so I'm curious, what do you what are you trying to? What are you trying to Chrome plate? Because I mean, that's a lot of work for a final product.
Well, well, the idea is to prove out building new trim pieces for cars that the trim pieces don't exist anymore that you can't buy. And so if I have a trim piece I need to replicate I can easily 3d model and print it. The problem is doing a 3d print is it's plastic. And you can luminize like a luminize plastic. That's how old like the trim pieces inside your car. Are chrome plated, or chrome plated in quotes is it's actually just aluminized plastic. There's like one company in all the United States that actually does that for small batches everyone else does it and ginormous. factories and you don't have access to that. But it's really expensive on the small batch scale. Granted, this process also is not cheap, but you can least do this at your home. And it's actually you're actually playing real metal. So actually will, will handle like abuse and where hopefully, it should I mean, you're basically plating metal onto it. So it's definitely better than the aluminized plastic, which will rub off if you dig your fingernail into it.
Right, you you want to be able to take a little bit of abuse, right?
Yeah, yeah. So we'll see. It's gonna be fun project. So it's way better than the alternative I was trying was basically spray painting a conductive paint on the plastic. And that works. It is very hard to get a good surface finish because that paint isn't perfectly smooth. And whole thing that everyone's like, Oh, yeah, just Chrome it. The only way reason why chrome looks so shiny and smooth is because what's underneath it is smooth and shiny as well. The Chrome is just super hard. The nickel, nickel plating underneath it is also smooth, but nickels softer. So that Chrome is really hard to prevent chips and dings and stuff. That's what the Chrome's for. It also changes the sheen, a bit. nickel plating is like bluish glow blue sheen to the silver
and Chrome is that classic silver. Yeah. So there's a lot of plating, though, because you got copper to go to plastic, nickel to go to copper, and then curl to go to nickel.
Copper to go to the plastic and then copper on that copper. Well, okay, sure. Right. Yeah. I guess different process of copper, different process. It's called Flash copper is the next copper. That's like the copper plating steps got flash copper. I don't know what the difference between electrolytic there's a couple different electrolytic copper plating processes. And the one that I have is called flush copper. I don't know what the difference is that, but we'll, we'll figure it out.
I mean, at the end of the day, it's just copper on there, right?
Yeah, all I care about is putting enough putting enough copper onto the plastic to where I can take the plastic piece to a buffing wheel and buff the snot out of the copper and make it nice and shiny. So that when I got a nickel, it's nice and shiny. And then I buffed the nickel, then do the Chrome. And that's nice and shiny.
Do you even have to buff the copper though? I mean, can't you just put it in like an acid bath and just eat off all the crap?
Well, there's not going to be any crap on it. The thing is you want to make the copper is not going to lay smooth. Got it, you want to smooth as possible, you want to make it smooth as possible. And the 3d print itself is also not smooth. So you're, it's where you want to attack, because I've done a lot of experimenting, plating FDM prints. The problem is you have all those layers. And it's really hard to get rid of those layers in the planning process.
Well, I think you'd have to do an iterative process, right?
Correct. Yeah, yeah. Okay. So I'm hoping that with the SLA style printer, I have less processing so it makes this process. It sounds complicated. It's way more complicated with FDM though, because you have more surface irregularities to deal with. Figure it out. Be fun.
Backyard chemistry. Yeah, I you know, so last weekend I was. I mentioned earlier, I was cleaning my brewing rig with a lie. Bath basically. And I was in the backyard with my welding gloves on which go almost up to my elbows. And and like big safety glasses. Like I wonder what my neighbors are thinking I'm doing right
now. The porch is inside watching TV. So nothing.
Yeah, probably. But if they did look out there like, Oh, this guy again. Well, remember,
oh man, remember when I made a lie bath in like a blind bathtub in my backyard. And so so people who might not have listened to that episode that was like, covered on the podcast. I was stripping anodising off an aluminum bumper from one of my Jeeps. And it's it's five feet wide to two feet tall and like six inches thick. It's like a cow trough. Yes. So yeah, I made a wooden cowl trough that was basically just barely bigger than this basic grill for Jeep, filled it up with a fairly concentrated solution of lye solution and dipped it in there for a couple hours and ate all the aluminum anodized enough, pulled it out for instance everything off and was able to polish the aluminum itself. It's actually amazing how well that aluminum still looks. I just keep an ice like every couple of months I just polish it and then put a coat of wax on it. And so looks better than it did anodized. Sunday I want to plate that. That grill though. So probably when I get a whole bunch of stuff plated, I'll throw those parts in there too to get plated, like professionally plated. Because that's a lot of backyard chemistry of copper and nickel plate, something in your backyard that big.
You got to give it off to the guys who have the swimming pools of those nasty
kept exactly the swimming pools. Were the pits of if you fall in there, you never come back out.
I remember a buddy of mine growing up. His father bought a Karmann Ghia and you know those things have their unibody so you basically unbolt the body and just crane it off. Yeah, and
you can separate the what's called the pan off the off the off the body.
And he got that thing powdercoated the body and he had to go to a special place that had a tank big enough to do the acid dip on it. Oh, so he acid dip the whole thing as a dip the entire body of the car. It cost him a pretty penny but it was it looked awesome when it was done. Yeah.
As long as doesn't get chipped will never rust.
Basically. Yeah, that's my baby did though like that was his his special color.
That's always that's that's one reason why I don't like oh, we're going to go down this route probably like a waste of time. Anyways, moving on just one last tangent for today. Because you brought this up is so a lot of people in automotive like building hot rods and stuff or powder coat chasse ease the problem of powder coating chasse ease is rocks rocks. So it's like a show car. You can do it because you don't have to worry about it. But the moment that that powder coat gets chipped, water gets in there starts rusting. And then you start getting bubbles and it will actually that powder coat will actually trap the moisture and corrosion and that lead dry out like powder coat is like my least favorite coating. Just because it's just a pain. It's it's one is it's expensive. And to the moment it gets chipped. You can't really do anything about because you can't repair it. Well. Okay, so
for cars, yes. For a lot of other things. It's a great coating.
Oh, yes, yes, yes. For cars in terms of chasse ease and that kind of inside of a car. Yeah. powdercoat away, or like on wheel. Wheels, wheels. powdercoating is fine, too, because it's interesting that you think something that close to the road, we get hit by rocks that don't really get hit by rocks because they are protected by that big thing of rubber around them.
Until you get some rash from hitting a curb. Oh, that yeah, that's different.
So I'm working on my parents as golf carts. And one of the things is that golf cart lives in Galveston and I want to rustproof the frame. That's because I'm gonna have to repair like there's like big sections of just nothing because it's been rusted away.
Well repaired air probably doesn't do good for it. No, no,
it's always in salt and water. Basically, you got to think it's like it's Galveston, Texas. It's 90% humidity with salt in the air.
So things rust in a matter of minutes.
Yes, if it's not, if it's not galvanized, or stainless or aluminum, it does not last longer than two years down there. And of those stainless and galvanized is the best aluminum. Depending on the grade of aluminum, it will last a long time. But if it's one of the lesser grades, it will eventually also it will corrode away. Stainless seams lasts a really long time and so does galvanizing. So what I want to do is I'm not going to weld a stainless frame. You don't already polish it. Well, it's already mostly steel anyways, so I want to get it you can get it sprayed with HotSync. So this is the coolest thing I started looking up of this whole process of HotSync spraying so you can hot dip it the problem with hot dipping a frame into zinc is it can warp the frame. That's really hot. It's really hot. But thing is about the when you shoot hot zinc onto it. It's only hot the zinc is only hot and transit and then it cools down when it hits your frame. It's localized heat, localized heat. And so how at least the ones I was looking at how these work is it think about like a spool gun for like a MIG welder, you know has like your aluminum spool gun. But instead of that spool of aluminum, it's a spool of zinc and at the end, it's got like two prong like prongs that has a lot has electricity flowing across them like the like the tractor beam in in pod Racing and Star Wars It shoots that zinc rod through it and it vaporizes and sprays super heats it. Yes, super heats it and then it has like an air blast that like sprays it out. It's pretty
dangerous as what you're saying. Oh yeah, you're shooting vaporized super hot metal through the air. Yeah, that's awesome. That's
pretty rad.
Do it. But is it? Is it done in a way? That's like powder coating where you you ground the chassis? So it sticks to it?
No, it just it just it just wet surface.
Oh, that's cool.
So they sandblast your frame. And then they spray that and it's only I haven't gotten quotes yet. I just seen what other people paid online for like entire cars. And it's about 300 to $500. Which is not that expensive for cheaper than powder coating. It's much less expensive than powder coating. Yeah. Because there's no there's not that whole bake phase of what's it what's the surface? It's on there. It's on there. Yeah. But I'm ideas. I want to zip code it that way. And then I want to paint epoxy paint on top of that. And it will be good for ever basically. Door hurricane takes it.
That probably doesn't make a very smooth surface though, right? It's probably lumpy. No,
it's fairly smooth. It's much smoother than because it's like it's almost like spray painting except with zinc.
Just metal metal.
So it does actually make a fairly smooth surface but I'm going to paint it with a epoxy paint to encapsulate that so it should last forever. That's cool or long enough to the next hurricane shows up and takes it away. Alright, let's end this podcast. Yeah,
I think that's a great spot. So that was the macro fab engineering podcast. We were your host Stephen Craig and Parker Dolman take it easy
ladder everyone thank you. Yes, you are listener for downloading our podcast. If you have a cool idea, project or topic let Stephen I know. Tweet us at Mac fab at Longhorn engineer or at analog EMG or emails at podcasts at Mac fab.com Also check out our Slack channel you can find at macro voices.com/slack And on every Tuesday at 6pm Central time, you can go to twitch.tv/macro Fab to see our live stream
Is grinding out math problems just busy work? Is the current state of Math class curriculum hampering the real life deployment of engineering skills?
A decade after graduating college, Stephen finally did a differential equation for his job! That is some real engineering I tell you what.

Earlier this year the FTC released a report on the current status quo of repairing manufactured items. Stephen and Parker break down this report!