Right to Repair is going global and Stephen might have solved his injection molded component's void by tweaking the mold design.
What are the common Design Rule Check errors that Parker and Stephen see as Contract Manufacturers? Are these DRC errors the ones that you run into?
Meta data for electronic components? Stephen talks about categorizing components to make it easier to get to that part that you really need.
Stephen
Parker
R.F.O.
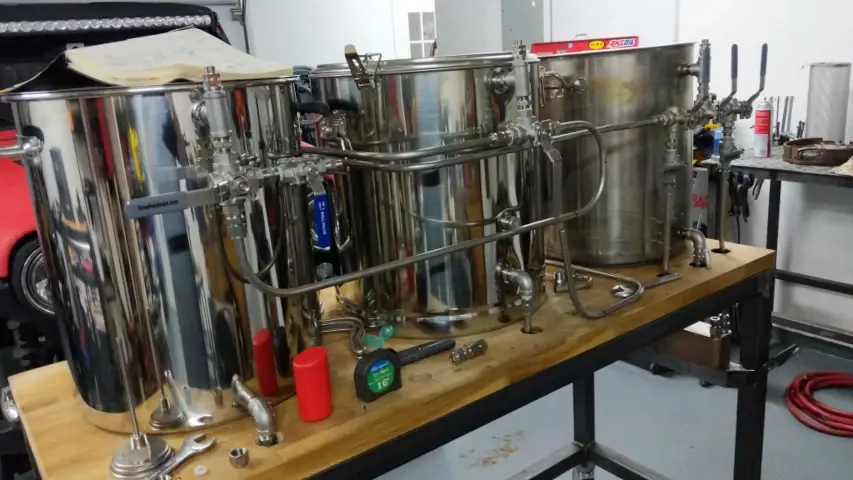
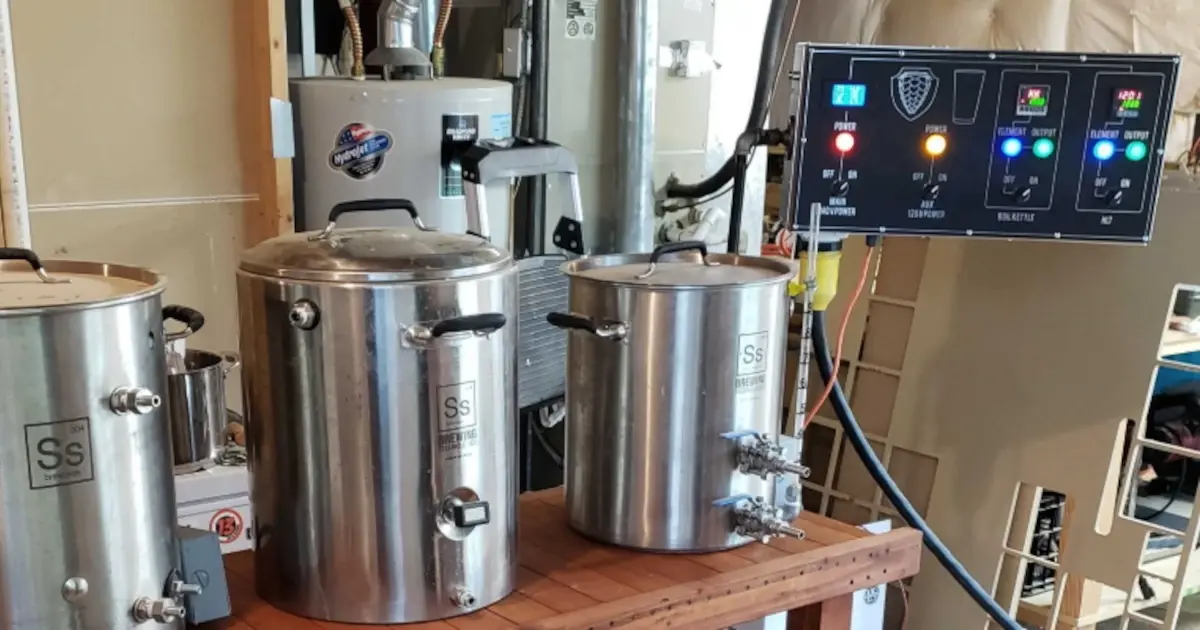
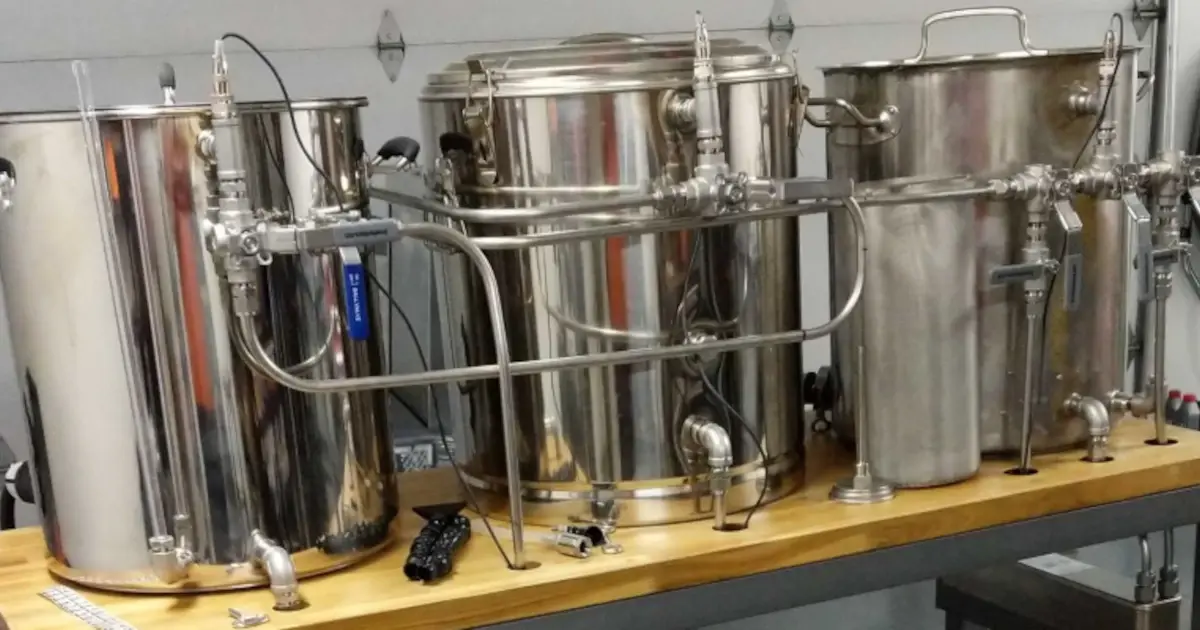
Plumbing the brewery Parker is working on. Tubing almost complete!
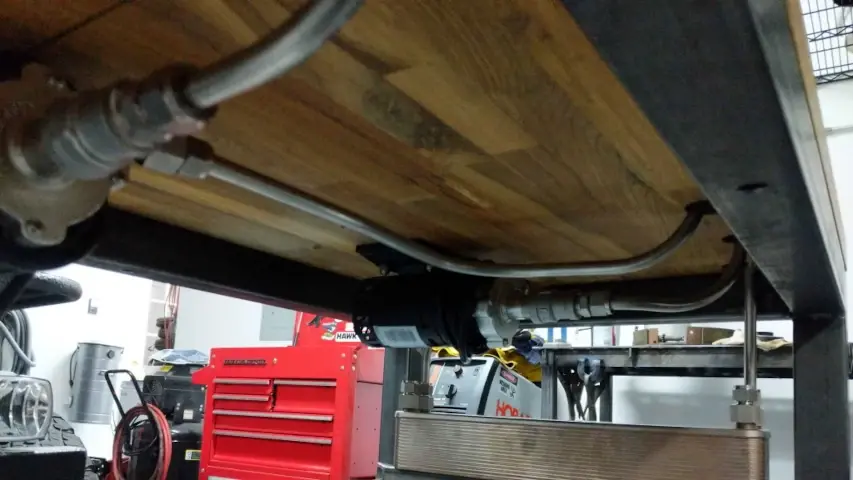
Under the brewery table are where the pumps and plate chiller are mounted.
Parker is an Electrical Engineer with backgrounds in Embedded System Design and Digital Signal Processing. He got his start in 2005 by hacking Nintendo consoles into portable gaming units. The following year he designed and produced an Atari 2600 video mod to allow the Atari to display a crisp, RF fuzz free picture on newer TVs. Over a thousand Atari video mods where produced by Parker from 2006 to 2011 and the mod is still made by other enthusiasts in the Atari community.
In 2006, Parker enrolled at The University of Texas at Austin as a Petroleum Engineer. After realizing electronics was his passion he switched majors in 2007 to Electrical and Computer Engineering. Following his previous background in making the Atari 2600 video mod, Parker decided to take more board layout classes and circuit design classes. Other areas of study include robotics, microcontroller theory and design, FPGA development with VHDL and Verilog, and image and signal processing with DSPs. In 2010, Parker won a Ti sponsored Launchpad programming and design contest that was held by the IEEE CS chapter at the University. Parker graduated with a BS in Electrical and Computer Engineering in the Spring of 2012.
In the Summer of 2012, Parker was hired on as an Electrical Engineer at Dynamic Perception to design and prototype new electronic products. Here, Parker learned about full product development cycles and honed his board layout skills. Seeing the difficulties in managing operations and FCC/CE compliance testing, Parker thought there had to be a better way for small electronic companies to get their product out in customer's hands.
Parker also runs the blog, longhornengineer.com, where he posts his personal projects, technical guides, and appnotes about board layout design and components.
Stephen Kraig began his electronics career by building musical oriented circuits in 2003. Stephen is an avid guitar player and, in his down time, manufactures audio electronics including guitar amplifiers, pedals, and pro audio gear. Stephen graduated with a BS in Electrical Engineering from Texas A&M University.
Special thanks to whixr over at Tymkrs for the intro and outro!
Hello, and welcome to the McWrap engineering podcast. We're your host, Parker, Dolman.
And Steven Craig.
This is episode 225. So before we get started, this is not an ad, repeat not an ad,
the sirens go off.
So, over the weekend, we had a platform update at macro fab. This is just let everyone know that we've streamlined the service tiers. So we don't have prototype tier and production tier anymore. It's all based on lead time.
So it's a it's a spectrum now. Yes, well,
it's only based on lead time and price now. So instead of like, before, it was like a prototype tier, which only have limited abilities, like what you can pick, like, you can only do two to four layer and only have a certain amount of components and that kind of stuff. But now it's based on lead times instead of specification so it's easier to understand. So now you get four options, you get still the 10 day, then you get the fastest possible given any specification that you can choose. Then you have a balanced like middle ground. The just get it to me option. Yeah, that's the best price that is the just get it to me for the cheapest, right. And then we did expand 10 day. So 10 day now allows through hole components, whereas before it's only surface mount. And I think we go to six layer PCBs now for 10 day. So that's cool.
Just out of curiosity, because I've been gone so long. I don't know how you do it anymore. Are you still doing a lot of through hole by hand? Or are you doing a lot of machine work on
that now we have a we fought we did get a new selective solder Steven? Ah, so So using that mainly? Yeah, mainly, yeah. Cool. Now for production. We try to wave it and that kind of stuff. But when you have a wave machine? Yeah, we had a new selector side of things. Actually, I got to take some pictures of it's like five times the size of the old one. We have a way is it a selective solder or is it a wave? It's a selective solder. Okay. Okay. Yeah, it's just, it can it can handle like, a 24 by 24 panel now. Oh, geez. It's monster. It is a monster machine. That's cool. But it's the same, same company. So it's actually when you open it up, you're like, oh, yeah, I recognize that. It's almost the same style.
Yeah. Cuz you rebuilt that gantry more than once? Oh, yeah.
I mean, it was when we bought that selector saw. This is the old rhythm RPS that we had at Mac fab. And we bought it at the end of its usable life, and then press it into service for another four and a half years.
That thing that thing was either like, really reliable, or a giant pain in the ass? Yeah.
I think it came down to the operator. Yeah. Because like, when I was running the machine, I could just push product through that machine. Like you just have to sit there and kind of babysit it.
Yeah, it took some finesse. It was not just press go and walk away.
Yeah, you couldn't you had to watch the machine. Make sure it was running correctly. It wasn't like a pick and place or reflow reflow oven you just throw a board in and it pops up the other end. Same thing with a pick and place but this know you kind of had to watch it and make sure it was behaving correctly. Because the moment it doesn't behave correctly. Well, hopefully you're not in smoke break and you come back and you have half your pot all over the floor. There's solder pot all over the floor. Yeah, yeah. I kind of missed that. Oh, machine, but the new machine is like super reliable and like nice. That's
what happened to the old machine. You just dump it get rid of it.
No. The we bought a basically the better upgraded version of it from rhythm. Yeah, I think that's the company's name. So they actually bought it from us bought it back. Oh, they just restore it and resell it. I don't know what they're gonna do with it. But they basically gave us a huge credit on upgrading to their new thing. So that was pretty cool.
All right, back to the not add about McAfee.
Yeah, yeah. No, that's about it. It's on the blog. If you want more information, people, or you can chat to me in Slack or whatever. Yeah, it's been a big effort here at MACRA to get this release pushed out because it's a kind of like a big service change deal. Yeah, I'm pretty excited for it.
Very cool. Yep. The day of reckoning has come, hasn't it? Or the day of reckoning is right around the corner. We're talking about the brewery, right? We're talking about the boot. You have some updates for us. Yes, this really that was supposed to be done two months ago,
supposed to be done like a year ago.
Now give us give us the fill is fill us in.
Okay, so since I got the wagon or running, I have a car again. So I was able to work on other projects like the brewery own brewery that's like,
do you have it? Do you have a name for the brewery yet? The brewery of Doom or something like No,
it doesn't have a name yet. I think once I got a brew on it, and then we'll have a name for
it. Yeah, it'll it'll just, you'll know it when it shows up.
Yeah. So over the weekend, and last night, I think I was up to like midnight, like bending tubing, because I wanted to get older. So all the tubing is bent and installed and everything is properly put together. Like tubing wise.
It looks legit. I've been getting pictures on my phone pretty regularly. Yeah, so all
the pumps are mounted with the 3d printed mounts. That's all nice and clean. The pots are installed with all the fittings, and all the tubing is routed. It's amazing. What I've gotten so good actually, at like eyeballing the bending of the tubing now, where when you finally bend it to the right shape, because you've got to compression fittings that can't move. Right. Right. So you got to put a rigid piece of tubing in between you tried to hit a target and three dimensions. Yeah, yeah. But what so when you when you bend it just right. And so basically, because you put one end of the tubing, and then you kind of flex it and that pops in, when it pops in perfectly. That's just like, Ah, yes. Because then the compression fittings just just easily screw on because there's no binding.
I was looking at some of the pictures you sent, and it looks like so it looks like everything was good. There was a couple fittings, I was like, Damn, you kind of nailed it right on where it looks like the bend begins, like right at the compression fitting like the bend starts. Right?
Well, so the trick I found with this is I actually looked at a lot of people who've been tubing for like chasse ease for like, or enroll cages. And what you do is when you first set up your your tubing Bender, because every single time you set it up stuff changes, like where your dyes are or where you're putting your enbloc at, but is do you have basically got to sacrifice some material to test bend. And basically like okay, if I put the tubing in here, put a mark on the tubing, where like the your dye starts and then bend the tube did the bends start where you expected it to because it might walk on you a little bit and might walk or the your you might have your dot your your enbloc which is basically holding the the tubing against the die, you might have a little farther away or a little too close or it might be a little bit to the left a little bit and so that mark will change how you set up your fixture. And so basically whenever I set it up, I would test that and I basically bend a 90 and then you have a test piece basically if I put the tubing in the dye this way, this is how the bend is going to be this is where the bend is going to start basically and then you can use that to kind of build your routes as you start at one end and at the unmovable compression fitting and then bend it around things to end up where you need to go right using that piece that you made basically based on your your fixture your your bending dyes so I got pretty good at that is really like the last like four or five were like perfect I wish I could go back and do it again on all the other ones to make them perfect but I'm like they fit and I don't want to cut me more to me more more buying anymore. Because I basically bought the tubing twice remember right right I actually should post the picture is because I actually got to use some of the the the tubing night made square by unrolling it incorrectly. I have to use some for the like some of the really long runs. I actually use that test do some bends. But I should I cut cut one and since the profile was a squirt tube I cut it I'm like, Man, I was really bad at unrolling that tube and do these at the end. At the end of the day. A the roll of tubing I bought was like 120 bucks. Okay, not super expensive but not cheap either. I bought $140 with a straight tubing and I ended up with two sticks left
so it would have been cheaper to just go with the straight from the get go yes.
Living let learn, you know yeah So what's next on it is? Well, the main thing I'm waiting on next is I'm waiting on the stainless mess bat basket. Mesh basket for the mash tun. Because you were doing a custom thing, right? Yeah. So I have it on order. That's gonna be a couple more weeks still because of COVID. You know, I'm not going to be like, angry at the company be like, No, my, my mesh basket is essential. I must brew, brew. No, no. So I totally understand that I'm not essential business. So that's the main thing I'm waiting on. Because that will influence the crane grain or crate grain, the grain crane that I need to design and build a granary. Oh, yeah. I mean, know how tall I need to build it. Yeah. Because I need to build that. So then I could paint the stand. Because I want to do all the welding before I paint.
You know, I got a, I got a really quick tangent, we'll get we'll get right back to the essential thing actually just came up for me. Just the other day, I was for a client project I'm working on. Of course, they specified a JTAG style programming connection on their board, as opposed to a standard six pin. But they really liked our Tech Connect that we have. So they're like, Well, why not get the 2050 as opposed to the 2030. The 2030 Tech Connect is the six pin Pogo guy. And the 2050 is the 10 pin. So I'm like, okay, great. Now I gotta go buy the adapter for the st. Link STM, and the connector. So it ends up being like 100 bucks or whatnot, just to get a programming cable, but it's Tech Connect, they're really nice. Now, here's the whole thing. I'm gonna I'm doing the whole checkout thing. And now if you check out from Tech Connect, they have like a whole thing where it's like, is this for an essential business? And I'm like, Well, I'm working on a client project. And like, yes, but like, the wording that they have is really confusing, because they say, is this is this order necessary for you to for your operation effectively? And then they have the word OR? And then they say is this for medical is this for blah, blah, blah, is is for like all these really like super essential stuff? So they asked, like, first of all, like, do you need this to do your job? And the answer is, well, yes, I do need this to do my job. But then after that you say, or is it for all these really, actually essential things? You know, so I ended up going with? Yes, because I do need it to have my job. But it's really confusing. Like, this isn't for medical, this is for a musical equipment. But it is essential for me to get to do my job for my clients. I don't know, regardless. So I don't know if you're gonna put that on there. I guess be a little bit more clear. If you really, if you're really trying to distinguish if something needs to go out like right now.
Yeah, I wonder if it's just how their local laws are structured on there. Because it's all like, some states is my county what is deemed essential? Yeah, especially here in Texas. In Texas, it's like by almost city, what is deemed essential, right?
Well, I think you're, I think, you know, you know, like, by buying this tag, connect programming cable, I'm probably not preventing someone in a hospital who really needs a tag connect cable, you know, so I figured like, It's okay. No one got harmed because I ordered a programming cable. Yep. Okay, back to you brewery.
Okay. So yeah, I gotta wait. I gotta get that stainless mesh basket. I know how tall I made it. But I don't know how big the hoop heart handle. What do you call that? It's a handle, but it probably has a special name for a handle that's on a bucket that's curved a bucket handle. Okay to handle. Yeah.
You know, so I really want to do that for my brewery. The only thing that sucks about it like so I've been using a mesh bag, not a steel mesh. And that's nice because I have a thermal well, and a probe that goes into my bucket. And so I couldn't put a stainless steel thing basket in there. Unless it had like a weird i don't know, like an extended boss in it with that the thermal couple could fit in. I don't have a good solution to that. I'm kind of going to Jelly that you can just have a big you know, Ben that you pull out? Yeah.
Well, that's because my temperature reading is basically the wort. Is there a name for the for the fluid when you're when you're currently mashing. It's good, it's done. It's work.
I know. Well, okay. So I think for just hot water. I think the second you pour your grains into the water, it transforms toward.
Okay, so that's it's the word. So yeah, I'm measuring the temperature the word just as it comes into my, my vessel. Yeah. So I'm not measuring it in the war in the grain. Yeah. Yeah. So well, I will have to play with it. See how that how that works, it should be fine. In theory.
So So I did. Gosh, we talked about this on a podcast a long time ago, I built a contraption, like a spider contraption that basically had five thermal couples on it. And I buried that in my brain one time to get a three dimensional map, basically, of what the grains look like while doing a recirculation mesh. And at first, the, like, the five different areas that I chose, which were different depths, and different radiuses. Inside the pot, were actually significantly different, like, upwards of like 10 degrees different Celsius across the thing. But you know, after 1015 minutes, it it equalized pretty well. It just, it just depends on what, what temperature are you putting into your PID, and, you know, the wort in is going to be cooler than the wort sorry, you're going to be hotter than the wort in the center of the mash. So yeah, you know, you might want to consider having like, a differential, like know that if you put 156 It'll be 154 or something. Yeah, center.
Yeah. So I was going to do a basic when the work comes in, it's just not going to spray over the top, I'm actually going to make a stainless tube that you jammed on the center. And it will pump into that and go outwards. Hmm. Okay. So that's the idea. We'll see if it works.
I think most of the time with the research stuff, they pour it on the top so that it flows through the whole grain. And that way it compacts the grain and the grain acts as its own filter.
Yeah, the problem with mine is because since I had this stainless, the bass gaskets, there's a there's a gap between that and the edge of the tank. It's about half an inch, where so basically, you could technically just hit the top and then go off the sides and then down. Got it. Got it. So I want to basically say it's going to go into the middle of the wart no matter what, or the matte grain, no matter what it was, this is a huge experiment.
It will change that's basically unknown. Yeah,
the this whole brewery setup is something I've never seen someone build something like this one before. And the whole stock idea of basically instead of making it I'm not even trying to make like the best beer possible. I want to make it the easiest cleaning brewery as possible. A completely different strategy of building a brewery.
Oh, yeah, the criteria is much different. Yeah.
So yeah, I gotta get that basket, and then I can build the grain crane. But why can do next I'm gonna do that this night is I'm going to mount the electrical box. And I was looking at the electrical box last night and I'm like, oh, no, I might have put the power input on the wrong side of the box.
Just put the box on the other side of the
thing. Well, I want everything on the front. But I don't want it underneath the boil pots. Have it under the hot liquor tank is completely fine, in my opinion, but having an under the hot boil is not because the hot liquor tank is. Technically it could boil water, but it's never going to boil water. Like you're never going to sit it to do that.
Yeah, it would only need to get to 170 F like Max.
Yeah, Max. See, I got a mount there logical box and then finish up the wiring. Once that's all done then
then brew day. Yeah,
brew day. And they're gonna brew that October mock Tober fest, I should say. Beer. So fake Oktoberfest beer.
I would have never guessed that. Yeah.
You've had that beer before. So I've had all your beers. Yeah, that's one we call it fat Elvis. Elvis. Yeah, it's good. So I can't wait. I'm really looking forward to this. But I was thinking about the green crane. And we used to just in the past just build like a little gantry that goes on the ceiling into your garage. I might just end up doing that. Yeah. Because it's like, do I really want to hold this thing outside to brew? I'm like, No, I'm probably just gonna like back the car out and just brew in the garage.
Well, just make sure or with all the hot steam, you know, you don't have a lot of condensation on the roof of your garage. But you know, that doesn't matter too much in Houston, you already have condensation,
condensation. So it's like, yeah, just open the garage door and just turn a fan on.
You wouldn't you want to get really cool. Get by yourself an eye beam at bolt that to your ceiling, and then buy one of those gantry hooks that connect to that eye beam.
And I was actually thinking is that I put in the right spot in the garage. I could use the lift, like heavy car parts, like I head off an engine or something. Hey,
there you go. multi use multi years feature creep. Now this is D. No, no, this is total feature creep, because this is like this. Is one project creeping into options for another branch.
No, well, no, it's reducing how much work the brewery actually takes. So it's feature creep in the tool set of the garage. Yes.
I you know, I don't think we're, we're typically not averse to more tools. So I think that's a good idea.
Yeah. I don't think about it. It's got to be in the right spot. IT departments I have a garage door that opens up so it's like I can't get in the way the garage door and I need a bigger garage.
Yeah. Is this multistory garage? Put brewery upstairs. Ah, yes, that would be so much.
That's actually one thing I'm really jealous about. Most people that like you're in Houston, it's actually in most of Texas too. I guess most of the South is you don't really have basements. Because of the water table so high. Basically, you would build a basement it would flood all the time.
Basement in Houston is three stories. Three stories. Like yeah, it's just a three story house.
Yeah, three story house. He's like you just can't have a basement here. And so like Stephens got a really awesome setup because he's got a he's you've got a two and a half car garage pretty much. And the entire underneath of your house is a basement.
My basement is 976 square feet. And it is the footprint of my entire house. Like the only thing it Parker can see it right now. It's just like the stairs that go down into the basement or in the center of that. So it's a donut. And it's cool because I chopped the donut off. So one side is like dirty where my CNC and my woodworking is and then the other side is also dirty, but it's the electronics.
It's just it just instead of sawdust. It's full of flux.
That's right. Yeah. And farts
if I ever was able to move I would move somewhere just so I can have a basement.
basements are the best. Yeah, they're so legit. Yeah.
So people don't realize what what they have until you don't have one
you know when we were when we were looking for houses on the street that we bought our house there was another house for the same price that was that was available when we were searching and it's almost the exact same house but it just flat out doesn't have a basement and I told my realtor I was like don't even take me over there. Like I don't want to see
Oh, cool. So hopefully next week I have more updates for the brewery um, hopefully basically by next week I have it disassembled and least like maybe had the woods sealed the countertop I have. I still can't paint it until I had the the crane. Maybe I should just go ahead and like welded hinges on the throne. You shouldn't paint that
at all. It looks awesome as it is. Don't paint it looks great
on painted. I don't want it the rust.
Okay, clear coat painted.
clear coated. All the grinding marks
forever. Yeah. Okay. I'm gonna I'm putting a challenge in for you. Okay, it's a really simple one. Okay, so we'll actually so it won't be next week's podcast because we have a guest next week.
Oh, yes, we have. Actually, we have al Williams on next week.
In fact, we have three guests in a row. So this is the last Steven and Barker episode for for almost a month basically. So here's the thing. At the end of that, at the end of those three weeks, the breweries got to be ready to brew assuming you
get your grain basket, the thing is, is if I do the gantry setup, I think I might go that route. It will cost a little bit more but it does allow me to use it for other things like lifting cylinder heads and, and other really heavy things. Tools like being able to lift like like the drill press around would be awesome because right now I kind of just like walk it around if I need to move it it, man, that's
what we did in our shop, we had the three ton gantry. And like, if we needed to move the tables, I was just strap it up and go. Yep.
But that was a that was a three dimensional, this would only be two dimensional. This I could slide it back and forth and up and down. I can't go. Could
you could? That sounds way overkill if three eye beams and you could do three dimensional. Okay, okay, let me amend my challenge to you then. At the end by the next time we have a you and me podcast, you need to have a birth date set. Just the deaths? Yeah,
I think. How about then? I've already tested it with just water.
Yeah, that sounds good. I mean, because you could do that like, right? Yeah.
Yeah, I can. I can do that with our basket. Basically, fill up with water, run all the pumps, make sure my idea of how my cycle is going to work.
Yeah. I mean, hell, you got a long weekend coming up Memorial Day. So throw some water in there and heat some stuff up. Yep. All right. We'll check back in all of us are gonna check back with you in four weeks. And we want some results. Exactly. Cool. Okay. Speaking
of results, Steven. Yeah, how's this how these, uh, the thermal testing been going?
Thermal testing has been going fantastic. So what Parker is talking about, we actually kind of mentioned it last week, I've been doing some thermal testing on a particular power supply that I've been messing with. And I need to cut this power supply its own paycheck, because it has now worked for me for over 80 hours straight. So it's time, it's time to just keep chugging along.
So I did a lot of a lot of testing in between there. But I did some simulations on I think last week, I was talking about some balancing resistors and things like that. So I actually installed a handful of those resistors and got the dissipation in my transistor and my regulator. So in a bootstrap configuration, I kind of got those down from 750 milliwatts, I was shooting for about 250 milliwatts, but I've got closer to about 350, which I'm totally fine with that's 350 to 350 milliwatts of a to 220 package just sitting in ambient, no heatsink whatsoever. So basically, I balanced it as best as I could it was, it was really hard to get the values, right, such that everything kind of dissipated the same amount. In reality, I've got one resistor that's dissipating the bulk of things, one that's doing a little bit, and then the other guys are kind of sharing it, everything else. And sometimes with these kinds of analog circuits, you don't really, you don't get this magical Goldilocks number where everyone's just doing all the same amount of work, you just have to sit back and be like, Okay, well, I'm fine with one guy doing a bit more. And I think that's what I'm going to go with. So, you know, with all these balancing resistors, it's not like I'm talking about, you know, 10k and 22k resistors. And things I'm talking about, like two ohms and 1.7, ohms, and stuff like so really low value stuff that is all just like real close to each other. So I don't have a lot of options in terms of when you get low like that your your options of values get kind of, technically, they're all the same, but they're all chorus, right, unless you want to spend a bunch of money and get special resistors. And I don't want to do that. I'm putting like two watt resistors in there that cost like 13 cents, right? I don't want to get special like big fat, custom value, surface mount guys or anything like that. So I think I've got the design locked in to how I like it. I've already cranked 80 hours of it just like juice. And so I actually also purchased enough components to build two more of these. And all of that shows up tomorrow. So I'm going to get all three of these circuits going. And I think I mentioned last podcast, the goal is 1000 hours on these guys, and then 10,000 power cycles on them also. So I'm just gonna keep chugging along. But so far, everything is good. And I'm way happier because the global temperature of the entire board is like in my basement, it's 20 degrees Celsius, and the circuit gets to like 35 to 40 degrees Celsius. So I'm not because before it was like 8090 Celsius, you know, when all the heat was focused on just the transistor and the regulator, just a little bit of balancing act and I can smooth it all out. So that's working out pretty well. Actually, you know what, when you're ready to brew, I should have some really serious date on this stuff. And Exit, you know, I was I was doing some research last night on something, I do not want to start a new project, I do not want to hear you laughing. I don't want to start a new project, I don't want to introduce a project. I don't want the macro Feb podcast to do a new project. I want one of our listeners to do this for us. If anyone's looking for a project, I think this would be fantastic. I would love one thing that would be really nice about this project is a data logger, some kind of really nice, but like simple data logger, because what I've been doing with this project is just basically cooking this power supply, letting it just sit there and chug at max load for however many hours and occasionally testing it. And a lot of my tests have been you know, sometimes I actually measure ripples, sometimes I actually measure voltage. But most of the time, it's just binary. Is it like, is it good? Is it not. But I would love to have a data logger that could run side by side with it, where I'm just you know, it wakes up, it takes ripple readings, it takes some output voltage readings and then shuts down every lateral minute, every 10 minutes, it doesn't even need to be that great. So I started doing a bunch of research on some decent data loggers. And in the simple and cheap range, they just kind of don't exist, it would be awesome to have like a really simple USB guy that could just I could just say like, Hey, give me these readings for the next you know, 40 days or whatnot. Because I would love to track is my ripple getting worse, across 10,000 hours, you know, are my caps starting to are my caps actually meeting their specs on the the datasheet and things like that, I don't know, I think it would be really or maybe even output noise, it'd be cool to see like, oh, is the regular getting noisy or across 2000 hours of life. Right now I can't even measure the noise. It's pretty damn good. I mean, I only have about 200 millivolts of ripple going into it. And the output ripple is lower than what my scope is. It's buried in noise, let's just put it that way. But, you know, I think even less simple like 10 or 12 bit four channel data logger that has just enough memory to you know, suck in all that stuff. But also give me kind of, not kind of also give me like, decent AC readings, such that I could actually read ripple would be kind of nice on that. And the whole point of saying this is like in my research last night, just some quick Google searches. I didn't find anything that was like reasonable. And I don't know, reasonable is kind of loosely said, because you can get plenty of multimeters that do pseudo data logging. In fact, there's a there's a nice Fluke model that I used at a previous job that I really like. And it has pretty decent memory depth. But for the most. For most of the data logging I did with it, it was I don't really had enough memory to do 2030 hours of logging at a reasonable sample rate. I'm talking about something that I could leave on for a month and gather data.
I wonder if you could if you had a lower costs, like Google scope, or whatever that has USB connectivity,
oh, if you could just ping it and ask for documents. That'd be cool. Yeah, or even a desktop multimeter. But But at that point, you know, you're talking about one channel, I would love to read four or five. And I understand that I'm asking for a lot here. But I was surprised because I'd never really had a need for this style of data logging in my hobby, you know, my basement electronics. And now I kind of have like a really good need for it. And it just doesn't exist. And if you want a data logger that can do what I want, you got to shell out some real money. And I don't want to do that. Because this is the only thing I would use it for right now. On top of that a lot of data loggers aren't, you know, ones that can do what I'm asking for, they only have like a 10 volt input maximum, I would love one with a 30 volt. It's such an I could use it with 24 volt circuits. And that, you know, so that kind of kills it too. And I saw that, you know Velleman had or is I don't know is that how you pronounce a Velleman or Velleman or whatever the guys who make like electronic kits, you know, you've seen them before, if you go to the electronic stores in like the retail stores or they sell them in like fries and stuff if you want to build like a buzzer or, you know, Christmas tree LED light kit, you know, like those kinds of things. They actually have a data logger as a kit, you can build it and it has like a whole software package and stuff. But it just didn't really seem to do exactly what I wanted it to and I don't think it had the right voltage range. So I don't want to have to like build extra circuits to have a data logger connect to my circuits. I just want to turn it on Wanna go for it? So, all that being said, if one of our listeners wants to make a really cool project that would be great for engineers make a data logger that does what I wanted. I did to be honest, I think it would be kind of useful. Even it doesn't even have to have like, super crazy specs. Because I don't, I'm not looking for like extreme accuracy. I'm looking more for relative accuracy. I want to see something change. I don't really care if, like, I see that something is 24.0 volts, you know? No, it's a good idea. Yeah. Cool. You got something else? Or? Oh, no, the brewery was was lets me
know what we can talk about. So we touched on this earlier as Al Williams is going to be back on the podcast next week. He's our guest. He's from Hackaday, and wants a lot of magazine publications. So if anyone has any questions that they want to ask al Williams, let us know when slack should be a lot of fun quick him when I was on.
We're talking about simulation, right?
I think so. I think that's the main topic. I think I was willing to talk about anything that we asked him. But I think simulation is going to be the main topic,
Al wrote us a an email with like, 50 Links to all kinds of simulation stuff. I'm like, oh, gosh, it's gonna it's actually going to be really great. Gonna do a lot
of homework for next next week.
So tune in, though, yes, let
us know on Slack or Twitter. If if you have any questions for Al. And, Stephen, what is your other topic you want to talk about today? So
I've been designing something at work that. So basically, what I've been looking into is up in clamping. So I've got a situation at work on a product that I've got where I want to give it the clamps. Yeah, that's right. Future.
So I've got I've got a user input, that I don't get to control what the user is able to put into this thing. For the most part, like 99% of users are going to put negative five to positive five volts into this input. But there's nothing to say that they could put anything else into this all the way up to plus minus 12. volts. Okay, so
this is a it is it's a, you're putting in an analog signal basically.
Well, it's just a Jack, you're putting anything into it. You want. Really? Yeah. But all I'm saying is, well, the intent is analog.
Yeah, the 10th is an analog plus minus, plus minus five volts signal. That's right. But this kind of connector can also carry a plus minus 12.
I can yes theory in theory, yeah. And it's, you know, that's one of those things where it's like, my circuit is protected against plus minus 12. So it's, there's no damage that's going to happen. But the thing is, I kind of want, there's, I have some very specific boundaries on what I want the functions to happen to have the circuit. And it's nice to, since I know that 99% of the time, it's going to be minus two plus five, I want my circuit to have all of its mojo to happen between those minus and plus five. And if you go outside of those ranges, I want it to do nothing. Or I'm like, if you go past five, you're not going to get any more of my circuit. And so it's just going to clip, it's just going to clip and I'm doing this in analog. Exactly, exactly. There's a difference between those by the way, clipping and clamping. And so. So I've been researching and kind of working with clamping circuits. I've done some clamping in the past. But I actually tested this one out the other day, and it works out fantastic. So I've got a link to this circuit. Basically what it is, it's an op amp circuit that has some op amps are configured as comparators. And they have diodes on the top on the outputs. And with this with this particular circuit, you use a resistive dropper. And that feeds into these comparators. And when the comparator sends a particular voltage, in my case, negative five and plus five, the op amps, actually, their comparator action, flip them around and activates the diode, and such that if you have any more or any less input than positive five or negative five, the op amp just syncs the current. And it forces that diode to act as a perfect diode as opposed to, you know, a curvy diode. So the op amp does all the work for you. And what's nice about that is in terms of clamping it actually creates a hard knee. So if you you know if you kind of draw like a characteristic curve of the input versus the output, it's a it's a linear line or whatever it follows tracks your input between your two values, your threshold values, but as soon as it reaches those values, those op amps just say no and they just chop it hard, which is super nice for exactly what I'm doing so The thing that's kind of nice about it is, with my circuits, I already have a plus minus 12 volt rail. So I have my power for my op amps. But I also use plus minus five volt reference rails for a lot of the other features that go into this thing. So I already have all the voltages I need. And my reference rails are actually high precision. So like, they're like 5.01, you know, they have variation of very low percentage. So I can just use those reference voltages on my comparators. And my competitors will just chop anything hard goes out of those bounds, right. So it's, it's, in a way, it's kind of like digital chopping, but using analog circuitry, where it just says you cannot go beyond this limit. So it's, you know, this, this link that I have is a whole article about this kind of clamping circuit. So I'll post that up there, the circuit I did is a little bit of a variation on this. And I kind of feel like this particular link I'm sending is a little bit of an ad for a particular type of op amp, because in this article where they're talking about clamping circuits, they're like,
oh, sirens that were the sirens that
they're like, this op amp because this op amp doesn't have input protection diodes, because this circuit doesn't work for op amps that have input ESD protection diodes, because those will actually clamp it, they'll clamp Yeah, they'll clamp it at point five or point six, whatever, around there. But the thing is, like, a really cheap op amp that I'm using also doesn't have the op amp that they're suggesting in here is like four bucks, you know, it's like a really expensive, so I'm sure that their output amp is really fantastic. Don't get me wrong, but like a TLO seven, two, which works fantastic for my situation is like 20 cents. So I actually threw this on my, my breadboard and fired it up the other day just to see like, what are the kind of the downfalls of this circuit, and it does have a couple of them. First of all, it's three op amps to get this thing to work. And if you want to buffer it and do some other stuff, it's probably more like four op amps. Now in my kind of circuitry, I'm already just like, peppering my boards with op amps. So it doesn't really matter too much for me to add a couple more. But say you have a circuit where you don't even have op amps on there, like are you going to spend the cost to add them just to do this, you know, you gotta weigh that in my situation, it's a no brainer for me. The other thing that sucks about this is, it's not particularly fast, it actually doesn't clamp super well once you get past like 20 kilohertz, or 10 to 20 kilohertz. And it gets pretty bad past there. But this is mainly supposed to be a clamor for really slow moving signals, like for the most part, my users aren't going to do anything above say 100 hertz, maybe 1000 hertz. So it works fine for that. So you know, you got to weigh your options. For me, it's great. It does have a small bit of overshoot, if you're putting AC signals into it, like right at the initial, it'll overshoot a, you know, 100 millivolts or so. But, you know, for somebody who's controlling a feature of this thing, they're not going to understand that there's a small, really short overshoot. And that overshoot virtually disappears as frequency disk decreases. So once again, for me, I don't really care. And then once again, another downside is it does not work with op amps that have input protection diodes. But that's part is cheaper, cheaper, op amps usually don't have that. So it works out really well. So if you're ever in a need for that, I just I like showcasing these kinds of circuits when they actually work. You know, a lot of times you see these things online, where it's like a really super ideal circuit, and you want to try it out, then like you realize that it actually really sucks because the world's not ideal. This is actually one of those circuits that does work. So check it out.
So what is the difference between clipping and clamping signal then?
Well, okay, so maybe this is a little bit of semantics for me. But if you type in clipping or clamping into Google and you look at it, there's gobs and gobs and gobs of examples out there of like how you can do clipping or clamping, and the majority of them end up just being like, here's a resistor and a diode. And technically, yes, that's right, it will clip or clamp but what they're not telling you is it's highly highly dependent upon the resistor or the diode and you can overdrive the living hell out of a resistor a diode and you can just keep going past the clipping level like diodes are great and source Xenos but they don't they don't have this magical sharp cut off that a lot of A lot of textbooks kind of like lead them to be in reality, in most cases, they're really soft. And especially with zener, is if you just keep raising your input voltage into a clipping circuit, you can go well beyond that what you know, if you put a five volt zener, it doesn't mean that five volts and that's it, you know, like, you're not getting anything more than five, well, you just keep pushing current into it. And yes, it will clip but you can keep raising it up there. So if accuracy matters to you, then Zener is not necessarily the best situation. So a clamping circuit, the difference between clipping and clamping is clipping. You know, forcefully chops off your wave, but clamping is precision clamping make sure that like once you get past that, and you keep going into overdrive, it just stops until something blows up, you know.
So, clamping is like a scalpel.
Yeah, that's right. Yeah, you're being a surgeon. Yeah,
we're clipping is like, you know, you're clipping your bushes with the edge shears,
you know, actually, so we have another product that I was just helping out with the other day, that instead of clamping circuit, we did use a zener clipping circuit. And it's kind of cool, because we did, we have what's called a saturation circuit on the input, it's the input of a filter. And for the first five volts that you put into this thing, it, it's pretty linear, you get variations of that, but I have a 5.1 volt zener. after that. So every volt, you put in past five volts, you get diminishing returns, but you can just keep going past five volts, and you get diminishing returns, but you still keep getting more. And so if you say have a signal that can go zero to 10, your first five is dramatic. And then the next five is like taste after that, like little bits of flavor after it. But but with with a clamping circuit, it's the first five, and then after that, you get nothing more. And that's sort of important. Because the circuit that I'm designing now, if if the control voltage that we're talking about here, if you go past five, you could actually get into a zone where you get no noise whatsoever, it could actually just kill the signal entirely. And I don't want that to ever be the case. So I'm clamping it at five. And I'm forcing five to be your maximum users maximum. And it's also nice too, because like, I never liked situations where a user can get off into no noise. In fact, there's a one of our sales guys was telling a story the other day where he saw a guy, he was at a shop in Germany, this guy walks in, and he starts playing with with some instruments that were on like a display booth. And he's he's over there for like 15 minutes, and he's turning knobs and he's doing all this stuff and like playing keyboards and stuff, and clipping in leads and stuff. And, and then like after 1520 minutes, the guy like puts out takes the headphones off, and it's like cooling and leaves the store. So our sales guy walked over there. And he's like, I wonder what that guy was doing. He was all over the place, and he puts the headphones on, and there's no noise, the guy for 15 minutes was just trying to get anything out of it. And he couldn't figure it out and just left and like, I don't like my designs ever giving the user an option to have like nothing, like accidentally. So clamping circuits are a great way to, you know, put put the user in a in a, a designer defined playpen. So check this circuit out, it's you know, might be useful for somebody.
So we have, I think only one RFO. So this is yours rules of thumb. Are they absurd? obsolete? You know,
I was actually thinking about this earlier today. And this is not like an article somewhere. I just I've noticed this recently, on a particular forum that I frequent. I've noticed some questions being answered with rules of thumb that I don't want to sound like snobby or like, you know, like golden engineer or anything like that. But the answers that were answered in rules of thumb were incorrect. They weren't bad or wrong in the sense that like they wouldn't work. They were just like, they're just not right. In fact, one, one of those particular ones was somebody was asking a question of like, Oh, hey, I want a I want x to happen, what voltage do I need at this node? And somebody chimed in on the forum and was like, oh, at that node, the rule of thumb is make that voltage be equal to this other voltage on this other node somewhere. And technically, there's some truth to what's being said there, but it's not enough. It actually needs to be two or three times that voltage for for the effect that the user wanted to actually be there. And I was thinking about that it kind of got sparked Something to my mind was like, rules of thumb, because that that forum post was like, Oh, the rule of thumb is this. So just do it right? Rules of thumb. How often do we see those in design? Or see those in our engineering life? And we don't question them?
Well, we know from all our capacitor talks with James Lewis are all raw gamuts. Is that as our whole concept of, oh, yeah, just use a bunch of 0.1 microfarads. That's a rule of thumb as using 0.1. micro farad, as a bypass cap is a rule of thumb, we could probably get away with a lot less. It just we're so ingrained in our design of putting one near each VCC pin on a on any kind of digital logic is a, that is what you do.
Right? And actually, a few weeks ago, we even had an article that was like, Dad, don't do 0.1 Just do like 100 microfarads. A ton. Right, right. So and that just goes to my argument here, where it's like, our rules of thumb, like, don't get me wrong, they're good. I think rules of thumb, what they are, is trying to hit a target at 100 yards with a shotgun. You know, they're just like, you're, you're getting downrange, that's all they do for you. And I think really rules of thumb, where they, where they kind of start to degrade is when the Internet is available. You No, no, no, seriously, though, like, Okay, so with that exact Okay, with this one particular question that I was talking about on this forum, where where someone was like, Oh, just pick XYZ voltage? Well, if you were to go look at the datasheet, for what this guy was referencing, what you could do in two seconds on Google, then you could figure out the voltage that was actually needed. And you would see very quickly that the voltage that the rule of thumb was asking for would not be sufficient, would not be enough. And the thing about it is, the concept behind it could easily be Googled, and the datasheet, to find the exact values you need could also be Googled. So the rule of thumb is almost not necessary there. Now, the rule of thumb, I think, is great for when you're just vomiting out a schematic, when you're like, I just need stuff out of my head, and I need it into the real world, you just black and you just stick it out there. I'm just going to do all my rules of thumb. But then I think you should kind of go back and clean all the rules of thumb up, you know, another great example is got to validate your thumbs. Here's another great example. Have you ever seen an op amp in an inverting configuration that has a resistor off of the non inverting terminal? The to ground, it seems really confusing at first, because it just doesn't. Like, if you look in a textbook, you're not going to see what that is, or like they're not, they're never going to show you that? Well. And that resistor comes into play when you're talking about op amps that have non ideal situations, ie, all op amps, right. So your input bias current can affect things based off of the feedback resistor in the input resistor. So you can counteract the some of these errors in op amps by offsetting things with a resistor on the non inverting pin. And there's a rule of thumb for what value that resistor should be. It's the parallel resistance of your feedback, and your input resistor. Which that's an old school rule of thumb. I've heard that 1000 times. And it's been true for old op amps. But it's not always true for every single op amp. So in fact, in there's there's plenty of situations where if you do that, then you'll actually get worse output from your op amp. So if you follow the rule of thumb, it's just not always true. And looking at the datasheet, or looking at information about whatever your circuit is needed, you could just do that on Google and figure like, oh, I don't need that rule of thumb. It just doesn't work in this situation. So that's sort of what I'm getting at. You're
getting at here is a rule of thumb could actually mask what you should be actually
learning. I think so. Yeah. And so when I say rule of thumb, are they obsolete? I think anytime you smell a rule of thumb, like go ahead and use it, but immediately check it. Don't just say like, it's just good enough, right? Yeah.
I think that's gonna be the end of this podcast. I
think it will also, we're, we're good at nailing these things for an hour, man. Yeah,
exactly. So that was the macro fab engineering podcast, where we host Parker
Dolan, Steven Craig, litter, everyone. Take it easy.
Meta data for electronic components? Stephen talks about categorizing components to make it easier to get to that part that you really need.
What are the common Design Rule Check errors that Parker and Stephen see as Contract Manufacturers? Are these DRC errors the ones that you run into?
Right to Repair is going global and Stephen might have solved his injection molded component's void by tweaking the mold design.