This week we are talking about Breadboards. Is breadboarding a circuit or design still applicable in today's SMT component dominated world?
What lore have you discovered in component datasheets? On this episode, Parker talks about how he picks electrical components and risk management.
This week's topics are: Porsche's Synthetic Gasoline, Record Chip Manufacturing Sales for the year 2022, and the Raspberry_Pi Social Media Firestorm.
Are you interested in seeing a blog series for the synth we’re working on? [Let us know!](mailto: podcast@macrofab.com)
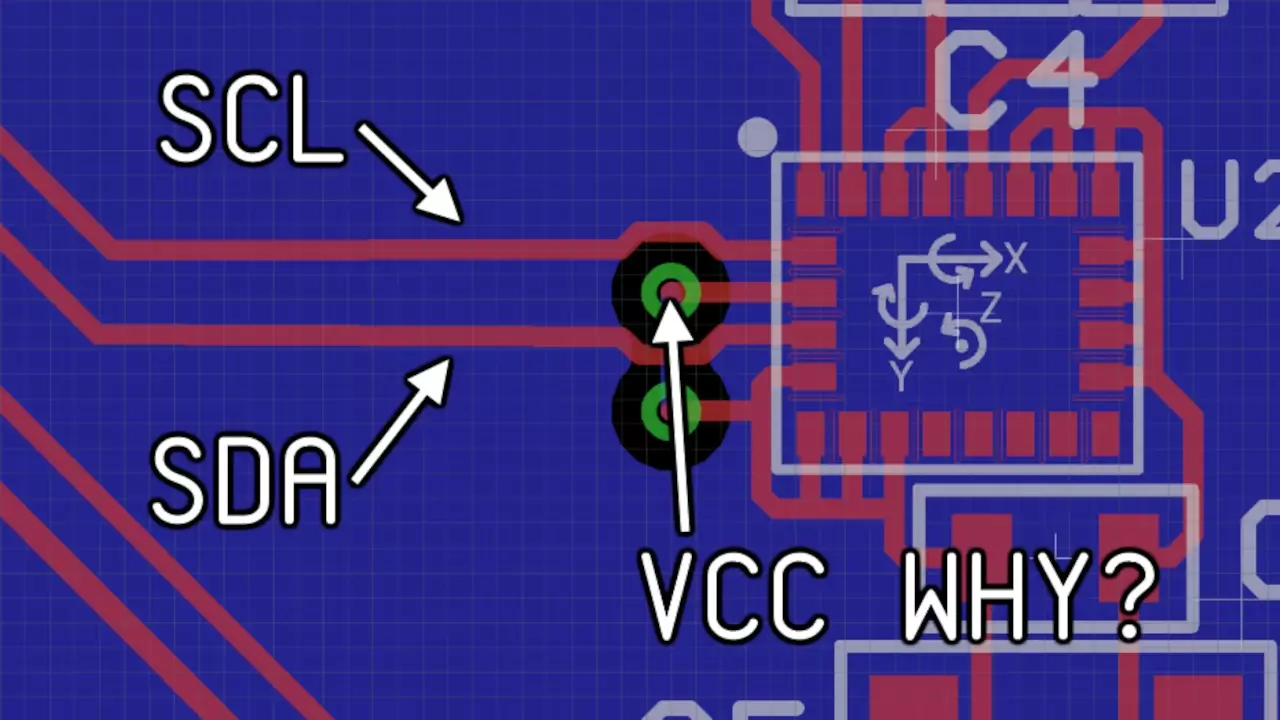
Figure 1: Parker’s routing problem with the LSM9DS1TR.
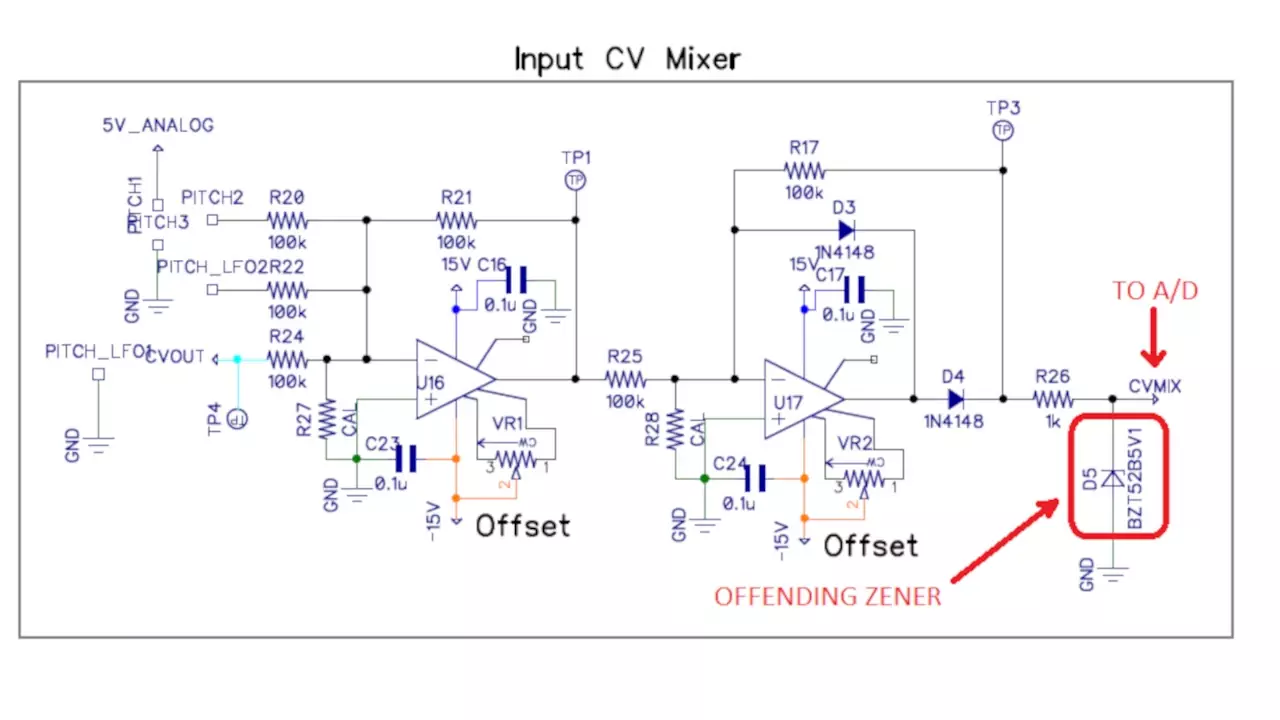
Figure 2: The offending zener diode in Stephen’s synth design.
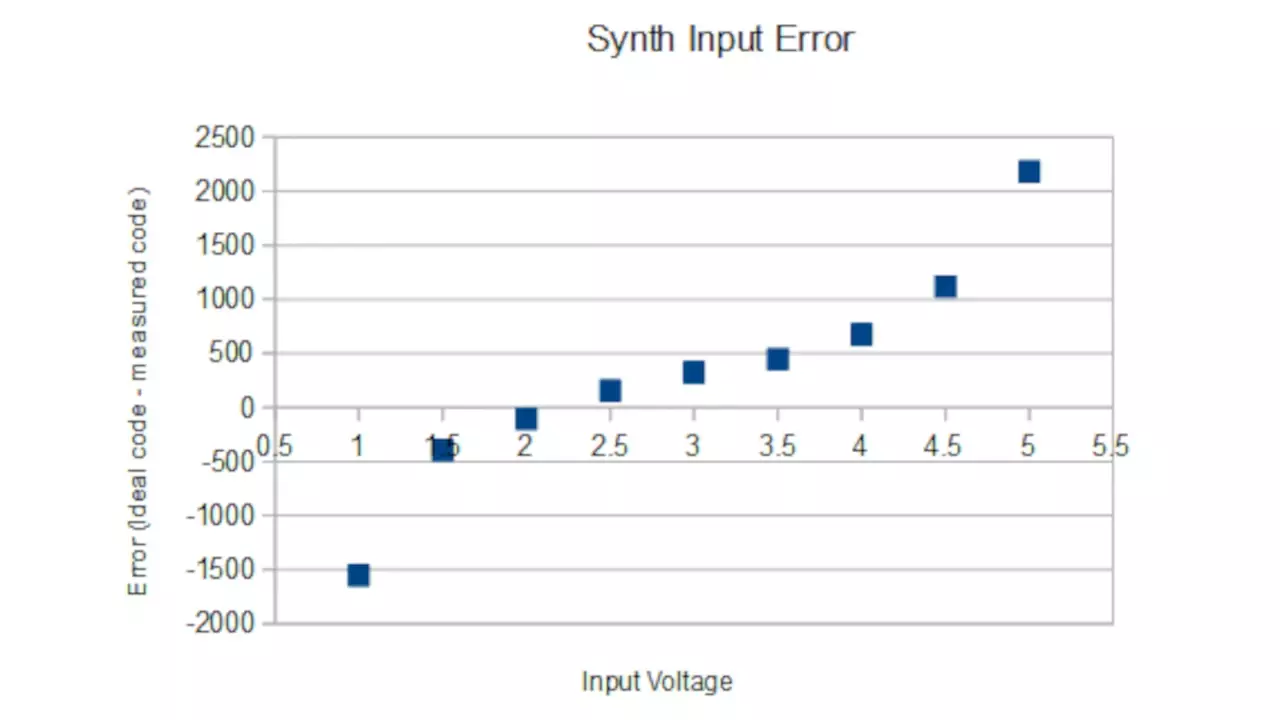
Figure 3: Graph of the error at a sweep of frequencies of the VCO in the Synth.
Parker is an Electrical Engineer with backgrounds in Embedded System Design and Digital Signal Processing. He got his start in 2005 by hacking Nintendo consoles into portable gaming units. The following year he designed and produced an Atari 2600 video mod to allow the Atari to display a crisp, RF fuzz free picture on newer TVs. Over a thousand Atari video mods where produced by Parker from 2006 to 2011 and the mod is still made by other enthusiasts in the Atari community.
In 2006, Parker enrolled at The University of Texas at Austin as a Petroleum Engineer. After realizing electronics was his passion he switched majors in 2007 to Electrical and Computer Engineering. Following his previous background in making the Atari 2600 video mod, Parker decided to take more board layout classes and circuit design classes. Other areas of study include robotics, microcontroller theory and design, FPGA development with VHDL and Verilog, and image and signal processing with DSPs. In 2010, Parker won a Ti sponsored Launchpad programming and design contest that was held by the IEEE CS chapter at the University. Parker graduated with a BS in Electrical and Computer Engineering in the Spring of 2012.
In the Summer of 2012, Parker was hired on as an Electrical Engineer at Dynamic Perception to design and prototype new electronic products. Here, Parker learned about full product development cycles and honed his board layout skills. Seeing the difficulties in managing operations and FCC/CE compliance testing, Parker thought there had to be a better way for small electronic companies to get their product out in customer's hands.
Parker also runs the blog, longhornengineer.com, where he posts his personal projects, technical guides, and appnotes about board layout design and components.
Stephen Kraig began his electronics career by building musical oriented circuits in 2003. Stephen is an avid guitar player and, in his down time, manufactures audio electronics including guitar amplifiers, pedals, and pro audio gear. Stephen graduated with a BS in Electrical Engineering from Texas A&M University.
Special thanks to whixr over at Tymkrs for the intro and outro!
Hello, and welcome to the macro fab engineering podcast where your hosts pocket omen and Steven Craig. This is episode number 70. Hey, listeners,
if you enjoyed the map, please let others know about us. Tell your co workers, your friends, your family, your loved ones and share it on social media at macro fab or follow us on Facebook.
And there's an Instagram that's macro fab Inc. That's right.
At some point during the show, we're going to announce a secret code word. If you email us the code word and your address, we'll send some cool neck fab swag your way, the email address is podcast at macro fab.com.
And so, two weeks ago, I was talking about the compressor IoT device thing? Yep. I finished hardware and got it ordered. So in about, you know, two to three weeks. I'll have that guy. Hopefully all works. His red one. We'll see.
That's using the photon, right? Yes,
yeah. So all I had to do was just basically make a board, because it's a carrier board for it. Yeah, it has a bunch of sensors I talked about last time, and some connectors and good
stuff. Cool. So two weeks or so. Yeah. And so
between now and then I'm going to start exploring the actual software stuff. So hopefully next week, I have made some headway on that. Like, I've got a server running and actually using the particle API, but we'll see. Go. And then I wrote an article about PCB board outlines and what to watch out for. Like how to basically draw a board outline correctly, there's actually some little tiny gotchas. Like what so usually you have, when you draw a line, the like the PCB manufacturer will actually mill out the board, right to the middle of that line with the cursor, the bit being outside, it doesn't go right to the edge of the line, it goes to the middle of line, doesn't
that depend on the EDA tool, though? No, it does not. Okay. So, when you're drawing an outline, then do you usually do you use the thinnest line? You can,
you can use the thinnest line, you can, or you can count for it, or account for it, I usually just use a 10 mil line,
knowing that it'll be five mils from what you actually see. Right? Just to be halfway in the 10.
Yeah. Okay. Yeah. And also, you know, on inside edges, because it's a round bit that carves out the board. And so you will have a rounded corner, right inside, you won't have a sharp corner.
And but you don't necessarily know what your manufacturer at the PCB manufacturer is going to use. Right?
Correct. So usually, you have to ask, ask the board house, what are they going to use to route it out? So you know, what the, you know, basically spec this, like, if you have a cut out, that goes into an enclosure, you have the spec, basically your tolerance on that kerf
Yeah, cuz that seems like that could be a pretty big get you there. If you you define that radius to be too small. I could see a situation where the manufacturer would just be like, well, we have a bigger bit, whatever, we'll just run it. Yep. And then you end up with something that you think is gonna be a square on the inside and ends up just being a semi circle or something. Yeah. So cool. Well, it's been a while since we've had, well, not too long. But but but having one of these articles come out. Yeah. And
so I think the only thing is, you need to go over it, make sure there's nothing else in there.
And then I'll take a look at and then there will
probably go what next week
is board outline? That's kind of interesting. Because do you get simple? Do you draw your board outline first? No. So you start putting parts down and then do I, what
I usually do first is, if it's a two layer board, I'll put the bottom layer as I'll put a copper pour, and make it ground my ground nets, and then put the parts on there. And I'll do all the modules designed first. So like I have the MCU and I'll do all the bypass caps that are so near it, the crystal and then put that off to the side and then I'll do this IC needs these pull ups, blah, blah, blah, do that part next, and I do all of them in like chunks basically. And then I kind of arrange them in the board, you know, how I kind of like them to look I guess, and then pay attention to the how the ratlines flow. So I know how the data is going to be transmitted. And basically try to not use vias as much.
Okay, you're trying to avoid them as much as possible. Yeah.
These breaks up the ground plane and return paths and a two layer board.
Well, okay, so in dip trace, planes don't work as nice as that you can define just like an area and make it, I guess you could do it the way you're talking about. But most of the time when, when I'm defining a plane, it has to have a board outline in order to define that plane, because it's based off of the board outline file. So I usually do board outline as soon as possible.
Yeah, I always delete the stock, because like, the moment you make a board in Eagle, it will draw a stock outline. I just delete it. Okay, yeah, it works. And so yeah, because when you draw a polygon plane, it is defined by the size that you made that plane?
Sure. I gotcha. Well, so um, I haven't read your article at all. I haven't. I mean, this is honestly, the first time I've heard of it. In terms of the actual information in there. So I'm curious to read it myself. Just because board outline to me has always just been like, draw a circle, draw rectangle, you're done. You know. So yeah, I'm interested also
covers like, you know, it kind of branches off the article that you wrote a long time ago about slots. Yeah, for parts. Because at macro fab, we kind of like to have that information in the board outline, because it's a million operation. Right? Right. So it covers that to a little
bit, right. If a if a, if you have a any kind of object within the board outline extense, then the PCB manufacturer will interpret that as a mill correct. It works a lot better than many of the other options that EDA tools offer. And it's more uniform, because all EDA tools have the ability to place that do that. Yeah. So it makes it easier on us and most PCB manufacturers.
But speaking about that, like avoiding vias for data transmission and stuff, yeah, I really, really, the the IMU I'm using for the vibration sensing has the VCC IO pin, basically the pin that powers up probably the the TriState outputs for the device, and you want those to be pretty stable. So you want to put up, you know, nice bypass capacitor right next to it. The problem is, to the left and right of that pin is SEL and SDA for I squared C, right. And so you have these two data pins that you need to keep close together to route close together. And you have a power pin right between them. And so you have to spread them apart to put the bypass gap there. Make it all nice. And you have to via down and go under the Data pin.
Yeah, kind of screws up the the nice symmetry. Yeah, that's the
only, like signal I have on the second layer on that board.
Do you usually try to put all your signals on one side? Everything? Yeah. And it ends up just being a game for you. Right? Oh, yeah. Yeah.
So I'll post the design stuff up and have a, like, zoom in part of the only like, via on the whole board? Or via for for signals at least that via
haunt you.
Yeah. And it's only like, you know, maybe a centimeter long or shorter.
So I usually tried to keep my designs easy to route. So I don't I don't usually adhere to all signals on one layer. It's more about how can I get it done? situation like with,
say, I'll go back. And I'm like, oh, that, you know, pinout is often at my controller, how I have it hooked up. It would be really hard to route. And I'll actually go back and switch the signals around to make it flow better. Oh, yeah. Yeah, absolutely. Same thing with connectors.
Yeah, yeah. And that's actually a really big issue with working on a team with firmware designers and hardware designers. It's, it's kind of a wonderful thing for them to work together and decide to switch pins and switch functionality, just so that everything works out. Like it may work out for a hardware designer to throw, you know, eight pins adjacent to each other off to somewhere. But that makes the code terrible because the guy might have to access five different ports. Yep, within those eight. So there's a happy medium, somewhere in between there.
Usually what we, what I tried to do for that kind of stuff is define what pins we're going to use those kind of projects to find what pins you want to use with the firmware team first, yeah, that way they can start working on the low level code as you're doing the routing. And that's kind of like locked in stone. Until if you have to change it, then you get them you know, you have a meeting and then say, Hey, I like to change it to make the routing easier. Is this going to affect the code base too much or is it just like you know, a pound define change?
You know, that's one of the prop is kind of nice because it's it's sort of doesn't matter. Yeah, anything in any pin work. So it's just the hardware guys like we'll deal with it.
Well, it's not completely true because a lot when you do a define in software on the Prop was spin. You can only increment the like, if you do if you if you're trying to let's say, assign a bunch of pins to one value, like, bring them all up the high. Yeah, so you do like Port define support to find a 14, dot dot 18. Get those pins, those pins in between two will be brought high. Yeah. So if you split it up, and you did like 1415 1819 20. And so you have a gap. Well, now you had to add more code in to actually slows down. Right? Spin is interpreted. It's not compiled,
right? It has to do Yeah, that's do extra. It'll do.
It'll bring those first set pins up. Right. And then the next clock cycle, the other pins, they won't do both at the same time. Right? Yeah. So it does change it a little bit.
That's why it's important to pay attention. Yeah. With your with your firmware guys, for sure. Yeah. But if you're writing firmware, then you can just screw yourself. Which one? Do you hate more writing code or routing hardware? You know, pick whichever one you hate more, and you can make that easier.
Is hardware. It's elegant hardware is what I really like when everything looks really nice. Sure, as far as I'm like, if I don't like that code, I can just collapse it in the IDE tool. Now had to look at that function. Yeah, you
kind of right at once. Yeah.
So, Steven synthesizer.
We're back to that.
We're back to synthesizer, right?
Yeah. Got some cool updates. So we've been, I've been working pretty steadily on getting incremental updates to the synth Ed, it's more than just, you know, sitting at my kitchen table and, you know, soldering crap. With, you know, we've been doing calibrations, I've been getting test gear, I've been doing all kinds of stuff. And since since that has so many different modules and aspects to it, each one kind of needs its own fine tuning. And the last time we talked about on the podcast, we played some tones, and it was just sweeping on there. So it wasn't specifically trying to play a particular tone or frequency. So in the in the last two weeks or so, I threw together some MIDI code that actually accepts MIDI codes in and plays a tone. And to, you know, I'm surprised because I'm usually not a very good coder. But my code actually works fairly well. It grabs MIDI codes and spits it out at to a frequency, which works out really well. There. We had some
you had some issues with that too, right? Yeah. So
it works in a very traditional sense. If you if you interpret MIDI code by like its base standard, then my code is awesome at that if you deviate from that at all, and it kind of crapped the bed. So maybe code. Really all I all I care about is a note on and note off command. There's a lot of other commands that are like glide and velocity and after touch and all these other things that can modify crapping, but my scent only really cares about note on note off, which is a binary 144 and a binary 128. So I basically just buy that's hex, I'm sorry, well, it comes in, it's an eight in one signal, okay, and then I try to sniff off a 144 120. And the thing is, so if I get a 144 code, I know immediately there's going to be two bytes that come after that the second byte is a zero to 127 signal that just determines what the note is. And then the next signal is velocity. Effectively, what it means is just how hard you hit the key on a keyboard. But my synth doesn't even respond to that. So I just ignore that code. So really, I look for a note on and then what note is turning on and that works great. When I send those key commands from like a computer. My, I guess my computer program of choice right now is Reaper because it's so easy to use. And whenever you run a MIDI file through that it just every time a note shows up, it just sends a 144 and the note and then when it's time for the note to stop, it sends a 128 and that same note, and it works great. I've tried putting my synth into some keyboards, and they do things a little bit differently because they work Going to polyphonic mode, not just one note after another. So it'll send a note on command for kind of the first note that you press. But if you're holding that note down, and you press other notes, it doesn't think it needs to send another note on command, because you're already because you're already on, it then just sends two bytes, which is the note and the velocity for every subsequent press. The same happens for a note off command. So if you're not just playing really staccato notes, on a keyboard, my synth doesn't really pick it up well, and it gets confused really quickly.
And you figured that out with the serial terminal, right?
Yeah, that's right. So I actually use a, they are the soft serial library with Arduino to capture all the middIe stuff. And then I use the hard serial to actually talk back to the computer. That way I can I can do both at the same time. Yeah. And, yeah, so I figured that out by reading all the bits that were flying in, because I was initially working on the synth on it with a keyboard. And it was just given me all kinds of garbage. And, and so I just started sniffing the line and watching bits fly, until eventually it was just like, Okay, well, I didn't know the standard, because the keyboard isn't following the standard MIDI. Well, the MIDI standard, yeah, of note on note off, and that's all. And that's what I was really looking for. And everything I read online that were like, MIDI tutorials were like, just look for a note on the note. Oh, great. This is easy. Not so easy. But But now Now it's it's sniffing for the the general note on note off, and I'm really just using my computer at the moment to do things. Yeah. So that was a cool thing. Luckily, that wasn't too much of a headache, because it was just watching the numbers fly by, and then figuring out what's going on.
Yeah, and you um you got the you basically wrote it in a big state machine. That's right.
Yeah. Yeah. So it's basically yeah, it's a state machine that's like, if it's, you know, state 144, then go do some more stuff, you know, so it's actually not even that big of a state machine. It's probably 30 lines of code total. And including the, the write commands, because I, I'm taking in a note, it's a zero to 127, I didn't have to convert that to a 16 bit number that represents whatever voltage is going out on E to D, or B to A. So there's not a lot of magic in the in the code. It's it's all the whole programs, probably 100 lines or less. Yeah. So
we'll post the podcast notes. Sure. It actually be really cool to do like, the evolution of the code.
You know, it's funny, I have the evolution of the code. Because I when I was writing it, I didn't delete anything. I just kept commenting crap out and pushing it to a different side. So really, it's probably like 400 lines of code. 300 is all communists. Yeah, well, the thing was, I kept writing different. Different mini sniffers when the keyboard wasn't working. I just kept instead of actually watching the the bikes fly by I just tried writing other things. Until eventually Parker was like, why don't you just look on the serial and see what's took me like five minutes to figure it out. It's like, damn it, Parker. So that's good. But that actually led to sort of the next issue in line with the sin.
You tried calibrating it? Well, yeah.
So the VCO now takes in MIDI code. Well, a week ago, it took in MIDI code. But there was, it was nowhere near on tune with what the code was, you know, it's a play a G four, and it'd be, you know, 100 hertz off of that, of that note, so it was completely out of tune. I'm
Samson here. Like it sounds good. Yeah. It seems like no, no, it was
it was terrible, in fact. So I have an audio clip that I recorded before I fixed everything and before it's in tune, so it's an audio clip that I recorded three voices from Super Mario Brothers. Yep. So we'll play that track right now. So you can hear the synth just purely accepting MIDI data in but not tuned at all. So that was that was the Super Mario Brothers on an untuned synthesizer.
So it was the clicking noises. So yeah, I
actually before we played I forgot to mention, right now the synth doesn't have the actual capability to turn off a note. The reason why you you have that is because you usually rely on an envelope that controls a different portion of the amp to actually physically muted notes. And I, I sort of have that functioning. But when I recorded it, I just, I did a kind of a ghetto way of turning off notes, instead of actually turning a note off, I just forced it to go to the lowest frequency it could play. So between every note you hear 13 hertz, which is actually audible, it's just clicking. So that's what all that buzzy clicky sounds are. But in general, you can hear that then the Super Mario Brothers terribly out of tune on top of that. So this was before I actually use the voltage standard that we calibrated with the Super Keithley
DMM. The
seven digit. Yeah, so So I wasn't, I wasn't, you know, worried about it. It's just I kind of expected it to be out of tune. But I didn't know why. So I hooked up the the the voltage standard to it. And since I know that voltage standard is bang on now, I can trust it before I didn't really have anything to trust, other than, you know, physically inserting code and simulating signals, but that's not good enough. So I hooked up my voltage standard, and basically just went in half full increments, and measured the frequency using a just basically a little tuner on the output. And when I did it, I got a horrible, horrible response response. Yeah, absolutely terrible. So every note, save one was out of tune. And some of them were not too bad. Some of them were absolutely terrible. And it was completely nonlinear. Yeah. And it was interesting, because one of them, which was 220 hertz, which is two volts, two volts input is 220. Basically, it doubles for every half volt you put in, so two volts is to 22 and a half volts will be 440. And continue on to 20 was was bang on. I was like, Okay, great. This is awesome. But all the rest are terrible. So what I did was I busted out a spreadsheet, I wrote down all the values that I would expect to receive from my A to D. Then I wrote down all the values that I was sniffing off of the A to D. And I calculated the difference between the two, and then plotted that, because I wanted to see what it looked like that my error across all the input frequencies. And I got a really curious curve.
I showed that to me on Tuesday, and I'm like, Why Does that look familiar?
Yeah. So after I figured it out, I texted Parker and I was like, you have to see this. This is cool. Just because I'm a nerd like that. And so the curve looks like x cubed. Yep, it actually looks a lot like x cubed, where, you know, for negative numbers or numbers on the left side of the graphic, kind of, it looks almost like an exponential curve down. And then on the right side of the graph, it looks like a curve upwards. Yep. And I stared at it for a while. It's like I have seen this before. I, I don't know what it is. And even Parker was like, I've seen this. And the the thing that's funny about it is it was a Zener diode.
Yeah, it was basically basically an IV diagram of a diode.
Yeah. After I saw that, it just blew my mind. I was like, Oh my gosh, I just plotted an IV curve of an exact Zener diode. And I look at my schematic, and I had put a Zener diode right on the input of my A to D, A, five 5.1 volt zener diode, and I look at it, it's like, Why the hell did I do that? That's really stupid. But but but I remember back OK, so the thing was, my inputs are not protected. Anyone can throw any voltage on on the input. And I remembered I, I put that 5.1 volt zener there because I wanted to clamp it such that if anyone puts, you know, 30 volts on the input, it's still stick to 5.1. The only problem is, I don't know why it Zener diodes leak, and they're not perfect. They, they they don't have a curve that's super sharp. And that was causing huge issues with the synth. So as as I was sweeping across all my input voltages, that diode would start to conduct at different places. And basically, higher frequencies were really, really flat, but lower frequencies were actually sharp, because of the the reverse leakage on the Zener. So it's just like, oh, okay, great. Yeah. And
we actually basically plotted the characteristics of the Zener diode. Yeah, in the nonlinear zone.
That's right. Yeah, that's right. It's It was absolutely ridiculous. So so getting this getting thing in tune. It's funny didn't require any like Turning of knobs or anything, it just unsalted, the Zener and then redo it. It's in tune. It's perfect. So I actually have the plot of the IV curve, which matches up with the datasheet. Yeah. And it's like, okay, great. Yes. Thank you. I, that's the Zener. So I pop that off. Everything works great. And like,
and like the the amperage that we, because you have like a 1k resistor that's in line. Yeah. And, like, if you calculate what the leakage current is that it's like,
it was 160 micro amps. Yeah. And 160 micro amps was enough to make me way out of tune. Yeah.
But it was just enough. And you know, of course, that 1k was just enough voltage drop. And you can just actually, you could calculate in what your voltage drop was. That's right, with that 1k resistor.
Right, right. So I recorded my Mario Brothers still has all the clicking on it. So but but you know what it is this time. So here is the Super Mario Brothers more intense? So there we go. Mario Brothers Intune. And it was all because I was an idiot. And I put a zener on the input of my ad,
you didn't know that. You were thinking that it was an ideal diode?
Yeah, that's right. Well, and the thing is, I still would like to put a clamping circuit there. But But what I should do is something that actually senses the voltage there. And then like shorts, a MOSFET, do an active stop, yeah, have a have a comparator such that it if it goes over five volts, then it just shorts the output to ground. Or, you know, you could get even fancier and do like active such that it's in a feedback loop and it would hold it down. All of that adds, you know, impedance, especially it adds capacitance to it. So it kind of gets a little bit funky. Right now, I'm the only one who's going to be playing this. So I just know not to put five more than five volts on my input. So I'm not too worried about it at the moment.
Yeah, you could. You could try a TV. Yes. It'll still leak a little bit though.
It'll leak. Yeah. And the the problem is, well, okay, so this was a good lesson, I guess. zingers are, at least this one that I chose is not sharp at all. It conducts almost all the time. And it was funny because the the one we're using,
again, it's barely conducting. Well, but but
in a sensitive circuit like I've got that was way more than kill it.
But in most of those like 5.1 volt zingers the use in digital circuits, were a couple micro amps isn't going to
order used it a power supply, where you just you're beat the hell out of them anyway, and you don't really care. It's not really sensitive. So yeah, it was it was just not the right choice for clamping signals. I probably should have chose something else, but But it's cool. So everything is in tune now. And so I can I can move forward. So I've got full MIDI capability. I've got all my waveforms. In fact, the animator waveform that wasn't functional last time I got that functional.
So what was wrong with that? A wire broke
we should post a picture of the synth right now. It's in ultimate prototype mode where it's just absolute disgusting. So yeah, I need to I need to one of the next things is going to be a little bit of a step backwards. And that's just cleaning up all my wiring, because I've just been slapping things together just for testing purposes. Now I want to make it a little bit more fixed.
So the next week, what are you going to have done on it? Okay, so it's gonna be nicer.
It'd be nicer. Yeah, I'll probably have a better faceplate. That's not made of an old fr for pccb. Yeah, but the The envelope, the envelope actually already functions. So that already works 100%. But I'm going to be using the envelope to control other parts. So I hope to have the voltage controlled amplifier working, such that the envelope will control that. And I also hope to have glide functionality, which basically slows down the transition between two notes. So instead of, you know, doodoo kind of thing, it'll do so and then you have variable amounts of slide and glide between nodes. So that's called Glide, or portamento.
I glide Yeah, glide better cuz I can I can pronounce that one.
So yeah, that's, that's what I've been up to.
And we were thinking about doing an article series, right. For the synth the Yeah,
that's right. That's right. Actually, yeah. If people are interested, please write in podcasts at Mack fab.com. If you'd like to hear about that, I, you know, I'd love to see if people are interested. But I'm done for writing some some articles about some of the modules on there. And kind of the theory of operation.
Yes. Breaking down, like do an overview article of the synth will the block diagrams and then go into each block diagram. And explain this is the how does this work?
Yeah, yeah, that'd be a ton of fun. Yeah. I'd actually have to get it working.
Well, you can write the overview. One before it's working. Yeah. Until you know, it stops working.
We I think we you posted a picture of my block diagram, right. But that was just a picture of the sheet of paper. Yeah. Well, with the picture of the sheet of paper with cut my coffee stains and all my notes. And yeah, I think there's even like phone numbers to someone. I was co working slopes. I don't I don't remember I'd looked at the other day. I was like, there's all kinds of crap on that age.
So cool. All right. So we'll have we have a Powell this week. Right? Pick of the Week, or part of the week or project is actually a project of the week. That's right. Yeah. It's, I think last week, we're talking with an XOR. About running Doom on stuff. That's right. Yeah. When we saw this, it's the doomed thermostats. It's a Honeywell prestige thermostat.
Yep. That somebody hacked into and installed Doom
and running doom.
It's great. It's, it's sort of like a more boxy industrial looking nest. Yep. That has Doom on the front panel. And it's just, I love it, because it does that. Yeah. Like why, but yes, it's so amazing. And one of the best parts is, it's controlled by NES controller. They actually hacked in an NS controller to play it, which is freakin cool as hell.
So when I saw I guess there's the, I guess I got to look at the article. But did they get the controller to work? Do they just like solder on to non use? GPIO? The MCU?
You know, I bet you they use the USB NES controller? And just check that in. Probably. Yeah, that's that probably. Although it'd be more impressive if they wrote their own wrote their own yet NES drivers
still run as a thermos, like it says still do the thermostat functionality.
You know how great it would be? Oh, my gosh, if you had the Doom guy's face on it, and he was constantly like, looking around, and if it got really hot, he just made that noise was like, ah, you know, shot the game and his face gets all bloody. Oh, that would be awesome.
But my favorite comments, because I think this is on Hackaday. Who found it? is basically this is getting to be like the leet hacker version of Blinky. That's right. Yeah, basically getting Doom to run on x hardware.
So so your first project is Hello, Doom. Hello, Doom. That's going to be the code word. Oh, hello, Doom. Hello, Doom. Write that in podcast at macro. fab.com for swag. For a swag a swag.
Okay, the RFO rapidfire opinions. Yeah. The first one is going to be the TI reference design. ti da dash 012430. I think I found that on E Web. Yeah, I think that's right. Then Hackaday procedurally generating random medieval cities. That was one that Stephen found on Hackaday. Yep. And then the Raspberry Pi named a finalist for national engineering award by electronics weekly. So we'll start with the first one. So the CI reference design ti da 01243101234. I bet you they're gonna look that up afterwards. So this is a very reference design, we used to talk a lot about type C, USB when it was the new thing, it still kind of is. And you're starting to see it a lot more in devices like it's on Nintendo Switch, it's on all new laptops, etc. So it's on your phones, eventually being your brain. So this is a reference design for USB type C, for like a dock system. So actually kind of like what's in the Nintendo Switch dock. Yeah, cuz it does power delivery. It does video support and all that stuff. By the
way, super, super thumbs up on Nintendo for doing type C. But the
problem is they put the connector at the bottom of the, the, the, the actual switch, yeah, on the actual switch, they put it on the bottom. And so if you're holding it, and the cables just sitting up the bottom, so you can't like rest it on, like a surface with the kickstand true. Yeah, yeah. It's like that might it's like that Apple mouse, that they put the charger on the bottom of it. And so the mouse had to be on its side with the USB plug plugged into it. Oh, you can't use the mouse.
Charging. Yeah, it's like it was a smooth move. But let's put the fact that Nintendo's got away from proprietary connectors and are doing type C. That's way thumbs up in my mind. Yeah. Especially because it's it's HDMI, USB, and USB C, you have a switch.
And so it's got a bunch of like fancy like, I think it does like four. It's got basically a four channel USBC.
The ROM on it. Yeah.
And but it also does 20 volt three amp. So does the do the 20 volts. Yeah, but doesn't do the five amp. It only does three amp.
Have you seen a design that does five amp yet? Not yet.
I want to find one. I think T eyes got a references on I got to pick it up. I haven't found one yet.
Okay, but 60 watts over type C is still pretty killer. It's getting there
is at four channels
at 60.
Not just the one cable. Okay, the four channel is being used as like a dock. And so you can plug multiple devices into it. Okay, like a normal USB hub. Yeah, well, that's pretty awesome. All right, this one is yours.
Yeah, so found an article on Hackaday for procedurally generating random medieval cities. Now this one is kind of a little bit off what we normally talk about. But it's kind of funny because Parker and I, we've been generally trying to set up a Dungeons and Dragons campaign through which I was going to or am going to dungeon master at some point in time. And we were going to play with a couple people from macro fab. And maybe even Josh, Josh kind of talked about it the other week, playing some d&d, and this randomly popped up. So this guy has created a online software that basically you click the size of a city that you want, and it makes a medieval city for
you. And it'll look it'll like label, like what the buildings are. Yeah, that kind of stuff. So like, you know, this is where the craft things that are the market. Yeah, they,
here's the turrets, and here's the castle and things like that. And it's, it's, it's really great if you're dungeon mastering because you don't have to draw that all out yourself. You just click this city and then show it to everyone be like, this is where you're at.
The only thing I think that couldn't be better is if when you click on a building, it like zoomed into the building and had stuff inside the buildings. That would be incredible. It'd be gnarly. And then it was like, it worked on like, an iPad or something like a big screen, tablet,
surface.
Surface, whatever. Yeah.
And then
and that way you can have, you know, all you have, you can actually just randomly generate a city on the go. And that's like, oh, you come across Camelot, three
new Camelot,
Neo Camelot.
And it would be really cool if the Dungeon Master could randomly add things. So if somebody you know, said they go to a house and they click on the house, it would zoom into the house. And the me is the Dungeon Master. I could say there's, you know, I tell the program, there's a treasure chest and there's three guys in there. You know, it's something like if you could randomly add that in there to that would be really cool. But regardless, for a start on this kind of thing. That's awesome.
That's the interface is really cool. It looks like an old map. It's got the right color scheme. Really cool.
Yeah. And we were looking into 3d printing figurines. Yeah, so I know I've kind of crapped on 3d printing in the past but in terms of getting a whole bunch of figurines to
play well you know what the best thing about this is you really hated 3d printers because they just print plastic crap. I think that's the exact quote me printing plastic crap
I didn't really hate it but now that I want some plastic crap there. To be a part of Parker was actually saying Earlier today he's like, why don't we just let the 3d printer run all day every day while we're at the fab the crap out
the problem with my 30 printer is doesn't really have a super high resolution for doing the small guys. Yeah. Can we just like, zoom, scaled everything up. And so like, even like the small figurines that people use that are like an inch tall, they're like three inches tall. That would be cool. And just make everything we just have to have like a big table.
Just play on the floor. Yeah, why not? That'd be great. So yeah, well, we'll have to, we'll have to give it a shot unless somebody wants to give us a really nice 3d printer. And then we can print d&d figurines. That'd be all wink wink. Intent. Maybe? No,
I'll give it something as a sample.
Ooh, resin printer, please.
I don't think we're that popular. No, no, no, I kind of wait. We are.
And we just talked about d&d. So we're a lot less viewership. Next up,
yeah. Next topic. Raspberry Pi, named a finalist for national engineering word. Buy electronics weekly. And so this the Raspberry Pi. I know, I hope everyone that's listening to this podcast knows what the Raspberry Pi is. I know what it was. Can you explain what the Raspberry Pi is?
Oh, credit card size computer. There we go.
And so it was named a finalist for the apparently coveted I did not know this MAC Roberts award. Now you can cover it. Yeah. And it's a innovative Prize award awarded each year by the Royal Academy of Engineering. And I'm going to guess, Royal Academy. That's got to be in England or Europe or something.
Well, I mean, this is being held in London. So you got it. Right. I got it. Right. Congratulations.
And the fact that you told me earlier is that the Raspberry Pi owns 1% of the global PC market share. That was
the biggest thing in this article. I mean, don't get me wrong. The Raspberry Pi winning or being a finalist in this competition or award, whatever it is. That's that's super cool. But the fact that the the the Raspberry Pi constitute 1% of the world's computing. That's pretty
cool. Well, you know, PC, what's, what's the thing? PC gaming is dying every year?
Y'all Well, yeah, I hear that every year. No, no, it's not sorry.
That's how they got 1% market share? Yeah.
Well, actually, one of the funny thing is this article calls out raspberry pies. One of their main functions is video gaming. I'm
emulating, yeah. Well, yeah. Yeah. I don't know of any games that are actually developed Raspberry Pi. Oh,
I think it had comes with two or three, I believe, but that's part of Raspbian. So
pi interests, pirates.
I think it's, I think it's one of those things like, the original, the, like the first version of Raspbian. When everyone was like, What's a Raspberry Pi, they just threw some games on there so that people could do something.
Awesome stuff. Ski free ski pie, ski pie. Pie free pot for a year. Yeah. So hey, good
on them. That's, that's super cool. I hope they I really hope they get it. They they are up against some stiff competition, though. The the other competition if I remember, right, they're doing things that are, like inherently helpful, socially, in a way. So they kind of have that going for him. Whereas the Raspberry Pi is just a giant monolith of computing.
Well, I mean, it does did introduce a whole bunch of people to programming and hardware and that kind of stuff. Yeah. So I mean, that was kind of what the Raspberry Pi was built off of was basically getting hardware in hands of everyone so they can learn programming.
You know, do you okay, do you know of any hardware issues with the Raspberry Pi? I know of only one. And that was the the the the flip chip that could reset if you take a picture of it? Yeah.
Yeah, that was the Raspberry Pi two. Yep. That was the two and the Raspberry Pi one had really bad issues with the USB power. Yeah, okay. Yeah. Basically, they because you would power it with USB. and then then it ran through a, I think a diode to prevent back feeding. Yep. And then a fuse poly fuse, and then it would go through another poly fuse to go out to the USB hub. I think that's how it worked. And then basically, after all that, it would be built up like a lot of times if your power supply was like barely above 4.5 volts. What no 4.75 volts, which is like the minimal
is there. Is
it a quarter of all or yes, yeah, okay. quarter volt plus minus. That's a huge you can have point five volt ripple and be in spec on USB as brutal ripple.
I guess that still counts for Type C also? Yes. Because half a volt if you're talking about five amps and half a volt.
Well, I don't know about the power delivery standard I just know about. Okay, just general. Yeah. General five volt is plus minus point two, five. Yeah, that's pretty big.
So the thing is, so I have Raspberry Pi threes out on our manufacturing floor right now that are actually running our scanners. Yep. So on our conveyor line, as the board goes by, our scanners will hit the barcodes and it talks to Raspberry Pi's. And I set them all up for Power over Ethernet. So they're all powered from a single hub. And when I was looking it up, the Raspberry Pi's maybe I got the wrong information because I, I swear, it said that USB ports could only source like 150 milliamps. And our scanners are rated at 470 milliamps. And I just was like, Oh, I'll give it a shot. And I plugged it in. It works.
So that's the older versions. Okay. Okay.
I thought I was looking up Raspberry Pi three, but I didn't have to modify the pi's. And they're just work. You know what, I actually have a two is it raspberry type two B plus, whatever the Plus model of the second one, and it also is running up almost half an amp scanner on it. So it's, it's weird, but hey, if it works, it works. Right.
Cool. Yeah. Neat. Neat. Awesome. Awesome. And so that was episode 70 Are the macro engineering podcasts. We're your hosts Parker Tillman and Steven Craig. Let everyone take it easy. Meet
What lore have you discovered in component datasheets? On this episode, Parker talks about how he picks electrical components and risk management.
This week we are talking about Breadboards. Is breadboarding a circuit or design still applicable in today's SMT component dominated world?
This week's topics are: Porsche's Synthetic Gasoline, Record Chip Manufacturing Sales for the year 2022, and the Raspberry_Pi Social Media Firestorm.