This week we are talking about Breadboards. Is breadboarding a circuit or design still applicable in today's SMT component dominated world?
What lore have you discovered in component datasheets? On this episode, Parker talks about how he picks electrical components and risk management.
Ever have PCBs that solder just will not wet and solder to? You probably thought it was improper soldering technique but that was probably not it!
Parker
Stephen
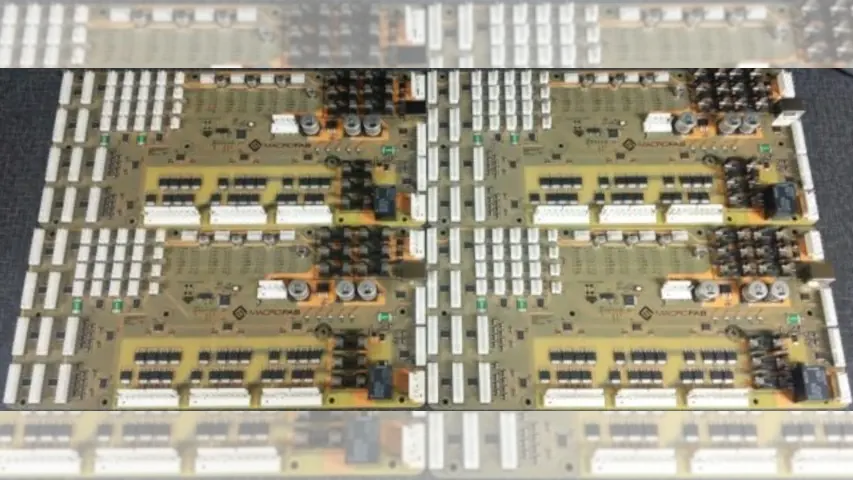
The four pinotaur revision 2 boards Parker built.
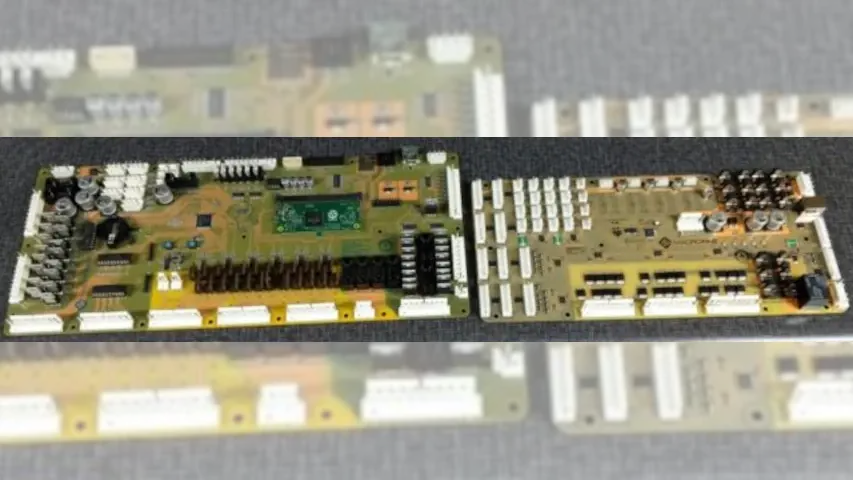
Pinheck Revision 8 verse Pinotaur Revision 2
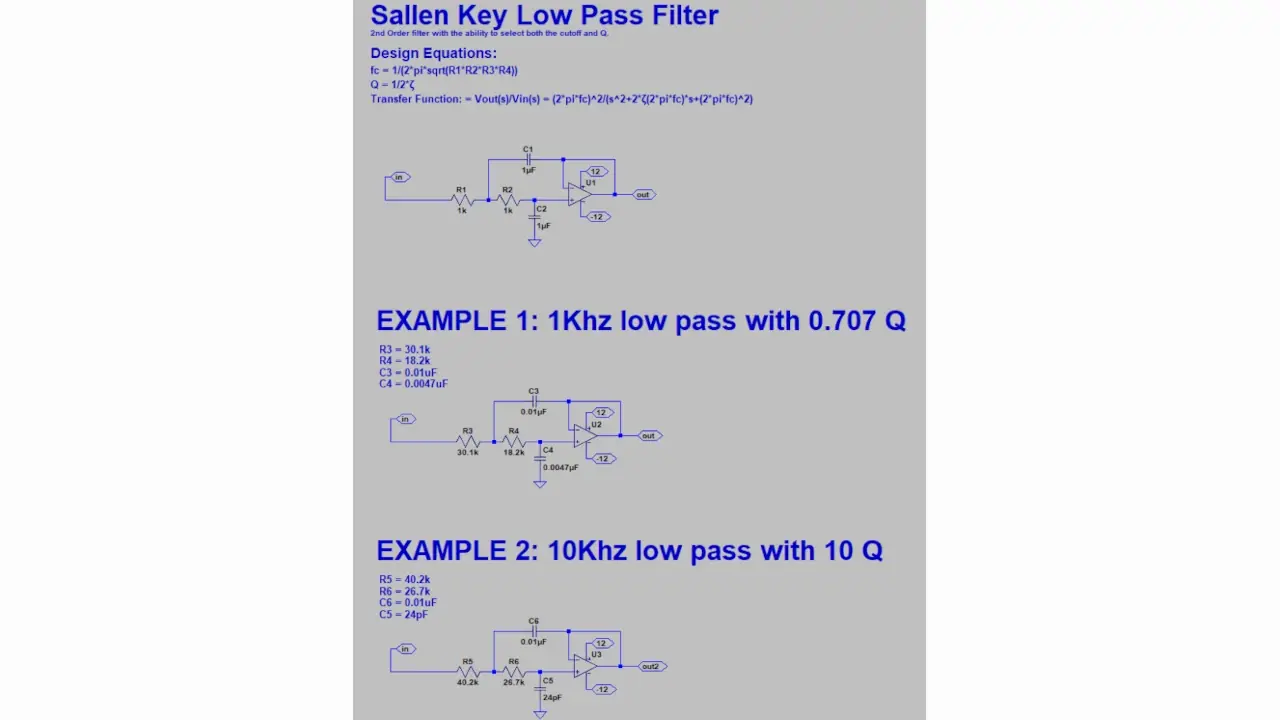
Stephen’s Sallen Key Low Pass Filter Simulations.
Parker is an Electrical Engineer with backgrounds in Embedded System Design and Digital Signal Processing. He got his start in 2005 by hacking Nintendo consoles into portable gaming units. The following year he designed and produced an Atari 2600 video mod to allow the Atari to display a crisp, RF fuzz free picture on newer TVs. Over a thousand Atari video mods where produced by Parker from 2006 to 2011 and the mod is still made by other enthusiasts in the Atari community.
In 2006, Parker enrolled at The University of Texas at Austin as a Petroleum Engineer. After realizing electronics was his passion he switched majors in 2007 to Electrical and Computer Engineering. Following his previous background in making the Atari 2600 video mod, Parker decided to take more board layout classes and circuit design classes. Other areas of study include robotics, microcontroller theory and design, FPGA development with VHDL and Verilog, and image and signal processing with DSPs. In 2010, Parker won a Ti sponsored Launchpad programming and design contest that was held by the IEEE CS chapter at the University. Parker graduated with a BS in Electrical and Computer Engineering in the Spring of 2012.
In the Summer of 2012, Parker was hired on as an Electrical Engineer at Dynamic Perception to design and prototype new electronic products. Here, Parker learned about full product development cycles and honed his board layout skills. Seeing the difficulties in managing operations and FCC/CE compliance testing, Parker thought there had to be a better way for small electronic companies to get their product out in customer's hands.
Parker also runs the blog, longhornengineer.com, where he posts his personal projects, technical guides, and appnotes about board layout design and components.
Stephen Kraig began his electronics career by building musical oriented circuits in 2003. Stephen is an avid guitar player and, in his down time, manufactures audio electronics including guitar amplifiers, pedals, and pro audio gear. Stephen graduated with a BS in Electrical Engineering from Texas A&M University.
Special thanks to whixr over at Tymkrs for the intro and outro!
Welcome to the Mac fat engineering podcast. We're your hosts, Parker
Dolan and Steven Craig.
This is episode 207.
What's going on Parker.
So last week, actually, past couple of weeks been talking about the pennant tar revision to Well, I finally got all the boards in last week, I soldered all the through hole connectors on it, and power them up. And they pass the smoke test. Whoo. Yeah, so they all work. I mean, that was kind of expected because Rev. One was fine in that regard, too. And then did a programming test. So they said just, you know, flashed a hex file I have lying around previous, the, excuse me, the previous revision, flush that on there worked fine. So they the microcontrollers are doing its thing. And, yeah, so I'm going to be shipping those boards off to the testers and programmers. And hopefully, you know, maybe within a month we have something that's like, you can play.
So do you have to do any testing yourself on it? Or did you just test it to see if it works,
I was testing to see if it works. And then I'm keeping one board myself. Out of the four I have. And one of my friends has got a couple of empty pinball machines, that is just like the shell. So it's like a playfield and artwork and stuff. And thinking about basically taking this board because they don't have electronics in them. And basically put a pin pin guitar, rev two in there, and then do some basic code again, and flipping. So you can actually like test the board's all the way. So we can test like the lights and stuff. So that we haven't really tested yet.
Right? I guess, because this is red to use. You did a lot more of the functional testing on the first one, correct? Yeah, this one was a little bit more just to fix a few small issues and move some things around. Right?
Yeah. And then we only built one rev one, and then rev two is going to be more, you know, we have three different people going to be using it now. So hopefully, you know more people find issues or don't find issues, I guess. But there's already a couple changes I want to make for rev three. The fuse holders aren't. I don't really like them a lot. They were using like this old school, five millimeter by 20 millimeter glass fuses, which are kind of standard for pinballs pinball machines. But oh, it kind of sucked to us. Was that the hard to grab? Because they're so tiny. So you kind of had to have like a glass fuse holder polar? Because if you use pliers, you just crushed them? And yeah, there's, I don't know, I've never really liked those kinds of fuses. So I think I'm going to change over to part number Keystone 358, which is a mini blade style fuse holder, that's also SMT like automotive mini blades, the mini automotive fuse. So it'd be like the size of your fingernail on like, what your index finger. But that size.
Ooh, they're not particularly cheap. They're a buck apiece.
Oh, fuse holders are expensive. Like the ones I'm using now are like double that price. So they're actually cheaper. And they're smaller in footprint. And so I might actually be able to squeeze like another inch off the board size, more fuses. Or put more fuses on it? Yes, but
you don't need any more. I saw how many you have
got like eight or something like that. I'm not including the PTC Resettable Fuses.
What do you use in those for?
Those are for low current stuff that goes off the board. Yeah, like up Optos. Stuff like that, that, you know, having a one amp fuse is like, way overkill. So I kind of wish I could do PTC fuses on everything. But some of them are like, you need five amps and the PTC fuse for five amps is actually really expensive. Yeah, and they get they get big, fast they get big and they get unpredictable and when they trip.
Wait, how so? They don't
have a they're done by heat.
Oh, yeah. Yeah. Yeah.
They trip from heat, I think if I recall. And so they have like a range they, they they trip at or I don't say trip they there's a range where they become infinite resistance.
So, so do you think that rev three is going to be kind of the end of this? Or like what you call is like, done?
Yeah, rev three, I want it to be the this is our Production Production revision. So we'll build, we will build more prototypes of Rev three course, but then be like, okay, you know, I don't want any more changes after that just to kind of speed up the timeline. But there's not much more than to like, you know, as long as this board works really well, you know, there's not been really, you know, we need to change electrically wise, like, one of the things to do is the update the logos, because that's 2019 on it. Now, let's say 2020 on it. And I want to do like full backside artwork, because there's only like eight parts or 12 parts on the back. And so I want the whole back of the board to have artwork on it. I don't know, you know, most people won't see it. It'd be one of those Easter eggs when you pull the machine apart and you see the back of the board.
You know, funny enough. I don't think there's any problem with saying this in terms of, I don't think Roz would care. Ross just designed his third PCB of all time. And it was a guitar pedal that he designed. Roz being having been a guest on this podcast, like five or six times now, good friend of ours. But on one side of one of the connectors, in small silkscreen, it says Epstein didn't kill himself. And you can, you can just barely see it, if you look right over the wires that connect everything.
So yeah, it's I think, Roz, even after three PCBs, he already gets it, you know? Yeah. Like he's already playing
the game. Funny, I was like putting funny stuff or Easter eggs on my PCBs. So
Oh, yeah. The the earlier in 2019, when I was doing the macro, that which was a four layer board, I embedded a handful of notes in the inner layers to some of the people at at macro fab, which was funny, because the the, one of the people who reviews PCBs, like just said, everything was fine. And like it passed it to me. And I was like, come on, did you really look, she got back to me about it's like, Oh, my God, found all my secret notes in there. So, yeah,
God do that. And, you know, fix a couple of the traces. For that, I blocked that 90s. So
you're just kind of waiting for some feedback from people, you might introduce some more things. If you get feedback from a handful of people
saying yeah, like connector placement, stuff like that. I expect that stuff to change. Like one thing we want to do is you want to add a connector for the ball trough instead of having like four Opto connectors, just do one connector, one master connector, but we kind of need a play around with what connector we want to use for that.
And get good feedback on that. Yeah. What about how does your How did your board mount inside the shell of a pinball machine,
so it goes on a metal plate. And so that's actually one thing we're going to do next is there's a couple of lists next is we got to design a metal plate that the board fits on. And then I'm also going to design so one is just going to be the board. And then I'm going to design another metal plate that's the board plus a section where the Raspberry Pi if using the Raspberry Pi can mounts to
so just like a regular Raspberry Pi just and then they just ribbon cable over or something like that.
USB plug. Yeah, okay, got it. Here's a little tiny six inch USB cable. And and then so that's the next thing I'm really needs I'm but that's pretty easy, because it's a 2d drawing of where holes go into a piece of metal.
So does that piece of metal just screw into the internal side of the?
Yeah, okay, just gets, like wood screwed to the back of the cabinet.
And then and then your board just mounts what the standoffs or something?
Yeah, there's some standoffs. And we're not going to use pin studs anymore. Like we did on pin. Heck, Rev. Six. I think we did PEM studs, which they were great the first time you install it, but the moment you need to, like take the board out. It's a pain in cards. Because like, it's not like it's right in front of you. You have to reach, you know, up and into the machine where they kind of like pop them off. So
they I've used those before in some assemblies. And it's like that's basically exactly right. The first installation is excellent. And if you only have to have to do it once, that's awesome. But it gets crappy after that.
Yeah. So we're just gonna do normal, you know, screw mount everything be all fine. And then the next thing we need to do Who is designing all those wiring harnesses stuff for all our plugs, that's next thing to do. Shouldn't be to wouldn't
be the responsibility of the manufacturer of the cabinet.
Typically, but we're actually going to be supplying them as like pigtails.
But But wouldn't it be different for every game?
Yeah, you just cut the length.
But I mean, every game has different assets, right? A different thing. Yeah. The length? Oh, okay. Okay.
Yeah, it ends up being cheaper. Because the well, so with the old system, we were using a matrix for the switches and lights. So like an eight column eight row style system, but this new system, everything's point to point. And so building a harness isn't really as really as unleased in the old way isn't as, I guess, beneficial to the manufacturing process than just it's cheaper to supply. You know, a connector with four feet have pigtail on it, then is to make this custom wiring harness that does the matrix see now? It just ends up being cheaper. Instead of having basically because back in the day, you have people like on your floor, like crimping custom cables. It's like, no, let's just get them all in the same length. From a you know, a another manufacturer would be cheaper. Got it? Yeah. So I asked her to,
at what point at what point in the pinball manufacturing process does your board go in? Or would your board go in the machine? Oh, like at the very end? Okay, so it's not earlier on?
No, you're talking about in the manufacturing process?
Yeah. Like, you know, I've seen the jigs that they have that allow you to rotate the playfield upside down and do all the wiring. So obviously, you would do all that wiring? And then would you build the entire cabinet up and then install your board? Or is your board installed? earlier on?
Yeah, so the playfield is its own separate piece. And it has, its wires just kind of are off, you know, there have connectors on it on the wiring harness. And then your cabinet also has connectors. So that all goes together. And then your board goes into the back and then you plug everything into it. So yeah, basically, actually, the PCB is probably the third last components, you probably put on?
Well, I've been you probably put that in before you're doing a lot of the decorative stuff at the end, right? Like all the flashing around the edges and things like that.
No, all the rails are part of the cabinets. Oh, okay. Okay. Yeah.
So So it's basically almost done when the PCB goes in.
Yeah. So you basically you would the last steps would be you put the board in, put all the connectors on it, put the glass on the back box that covers it, and then you you would slide the glass over the playfield and then put your lock bar down, and then turn it on, and hopefully it doesn't explode.
Hopefully you got it. Right. Yeah, I would think that setting up all the documentation for a pinball machine is probably a nightmare.
Not as bad as you think it's just a process.
And yeah, but I mean, it's just like, it's a lot of wiring. It's a lot of custom stuff. And it's a lot of like, what seems like free floating wiring. I know it's not I know they have bloomed and they have they
know where buyers want to go. Yeah, you put this harness here, cut it like this solder like this.
When when you've done it in the past, or you've seen other people is, is the best way to do that. Or at least, do you think that this is a good way? Because this is what's going through my mind is you build like the engineering department builds their own custom play field that has all of the wiring done up nice and pretty. And then do you disassemble it all measure it all and replicate that? Or do you just try to build it? Like one off every time?
We build? Oh, no, it's not done. We're off at a time. Yeah, you build one that is, like, usually build a prototype machine. And then you build a second one. That's like, this is how it's gonna be built in production for like your first article. But of course, it's wiring harness is custom, because you have to make sure everything's the right length and everything. Right, and then when that's all looks good, then you take it apart, measure all the wires. Then you say, Okay, we're gonna make 500 of these. We need 500 of this link 500 of this link. 500. Yeah,
got it. Yeah, yeah, yeah. Yeah. Well, it just I've seen some YouTube videos and of documentaries and things like that, where it's just guys with spools of wire and they're running wires individually, and that feels really, really inefficient, you know, and that makes each game custom basically Yeah, yeah.
But yeah, I mean, you're building the harnesses by hand. Yeah. It's just, you know, this one needs to be this long that one wire needs?
Well, that's why he's saying the documentation could be a nightmare, because you could have, what? 100 pieces of wire that all have a unique length. Right?
Yeah, it's not as bad as you think, though. Because usually you put a little slop in it, because you know, it's plus minus, you know, an inch. Oh, yeah. That's not actually as bad as you would think. So, yeah, gotta get the wiring harnesses designed for, for the boards, because we can't we want to supply the boards with the harnesses. Just prevent, like, design issues and, and problems with like, oh, we built 500 of these and this plug doesn't work. It's like, Well, alright, if that plug fails in the field, because someone decided to cheap out on a plug.
Yeah. Do you want to be in control of that? Yeah, I understand that. Yeah, that's good.
Because we had those problems in the past. With the previous board set,
you've had 500 and fail in the field.
Yeah, we had connectors fail in the field. And you asked, you know, where do you get these connectors from? Like, Alibaba, it's like there's a reason why they were half the price is the legit ones.
Wow. Like, did
you have any, like burning problems and things like that? No, just actually the plastics failing. Okay, and losing contact and stuff. Yeah, like because they were using the kind that IDC style, which is where you press the wire into it, and it makes contact, so you don't need a crimp. Right. They were having issues with basically that the tolerance of that IBC slot section, I guess it was, or something the wedge wasn't tight enough for for the vibration at the pinball machines were seen, because the connector was cheap.
Right, right. Yeah, pinball machines kind of get a bit of an abuse, you know, a little bit. Yeah. Well enough enough that like, you wouldn't want a chance that No, I would think that crimp or screw terminal would be ideal. Maybe not even screw terminal.
A lot of pinball machines are IDC. Really? You'd be surprised just for cheapness. cheapness? Yep. So that's why I want to move to this style of wiring harness where we provide pigtailed crimped connectors because I'm like, we can provide you the same price cuts made by a third party, instead of having you guys, you know, assembling them.
So are you going to try to find a wiring house? Or are you guys going to do some of it yourself?
Or we're gonna have wiring house? Yeah, no way I'm doing you're not
crypto 1000. I don't blame you.
Yeah. Gotta do that. And then when designing a audio amp, for the Raspberry Pi, kind of like a hat? I think they call them hats. Yeah, they should be called pipe plates. My my opinion but. So we're going to point out PCM 5122, audio DAC on it, which is that part I've used before? Yeah. It's like I two s. Audio DAC sounds really good. And then Pair that with a class D amplifier should be good to go.
How much? How much power? Are you looking to push through that? Like 10 1015 watts or something
like 180 watts? Yeah, Max. So I want it really all really good sounding system. Because when you're at a trade show, the only thing you can hear is the loudest pinball machine.
And that's what you want. Yes.
One thing we did, or I didn't do, but one person in our group did. They built a sub, they actually put a subwoofer box for the subwoofer part. Instead of just throwing the sub woofer in the cabinet. And it basically doubled the sound output of that machine like an external sub box. No, it was the same speaker that every single pinball machine uses but they actually designed a oh, they ported it well, I properly ported enclosure around it. Yeah, it was basically they made it part of the cabinets. Yeah, yeah. And it made a huge difference. So I'm like, why don't we do that with like all the speakers like oh cheese, put a because it's got two speakers in the back box and like put it in the closure behind those and port them and then
like just properly isolate them and give instead of just shoving them anywhere in a box.
Yeah, yeah.
Although like, Pinball never struck me as a thing where like, the
you know, I know this will be different in for you from Your sight, but it never struck me as a thing that like the sound and what they were saying mattered too much. Because I mean, like everything around you in an arcade or wherever you normally see pin balls are, are also making so much noise. Like, if it was just me alone in a room with a machine, I would pay a lot of attention to what it was saying. But it's like, noise and sound and lights and all kinds of stuff. Blue, blue, blue, and that's kind of what it all boils down to.
Usually, if you pay attention, Stephen, the machine is telling you what you need to do what you need to do what half the time you can't hear it, you know, because the sound systems improperly designed. Oh, okay, because they just threw some cheapest bid speakers and a big wooden box.
Yeah, yeah. Those speakers were like, the it's just like a stamped bug basket around them. And it's the crappiest steel and yeah, oh, yeah. Yeah, I know that that's exactly what they
are. Yeah. So
are those are those what are they rectangular speakers? You know, those those things just because they fit nicer in a box?
Oh, yeah. Yeah. Well, I mean, like, my space shuttle is just mono. It just has one big speaker in the middle. Really? It's like 12 inches wide and three inches tall or something like that weird speaker.
Oh, yeah. I bet you that thing. Sounds like crap. It's been a while since I played that. So I don't remember. Yeah. I remember that wouldn't be in hard. They came they gave me especially
as a rough game. Well, nothing's Space Shuttle was designed in an era of arcade where they didn't want easy games. They wanted games that would eat your quarters. And you wanted more people on that game. So if it was an easy game, someone could just play all day. Right? Unlike one quarter, but if you had a hard game that would drain you know, every five minutes for for a player or even for a good player, then you get more turnover. People playing games.
Yeah. I mean, that's that's sort of the whole point of an arcade. Right?
Yeah. Gotta make those quarters man I went to I went
to a video game conference up here a few months ago. And it was like retro games and all kinds of other stuff. But they a lot of people brought their arcade cabinets and just had him on free play. And so there was probably 20 or 30 arcade cabinets sitting there. And that was one of the things like it's always fun when you get free play when you can just try anything and play all these games you haven't seen before. And you get a real appreciation for that where it's just like, some games are like, Man, I'm really um, I don't know this game very well, but I'm doing fine. And I've stayed alive for a little bit. And then there's other games where it's just like dead dead dead.
They're just brutal. It's like, Metal Slug to oh, that game was awesome. On the NeoGeo platform. The first level I can beat without dying. Yeah, I die. I'll lose all my lives on second level.
Oh, yeah, it games super hard.
Though. Your quarters man.
There's a Dungeons and Dragons. Beat him up style game. It's tales of young legend aura or it's it's gonna legend dish. But it's a side scroller like the old Teenage Mutant Ninja Turtles or the or the Simpsons arcade game. It's like that. And it's great. Because there's like, what the game is super awesome. As you go through the game, you get options where it'll be like, you come across the town and you see these couple of things happening, what do you want to do, and you can choose different paths and stuff. And later on in the game, there's an option where you can go into a cave, where you've been told there's a red dragon in the cave. And and like, if you say, I want to go into the cave, it's like, Are you sure you want to go into the cave? And you have to say yes. And it's like, no, really, are you sure it asked you like three freaking times, and you go into the cave. And of course there is a red dragon is the most powerful thing in the game. And for the first like, I gosh, like three minutes that you're fighting this thing. It's invincible. And every attack it has is an instant death. So like, if you go into that cave to fight the Red Dragon, you have to have like an extra dollar just before you can even fight it because it just keeps killing. Man games are good.
Did you beat that dragon? Well, I
mean, I have it on. I have that game on a Raspberry Pi. So I could just spam quarters. Yes, I beat the drag. Cool. So besides
beating dragon Steven, what do you been up to?
So I have another simulation. So last week, I did a simulation that had some precision rectifier stuff. And I want to keep this gravy train rolling with my simulation work. And I'm going to be sharing that with you guys. So this week, I want to do show off doing AC analysis with LT spice. So in order to show this off, I put together a Ceylan key second order low pass filter, which is a really, really nice topology. If you ever need a second order filter, or even just like a Joe Schmoe filter, it's a one off and filter, it takes two resistors to caps. And you can get a second order high or low pass with it. And what's cool is with this topology, you can actually you have control over a handful of factors. So you can control the what do they call it? Well, that you get the frequency cut off. And you can also control the cue, but you can also control the dampening factor. So if you want it to be under damped or over damped, in other words, ring or not ring, you can control all of that, which is really nice. Some of the equations for it are a little bit nasty, but they're you know, nothing too bad. And there's lots of calculators out there on on the Google's. So I threw together I
was just scrolling through the Wikipedia and I hit some of those formulas. Yeah, they get nasty. And I'm like, yes, that would be a final on a college exam.
You know, what the will the final would would be like, it would be multiple questions about it, it would be like, what's the cutoff frequency? What's this? And then it would ask you something nasty, like, what's the input impedance to this, you know, and be like, Ah, those are always awful.
But in my first job that I had out of college, we did a lot of custom work for customers, where I did vibration sensing, and customers would ask for, you know, a vibration sensor that has, you know, cut offs at high and low this and that frequencies. And we use sailing key topologies all over the place, because they were pretty easy to to adjust, and you get second order cut off, which was good enough for most of our customers. So I dealt a lot with the sailing key stuff back in the day, a lot of fun with it. So in this simulation, I gave two examples. One of them is a low pass filter that has a cut off at one kilohertz and a cue of about point 707. So it kind of gives that classic curve that your that you expect when you do an AC analysis at it. And then the second example is a 10 kilohertz cut off, but I also gave it a cue of 10. So at the cut off, it has a really high resonant peak that goes all the way up to a positive 20 decibels. So it'll ring really, really hard at that level. And just by adjusting the resistors and cap values, you can have control over all of that stuff. So that's the simulation of the week. Next week, I have a really fun one coming up, I'm going to be looking at Monte Carlo and Gaussian distribution of tolerances. So I'm going to add a high pass filter to this low pass filter from this week. And then I'm going to apply tolerances to all the resistors and caps. And then do a Monte Carlo evaluation that shows what is absolute worst case of the tolerances being high and low. And you can see the boundaries of like, if you were to build 1000s of these units, what could you expect the cut offs and the cues to be on these kinds of things? So a lot of cool stuff coming up. Okay, so
yeah, so Monte Carlo, that's not the location on the map, right?
No, that's the worst case that Monte Carlo was like, throw it all in, you know. So yeah. With it with a traditional Monte Carlo simulation, you basically say, Here's my boundaries. So if like I say, a 5% resistor, you see the top and the bottom. And with Monte Carlo, you tell it how many times you want it to simulate, and it will simulate and just like randomly pick values, and just kind of tried to show you like what are your worst cases. So with a filter, say you do 100 different simulations with variants, and you plot all of them, and then you can see where your boundaries have everything on. Okay, that makes sense. And then but Monte Carlo Monte Carlo was worst case, money color just shows you like if the shit hit the fan. A Gaussian distribution is a lot better. And what's cool is LT spice allows you to to handle tolerances in a Gaussian way. So you could say 95% of the time, my tolerance is going to fit within this, you know, the next 5% is going to fit within it and blah, blah, blah, you know, go further out and out. And so you can plot Gaussian. Gaussian will still show you worst case, but Monte Carlo has equal distribution for all tolerance values, whereas Gaussian fits closer to the center which is a little A bit more realistic. So I'm gonna give examples of both of those. And the hope with these simulations is that if, if someone wants to do say, for this week, I'm doing an AC analysis, if someone wants to do their own AC analysis, just download mine from my GitHub, which will have a link to this. And then you can just basically cut my circuit and put yours in. And it's already set up for an AC analysis. And then if you want to do next week, or week after Monte Carlo and Gaussian, just download mine and plug your stuff in. Cool. So other than that, I'm actually resurrecting or going back to the fermentation controller project that I started q3 of last year. All right, the Yeah, so I got I got, you know, a bit of the mechanical design done on that. And I actually have a good chunk of the schematic design done on it. And a bit of actually the PCB too, in terms of determining where things are, that that preamp project that I did in q4 actually got in the way, because that had a little bit of, we need a little bit more speed on that. So I kind of plugged that in. But now that that's complete, which I'm actually sending one of those two rods this week, the second one that I built, so he's going to play on that the preamp. But but now that the preamps out of the way, I'm going to go back to the fermentation controller, which I have duplicates of almost all the parts of that. So now I basically just need to start slapping it all together and get a PCB on order. I still need to get all the connections and everything right for the screen and all the other stuff. So this week, I'm going to be working on getting the schematic complete, and the PCB in a place where I'm happy where all the locations of stuff are. And when the PCBs on order, I'm going to start milling these enclosures, because I actually have two enclosures here. So I made a couple of audible decisions for the, for some of the things originally, I was thinking I wanted to get a little fancy and do like membrane switches on the front. And I've decided that's just kind of a pain. And I don't really want to do that. And I thought a little bit more about the application of what this is going into. And in terms of where I'm going to be using it, I'd rather have big or more tactile buttons on the front, something that just like, membrane.
Arcade switches are we talking about like IE stop switches, or, you know,
I haven't I haven't fully decided yet, but I want something bigger than membrane, and I want something with more throw than a membrane, I want it to be kind of Clicky. But I want it to feel substantial. So I got to, I've determined most of my other parts on this, like, I know almost everything that goes through that the last thing is just the buttons really. So I'm, well I guess, buttons or switches, whatever you want to whatever works for the application. So that's my next kind of what I need to do next, I should say is figure out what to find on that. Just because membrane switches are cool. But like if you have gloves on membrane switches aren't that great. Not that I'm going to be using this with gloves on. But I've been going through in my head of like, do I really want to do membrane switches because I don't really like the feel of it. And I was doing it more as a challenge to myself. And now I'm thinking about like, this is the thing that I actually want to use. So I want to put some cool buttons on it. Ones that are like yeah,
I mean, you might look into one of those 22 millimeter industrial buttons.
Yeah. Oh, yeah. Like the ones you have in the front of your cabinet. Yeah, I you know, those are, those are nice. The thing is, most of these buttons are going to be used for like, scrolling around menus and things and I don't know, buttons will be super nice. So something in between a membrane switch and a big button like that. So
and then the last thing I kind of, I haven't figured out yet is do I want there to be a lot of lights on this thing. Or do I want the screen to be the entire indicator? Like if so if this device turns on my refrigerator for cooling or for heating, do I want it to have a light that that lights up and says I'm cooling or I'm heating or I'm active in some way? Or would I rather just have that information displayed on the screen? I'm kind of leaning towards like a nice big LED. That's like a tower on a light tower like that. That's great. I
have been using on a industrial machines
I could get I could get a I could get a blue, yellow and red one so red for heating blue for cooling and yellow for I'm not doing anything. Yeah. Although that would be super annoying because then I'd have this yellow light glowing off it all the time. cuz, yeah, I think I'm gonna dodge that. But I do like the idea of of having something easier than having to go up and read the screen. Even though the screens are pretty large. It would be nice to just be able to look at me like, Oh, it is doing something right now. So yeah, so the next step is get the figure out a good button situation and then figure out that lighting scheme. So that's what I'm going to be working on.
I can't wait. Yeah. My burgers almost done.
Well, I'm not Yeah, hopefully I can get this relatively soon and off to you, you know?
Yeah. And I will be I got to weld up my cart. Next. I got all the steel.
That's right. You got like 500 feet of steel. Right.
Almost 96 feet of steel from local steel shop of steel yard. So nice. And they did all the cuts for you. Right? Yeah, they cut in a foot pieces to fit on my trailer. Nice. So
yeah, cuz I because what didn't you buy? Like 48 foot sticks or something like that? They come in 24 foot sticks. Oh, I thought it was that you said 40.
No, no, I mean, 24 foot sticks. Yeah. And I'm like, can you cut it? No, like, yeah, we can get it.
To 16 feet hanging off the back of your trailer.
Yeah. Just sparking down the freeway.
Yeah, you just ground appointed to it. Yeah.
So I'm hoping by next podcast on how the cart done. And then some tubes, like bent and stuff. So I can at least like start testing that out.
So what do you think spring break will be inaugural brew?
I hope not. Oh, what sooner? Really? I'm thirsty, man.
It's been a while since you brewed? Geez. Yeah. Last time you brewed.
I brewed two football seasons ago. So two years ago? Yeah. Two years ago. Yeah. Two years ago. Now.
Do you typically measure brewing in football seasons?
Yeah, usually. That's usually I do most of my brewery net. Yeah. Yeah. I try to bring a keg of beer to the tailgates. That's gonna wrap up this episode. Yeah, well, short one for this week. But it's been very boring. In terms of electrical news this week.
One thing. So last week, in our RFO section, we had talked about to two things. One was all splice.io, which was a Git GitHub style repository. And I guess, well, it's a GitHub style system for hardware design. And
it also does Design Review. Yeah. Right. Right. Right, biggest draw to it.
So they're gonna be joining us on the on the podcast as a guest in early February. So keep your ears open for that. And then also, last week, we talked about some, some really interesting ICs. And a really cool, some really cool technology behind like pitch detection and things like that. And the the gentleman who has done the work behind that and holds the patent behind that his name is Brian Krasinski, I think that's how you pronounce his name. He will actually be joining us next week to talk about some really cool topics. First of all, we're going to talk about well, we'll talk about his technology. But we're also going to focus on IC manufacturing, how to do that and you know, the ins and outs behind that, but he's also going to talk a bit about pitch detection or more, I guess better said is frequency detection in firmware, which that would be really cool.
That sounds really good. All right.
Well, that was the macro fab engineering podcast. We were your host, Stephen Craig
and Parker Dolman.
Take it easy.
Later everyone. Thank you. Yes, you our listener for downloading our show. If you have a cool idea, project or topic. Let's save it and I know Tweet us at Mac Feb at Longhorn engineer at analog E and G or email us at podcast at mag fed.com. Also, check out our Slack channel. If you're not subscribed to the podcast yet, click that subscribe button in your podcast app. That way you get the latest episode right when releases and please review us wherever you listen as it helps us show stay visible and helps new listeners find us
What lore have you discovered in component datasheets? On this episode, Parker talks about how he picks electrical components and risk management.
Ever have PCBs that solder just will not wet and solder to? You probably thought it was improper soldering technique but that was probably not it!
This week we are talking about Breadboards. Is breadboarding a circuit or design still applicable in today's SMT component dominated world?